
Box o' Stuff Challenge: Mornet Shuttle & ROLAND- class Attack Cruiser |
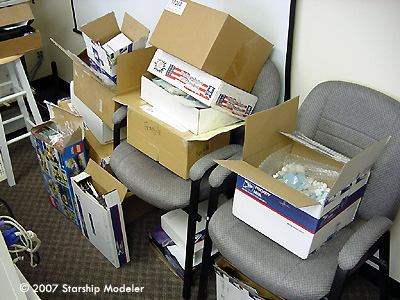
By Craig York - images & text © 2007 Editor's Note: What could you build given 2 pounds of parts and a deadline? Back in 2004, a challenge was issued on the Starship Modeler Discussion Forums to answer just that question. Participants scoured their strategic styrene reserves for likely parts, then sent them in to SSM, where they were randomly boxed up and sent back out again. None of the participants knew what they would get. The results .... well, see for yourself. |
|
Image: Below and behind Image: Under-wing engine detail Image: Rear view Image: Under construction |
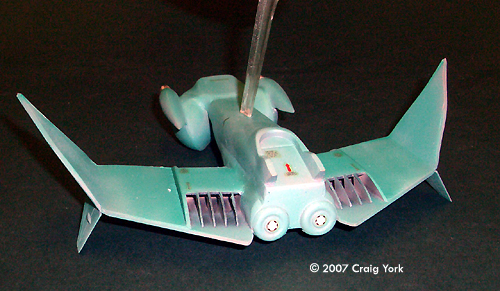
Mornet Shuttle Here is one of two finished projects from my 'Box o' stuff ' , the "Mornet" from our SSC universe. The name is a combination of two of my favorite WWII era aircraft, the DeHavilland Mosquito and Hornet, and is named (in the SSC continuity) for an aggresssive insect-analogue found on one of the early colonies. I wanted to use some of the basic motifs from the Leif Ericson's VEGA shuttle, particularly the bug-eyed cockpit-and was lucky in getting some of the plastic easter eggs I'd sent in as part of my own contribution back in my box! Construction started with the wings and fuselage, the former from a 1/72 Viggen, rotated 90degrees and plated with sheet plastic. The fuselage was from a 1/72 A-6 Intruder, flipped on its back and reversed. (There's an old Firesign Theater line-"Lets STAND HIM ON HIS HEAD!" which I use as sort of a maxim in my kitbashing-and which I guardedly reccomend as a proceedure. ) There followed a lot of filling, sanding and more filling to get a fairly smooth surface over all, and I still wound up missing some spots, as the underside view of the 'jet' engines clearly shows. |
|
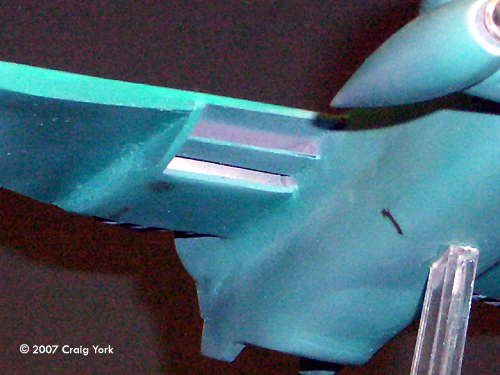
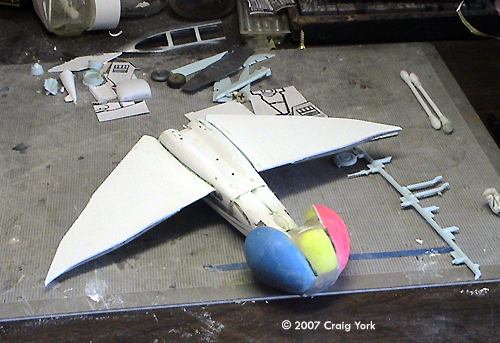
The wing tips were canted down by cutting a notch on the bottom of the wing, not quite slicing all the way through, the using a triangular needle file to trough out a v-shape. This was then bent down gently to bring the edges together and super glued-the Viggen's canard fins then became the vertical stabilizers, effectively disguising the upper seam of the wing bend. Now it was on to the front office. I had already cut the tail cone off of the A-6 ( which went on to become the nose cone of my 'Faux' Leif) just aft of the airbrake door which I left open as I liked the 'radiator ' detail behind them, which you can see just behind the cockpit. I had also gotten some clear plastic blister-pack material (acetate, isn't it?) and figured it would be fairly easy to smash -mold a clear canopy. Which goes to show that even after 30+ years of modeling, I still have a thing or two to learn. I faked up the mold by sectioning two of the Plastic Easter Eggs (PEGs hereafter for obvious reasons!) and mounting them on a dowel, and this is where things started going a bit sour. Heated over a candle flame, the clear plastic clouded, which I've never had happen before-I pitched that piece, tried the next one, got it nice and droopy, them slapped it over the mold which I had clamped to the bench. It melted the mold. I had not figured on the heated plastic being hot enough to transfer heat to the mold material, but thats exactly what it did-pushing the PEGs down over the dowel and rendering it useless. I should have backed the mold with clay or plaster, but there you are. I now had no clear plastic left, hence the decal paper 'windows' you see here-the oval shapes were cut using an interior decorating template, which has proved useful for some other projects, so I did learn something out of the experience. The in-progress shot shows how the cocpit area was formed from sectioned PEGs. The gun pods on the sides are the drop tanks from an old Frog Canberra bomber, with the ends cut off and some metal fitting pushed in for a gun barrel. Painting was done with an old Paasche H-1 (now one its second needle) in Gunze Sangyo acrylics. This was the first time I'd tried the 'pre-shading ' technique, and I rather like it, but I think I need a bit more practice with it. Scratch-built detail consisted of the underwing 'jet engines' and the U-shaped anti-grav unit under the stern. Both of these were built up out of sheet plastic. Finally, the whole thing was mounted on an old Airfix stand-which I was delighted to find two of in my box-I seldom build things 'wheels down'. |
|
Image: Starboard side Image: Front/right view Image: Rear view |
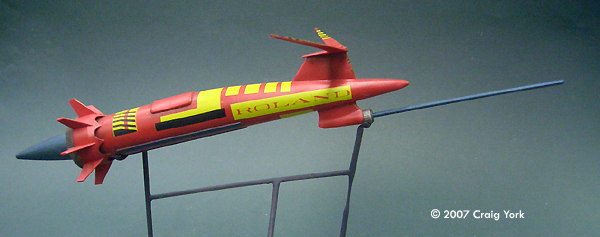
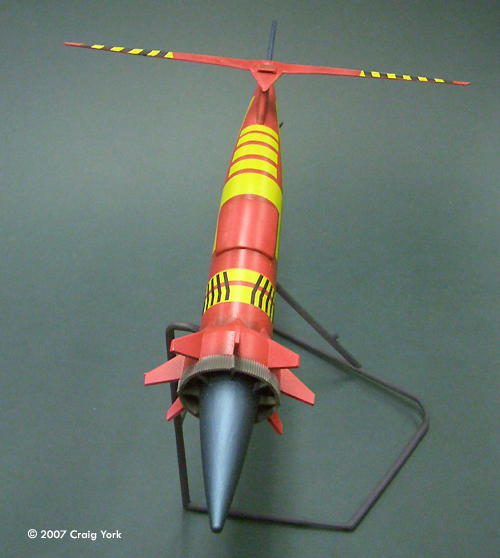
ROLAND- class Attack Cruiser The second of my finished projects from my 'Box o' stuff ' , the ROLAND” class attack cruiser, started life as an old FROG Canberra. Regrettably, I have no extant in-progress shots on it, but I’ll try to describe the build as best I can. Step one involved determining a look. I had originally considered trying to build the ‘Cyclops’ class missile carrier from the ‘Spacecraft 2000 to 2100' book by Stewart Cowley, but finally decided I just didn’t like the design enough to model it-which Didn’t stop me from borrowing a lot of the design elements. I’d already made mention Of a ‘ Roland ‘ class ship in the SSC forums, and decided to make the earlier version. It has single large and less efficient version of the ‘Advanced Ion engines’ of the slightly later Leif Ericson. |
|
Construction started by lopping off the nose just behind the cockpit, and plugging the slots for the wings and stabilizers. This was accomplished with sheet styrene and green putty, and lots of elbow grease. I had found a nose cone from a flying rocket that slid perfectly into the aperture formed by the missing nose, and the finned collar that slid over it was a near perfect fit to the fuselage. Incidently, ff someone could tell me what kit that finned collar derives from originally, I'd appreciate it-its one of the few parts in my box that I couldn't place. The 'sail' was built by taking the halves of the Canberra's rudder and sandwiching a piece of thick sheet styrene between them. Once this was fixed to the hull, I sketched a few notional fins, and once I decided what shape I wanted, used a xerox of one pattern to cut them from sheet. I notched the top of the sail in a shallow V and glued the two fins in to give them the jaunty dihedral you see here. I put a short 'bridge' of styrene between the two halves, to add strength and deepen the assembly. This was shaped and faired smooth with more green stuff. I also added a few small details to the area to establish a sense of scale and size ( I'm calling this one 1/500-in scale with the original Leif Ericson) . The last bits of detailing were adding three parallel strips on the underside to simulate an early form of 'gravity mirror/ inertial modifier/ contra-grav ' gear that later takes the characteristic horseshoe shape, the shuttle bay hatch, formed from a piece of the forward fuselage, and the RBG* under the bow. The last was a combination of some form of underwing tank or pod, an exhaust burner from a 1/144 jet ( I think ) and a long section of sprue, ground to a slight taper with a dremel. Though I wasn't building the 'Cyclops' I did like the paint scheme, and though I'd try something similar. Most of the colors are Gunze acrylics, the main hull being airbrushed over my second attempt at pre-shading which I've described the write-up of the Mornet. This didn't go as well, and I think I should have used a dark red instead of the black-it's a bit too strong in places. ( I do like the effect around the engine intakes, though.) The base colors in place, I went to town with a straight edge, #11 and decal paper, after giving the whole thing a couple of spray coats of Future. The decal paper snugged down nicely, and though I probably could have further with it, I'm satisfied with the result. The ship name on the side was from a MicroScale railroad sheet, which was all I could find at the time. The base is heated and bent sprue, tapped with the grinder in a couple spots to help the fit to the hull. Length of the main hull is about 11 inches, length overall is about 15. Span across the sail fins is eight inches. As with the Mornet, I am considering eventually rebuilding her with more 'typical' SSC style engines. |
![]()
Starship Modeler Home | Site Map | Gallery Main Page | Feedback
This page made possible by Starship Modeler™ - copyright © 2007 Starship Modeler™. First posted on 10 April 2007. Last updated 13 May 2016.
![[Please click to enlarge]](cy_box_0370.jpg)
![[Please click to enlarge]](cy_box_0378.jpg)