
|
By Michael Dentzer - images & text © 2001 It's been 32 years since Aurora released a kit of the Orion III Spaceplane from the film 2001: A Space Odyssey, one of only 2 vehicles from the film ever to see mass production as a model kit. The other, the much sought after and rarer Moon Bus. Until the advent of the garage kit industry, the only other version of the Orion to be had was the more available, but far less accurate release from Airfix. |
![[Click to enlarge]](md_orion9.jpg) |
|
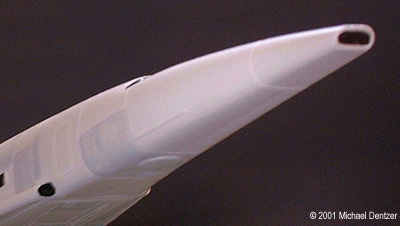
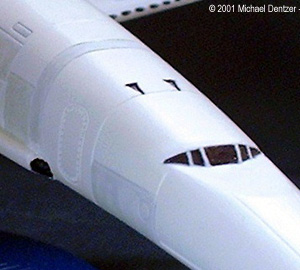
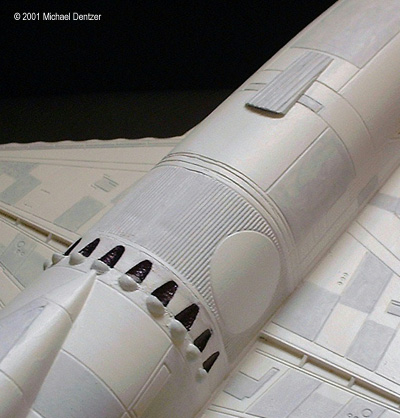
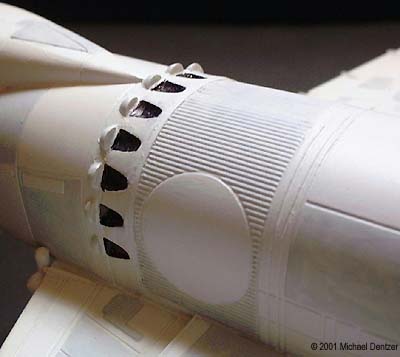
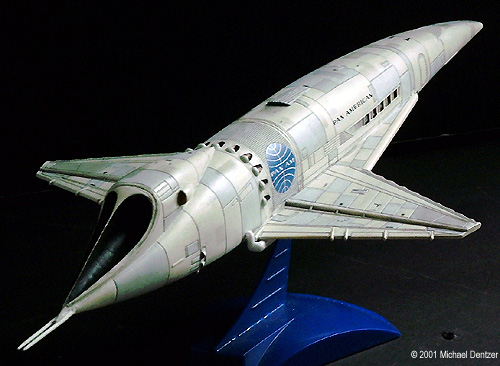
Image: Added detail to the nose and side thrusters Image: Added window struts and top details Image: Added detail to rear sep ports and top vent Image: Adding the quartered beads to the sep ports Image: Another view from the stern, starboard side |
This kit (in my opinion) does not do justice to the subject, especially when compared the offering from Aurora, which sadly was only reissued once, in 1975 (unlike the Airfix kit, which made a return to the market in 2000). Fortunately, I still had my Aurora kit from 32 years ago, and I thought it time to give it a proper treatment in honor of the year in which it was portrayed to fly in Stanley Kubrick’s epic. Assembled three decades ago by a mere youth just starting in the hobby, it was a pretty simple build. There were only a few major parts, which fit well enough together that it presented no problems, even for the inexperienced hands of a child. There was a more complex conjectural interior rendition of the engine compartment that never made it into my kit. I had never painted the model, so all I needed to do was some seam cleanup and the addition of details missing from the exterior. Correcting and DetailingAurora did a first rate job in getting the overall shape of the kit to match the studio version, but there are a few things missing , altered, or simplified that I felt needed correcting. Thanks to the availability of new reference material in the form of Piers Bizony’s “Filming The Future” these differences could be clearly seen. Starting from the tail end and moving forward, the first departure from the studio model that Aurora made is the rear antennae, which on the kit is a single spike, but should be a double set of parallel antennas. I drilled two small holes into the tail end and epoxied two lengths of the business ends of two large safety pins into the holes. No chance of them snapping off at the slightest bump. Moving forward, the next area to be addressed was the band of exhaust ports running the girth of the fuselage just forward of the main engine housing. The Aurora kit lacked the series of “bumps” just behind the exhaust dimples. I had a string of small plastic beads laying around that were just the right size. With a sharp Exacto knife, I halved, then quartered the beads, filed the cut points, then glued each one on individually behind each dimple. Next up was the part on the top of the fuselage, some sort of exhaust vent, that Aurora failed to include. I had a ribbed plastic piece from the parts box, and with a little filing and shaping, fashioned a suitable rendition. At the forward point of the wings where they meet the hull, the Aurora kit has a clear piece to represent lights. In examining the reference photos, these appear to actually be either exhaust ports for forward RCS thrusters, or intake ports, depending on your interpretation. I prefer the former. Leaving the part as is, I used a Dremmel with a small drill bit to hollow out these pieces to form the ports. There are two triangular details on the top fuselage behind the cockpit that I engraved with an Exacto knife. I then added 4 small sections of styrene strip to the cockpit windows for the windshield supports. The last of the physical modifications I made was to the nose of the craft. Although correctly angled on the kit (unlike the flat nose of its Airfix sister) it lacked the open end as seen in the reference photos. A little work again with the Dremmel, and a final touch with the Exacto did the trick .There were other areas I could’ve addressed if I were inclined to go for super accuracy, such as the wrongly angled panel lines on the rear half of the wings, but that would have required filling, sanding, then rescribing the correct panel lines, an effort I just wasn’t willing to put out. I just felt these were purely minor differences, and that I had addressed the major structural differences to my own satisfaction. PaintingNow it was time to paint. I used Testors Model Master acrylic flat white for the base coat, then painted the various panels with flat light gray. A wash was then applied to give definition to the panel lines. The wash I use is a mixture of flat black acrylic and alcohol, applied to the model with a brush, allowing the wash to seep into the recessed lines. Then with a paper towel wrapped around a finger, the excess wiped off, leaving only the wash in the lines to dry. Flat black was applied to the main engine exhausts, dark gray for the landing pads on the underside, and I used a black fine tip permanent marker to detail the vents on the leading edges of the wings and various exhaust ports. The very small markings on the wings and fuselage are drawn on with pencil. |
|
Decals and Weathering
I then applied the decals. This is the decal set I got from Tangents (now Griffon Games) some time ago. After application, I thought the Pan Am meatballs’ shade of blue was a bit too light. Oh well, not much to do about it at that point, so I began the finishing work of applying additional panels using a rectangle cut out of the adhesive section of a post-it note to use as a template, and rubbing the panels on with a Q-tip dipped in pencil dust. I was working on the area just above the Pan American decal above the side windows when, upon lifting the post-it off the fuselage, the decal came with it. So I immediately ordered another set from Griffon Games, and as this turned out, this little mishap was a blessing in disguise. The new decal sheet was a better printing than the old set. The Pan Am logos were a deeper and more correct shade of blue. Very nice. Not repeating my previous mistake, I finished the penciled panels, then applied the new decals, but first I laid down a layer of diluted white glue to the areas first to assure good adhesion to the flat paint. So much simpler than gloss coating, applying decals, then flat coating. The new decals looked great, and my Orion was finally finished after waiting 32 years. |
|
![]()
This page copyright © 2001 Starship Modeler™. Last updated on 18 April 2001.
![[Click to enlarge]](md_orion3.jpg)
![[Click to enlarge]](md_orion6.jpg)
![[Click to enlarge]](md_orion10.jpg)
![[Click to enlarge]](md_orion11.jpg)
![[Click to enlarge]](md_orion12.jpg)
![[Click to enlarge]](md_orion13.jpg)
![[Click to enlarge]](md_orion14.jpg)