 |
| |
| By Rob Caswell - Copyright © 1999 Unbuilt copies of Aurora's 1968 issue 2001 Moonbus are one of the hottest collectibles in the sci-fi kit field. They've consistently sold for between $300-$500 on ebay. I've always liked the Moonbus and can still vividly picture the one I passed up on the shelf in 1969. But I'm not a rich man... in the financial sense. There's some proverb that goes something like, "The true measure of a man's wealth is in his friends." (Or maybe I just made it up - it sounds good!) By that standard, I'm rollin' in it! A few years ago, for Christmas, my pal Jeff Gable surprised me with a built-up Moonbus he got at a show. At last - my own Moonbus. My elation rapidly gave way to a practical assessment regarding what it would take to refurbish this kit. The model looked like it'd been built around 1970 and painted with thick, goopy spray paint. Clearly the original paint was white, but it'd aged to an ivory tone. All the parts seemed to be there, except the dorsal antenna. First Pass Before I could do anything with this model, I had to find a way to strip the paint off. I immediately turned to my old, highly toxic stand-by: Easy Lift-Off. I'd used this Floquil product successfully in the past, so I donned the rubber gloves and brushed it on. I waited an hour (usually a half hour does the trick), then tried to scrub away the paint in my test area. "No good. Just impacted on the surface." It hadn't touched the paint. It didn't even soften it. I was too surprised, as paint doesn't get much more cured than this. On top of that, it was on thick. Disappointed and out of immediate ideas, I put my Moonbus back up on the shelf for a couple of years... If At First... Early this year I started hearing news about a product called Strip-A-Kit. This was another paint stripping product, only this stuff was biodegradable and didn't have vapors that would make you grow a third eye (….or worse…). The clincher was when I began corresponding with Phil Sterett who had used the product on his own paint-encrusted Moonbus. I decided to buy two bottles from the manufacturer (that's the only source, for the moment) and give it whirl. While it still required some safety precautions (eye goggles to guard against splatters and latex gloves, which the manufacturer thoughtfully provides), it was a lot easier to work with. The substance is quite viscous - almost a gel - and has a pleasant lemony scent. I put some on a test area, where the paint the was thickest, and waited 30 minutes. It took some elbow grease and scrubbing with an old tooth brush, but the paint was definitely coming off! I began to get excited about that old Moonbus kit again. PLEASE NOTE! While Strip-A-Kit seems to be a relatively friendly substance, take those safety precautions seriously. I got lax during the process and started slopping the stuff around. A dab got on my leg, but I waited two minutes before cleaning it off while I finished scrubbing a part. When I finally wiped off the smudge of Strip-A-Kit, a chunk of my skin came with it. I immediately rinsed the wound with warm soapy water to make sure all the chemicals were removed, but It left a nasty gouge in my leg. Please learn by my mistake and take this stuff seriously. Breakdown Now that I knew I had an effective stripper, I could formulate my plan for refurbishing the kit. The first step was to break the kit down into individual parts or small subassemblies. From there I could strip off the paint and clean up the parts in preparation for reassembly. I was very lucky in that my Moonbus had been assembled with pretty shoddy tube glue. Very little of the physical plastic had been effected. Most of the glue's adhesion came from your basic "sticky goo" factor. The meant that most joints and seams were covered in a crusty, brown residue that would have to be removed. The use of more modern cements would have made breaking down this model much more challenging. When Jeff gave me the Moonbus, he also gave me a copy of the instructions. This was invaluable. I really needed to understand how and where the pieces had fit together in order to take them apart without causing unnecessary damage. My main disassembly tool was a flat-edged Xacto blade. With this I slowly ("slowly" - that's very important!) pried up parts and broke apart seams. If you rush this phase, you run the risk of damaging the parts. Some seams required brute force, but for the most part, slow and steady did the trick. Once I had the interior exposed, I found out the kit was also missing the rope coils stored on the bulkheads. Scratching together replacements shouldn't be at all tricky. | for a larger view.
^ I'm sure the original modeler put his all into this model, but I wanted to do more with it. The yellowed paint shows the model's age.
^ I photographed the markings before stripping them off with the paint so that I could later recreate and accurize them.
^ I first carefully pried the roof off the model. I found that the rope cargo tie down coils were missing, but I can throw together a replacement that will look even better.
^ The astronauts were painted with little dots for eyes, making them look like brainwashed cult members. It was kinda cool, in a creepy cartoon-like way.
^ Some details, like the rear bulkhead, will get extensively reworked during reassembly, to make it more accurate to pictures of the studio model.
^ Here are all the parts, stripped and unassembled. I didn't break everything completely down, but pretty close to it.
^ Different paints responded differently to Strip-A-Kit. For instance I was able to get enough matte black off to be workable, but I couldn't remove all its paint residue. |
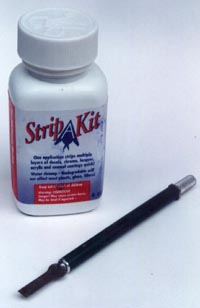 ^ Two tools were vital to making this project work: Strip-A-Kit and a chisel-bladed Xacto knife. While Strip-A-Kit was designed with the aircraft modeler in mind, it's an invaluable tool in any scale modeling genre. | Take It Off. Take It ALL Off! With the parts broken down, I could strip the paint off. I took a pass on the large roof piece first. I gave it twice as long as recommended to let the Strip-A-Kit work in. Most of the paint came off, but it required lots of scrubbing. From the sounds of it my paint was more stubborn than the stuff Phil had encountered on his model. In talking about it, I found that wasn't the case at all. Phil's paint didn't want to budge so he invented the "Toxic Taco". He coated all the parts in Strip-A-Kit, put them in a ziplock bag, and left them overnight. I gave this a try and it made all the difference. A few of the parts needed another application after that, but for the most part the "Toxic Taco" tackled the chore. Clean Up Once the paint was sufficiently removed, I began to clean up the parts. This was a long process requiring (again) the Xacto chisel and varying degrees of sanding. With all the parts ready for reassembly, I was ready to put it all back together - with some improvements. As soon as that project is completed, I'll detail the process in Part Two: ReConstruction! |
| Special thanks to Phil Sterett for ongoing research into the studio model and for his nudging me towards Strip-A-Kit. Thanks to Jeff Gable for the goods and to Pat Sklenar for his continued brainstorming on this and other 2001 vehicle subjects. And finally to OneZero - keeper of useful URLs. |
![]()
2001 is ©1968 Turner Entertainment Co. and 2010 is ©1984 Turner Entertainment Co., all rights reserved.
This page copyright © 1999 Starship Modeler™. Last updated on 12 August 1999.


