
By Christopher Doll - images & text © 1999
|
![[Click to see a larger view]](cd_j2_6a.jpg) For those of us who grew up with the classic Jupiter 2 from TV's Lost in Space, nothing could replace the charm of that early 60's blunt saucer. |
|
|
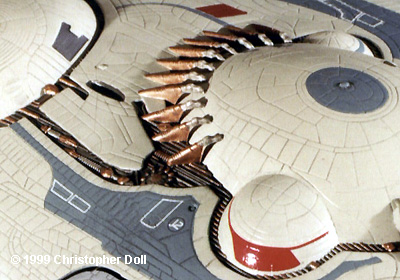
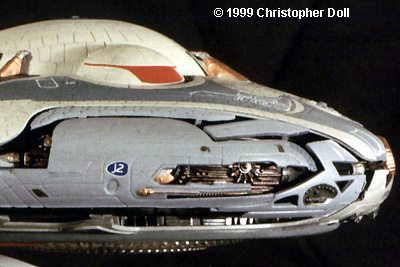
The redesign for last year's movie was a sleek departure with asymmetrical features and a meaner looking drive core. When the movie came out I was just getting back into modeling and decided to give the Movie Jupiter 2 a shot. This was the first kit I'd attempted in many years and I was looking forward to trying some of the model building and finishing techniques I'd learned while studying Industrial Design. I had never used an airbrush on models, nor had I brought any kit to nearly the level of completion as this. PreparationOn opening the kit I was surprised to see the level of surface detail. I had read several negative reviews of the kit online, but it looked great in person. The surface tiles and the hexagon pattern on the bottom showed up beautifully. I began by washing the parts with a mild detergent. There was a little flash around some of the small detail parts, and on the short "walls" that make up the sides. I did a test fit of the major components and proceeded to evaluate the sub-assemblies prior to finishing. While on the Internet, I gathered as many stills of the movie miniature as possible. Thankfully, someone was kind enough to shoot some pictures of the miniature while at a convention last year. AssemblyThe fit of the major pieces was great, and I was able to assemble most of the model simply by aligning the pins. The pins were a bit tight and required a bit of filing to match the pieces exactly. As a testament to the quality of the fit, the model as shown in these pictures is, essentially, three main assemblies snap-fit together (top, bottom, engines, hyperdrive core on the bottom). My intention is to light the kit at a later date, and being able to split it in half (nicely) will help out a lot. This also explains why I've neglected to add the window piece in the cockpit. There was a little bit of work to get the main dome on the top of the ship to fit into position. The top of the hull bows in a complex curve that would've been a nightmare to engineer - I'm impressed that ERTL got it as close as they could. To glue this piece in, I literally sat with it in my hands while the liquid cement cured (none of my clamps reached in far enough into the concave surface). Multiple spars are molded into the top of the hull. In the studio model these appear to be metallic copper fingers or shocks of some sort. These reach up to the three-node "dome" which houses the hyperdrive. It may have been easier to provide those as separate pieces. The cockpit dome required some body putty; the seam along both sides is a nasty one to conceal. Ideally it would require building up the surface of on the cockpit piece with putty, then sanding a smooth curve. I felt that this would put a strange bump in the curve, so I simply filled it and moved on. The only other piece that was a bit of a hassle was the hyperdrive core, a flat transparent piece on the bottom. According to the design, this core should line up with a pinhole in the bottom half of the hull. I had to remove the pin and shave down some of the supporting structure on the hull to make it fit properly. It still sits a bit high and I'll return to modify this piece when I light the model. FinishingIt was apparent that this kit would be my introduction to full-scale model finishing. I began with a light primer coat of flat black enamel. This is a thin enough paint to act as a primer yet it won't fill in the details. Black also helps to darken the model, reducing any opacity problems that the main colors wouldn't fill. From there I was able to gauge any flaws in the model's surface - most of which involved putty lines on the main cockpit bubble. With the primer dry I used Flat Light Gull Grey as the main surface color. I used Intermediate Blue for the pattern on top of the hull, after carefully masking it off with low-tack 3M tape. The spars that make up the sides were painted medium gray, which had the same lightness as the Intermediate Blue that I'd used on the top surface detail. I also used medium gray as the main tone for the bottom half of the hull - where the hex-pattern is. Later on I used mixes of these grays on miscellaneous paneling and the washes. After laying in the main tones I continued on to detail the engines and side "detail" panels with silver, copper, and steel paint. I dread using these paints, because to me they're just a little too obvious. However, I think they ended up looking quite nice on these pieces, especially after going over the kit with a dark wash. Intricate detail is recessed in several channels along the top of the hull. These tested my fortitude with hand brushing - may I recommend holding off on the coffee when going in with the brush. Several slips and goofs were reasonably recovered with a final round of touch-ups. I then applied a layer of clear coat before proceeding with the decals. |
|
In the past I'd dreaded decals until I discovered Solve-a-set. Usually this slammed them down into the detail quite nicely. For whatever reason, this solvent made many of the decals on this model bubble up. You can go back to the close-up photos of the model to really get a good look at them. I'm chalking this up to simply being out of practice. The most notorious decals in this model where the white panel lines that you see on the top surface. I even attempted cutting one of them into several pieces before applying, but it still didn't help much. After the decals dried for several days I re-applied the clear coat and took the photos you see here (my brother-in-law is an accomplished photographer and I had the opportunity to shoot the model with large-format film). For the last phase I wanted to emulate the contrasting specularity of the hull panels - some are shinier than others. I began masking off about 45% of the hull panels, but this time I decided (the low-tack tape was peeling up) to use regular tack 3M tape. This masked off the panels just great, I can assure you. After I finished masking the model I sprayed several layers of flat coat on the model. On removing the tape I found that I was pulling off the former layers of clear coat on some panels. This looks a bit odd because I notice it, but thankfully the color is still intact. Be careful of your masking media! Overall, it's amazing how this model follows the Trek-movie style of finishing - gray to blue-gray coloration and a pseudo-aztec pattern. Wrap UpAll pitfalls considered, I had a good time with this kit and it gets many comments from my office mates at work, where it's now displayed. |
|
![]()
This page copyright © 1997-9 Starship Modeler™. Last updated on 8 November 1999.
![[Side]](cd_j2_4a.jpg)
![[Side]](cd_j2_11a.jpg)
![[Top]](cd_j2_7a.jpg)
![[Bottom]](cd_j2_2a.jpg)
![[Bottom]](cd_j2_5a.jpg)
![[Oblique]](cd_j2_10a.jpg)
![[Rear]](cd_j2_3a.jpg)
![[Oblique]](cd_j2_8a.jpg)
![[Underside]](cd_j2_1a.jpg)
![[Another Top shot]](cd_j2_9a.jpg)