|
By Larry G. Johnson - images & text © 2003
You've asked yourself, what about modeling figures? Is it really modeling? I have so many spaceships, antigrav tanks and mecha, do I want to build figures too? Well there must be something to figure building. Just take a look at the premier sci-fi model show in the U.S., Wondefest. Five categories for figures and one for everything else. Vinyl figure modeling can be a rewarding hobby. It appeals greatly to modelers who do not like assembly as much as painting, for the true skill lies in the latter. Assembly is often simple: few pieces, easy fit, a little trimming and super glue and your done. Painting will either render a true masterpiece or something akin to a G.I. Joe doll. This narrative will introduce the newcomer to the essential basics of how to build and finish a vinyl model. Some slightly advanced material will be touched upon but in general, just the basics. We will use the Revell 1/6th Batman from the movie Batman Forever as our primary subject in demonstrating building a vinyl model, although many other models and companies will make a guest appearance where helpful. With just a few ventures into vinyl kits, Revell has not done too badly. The Batman is well cast, nicely detailed, and falls together easily with just a little attention to the seams. |
![[Caped crusader]](lj_vinyl/pic_33.jpg) |
|
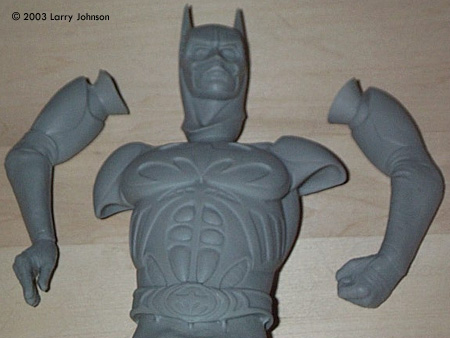
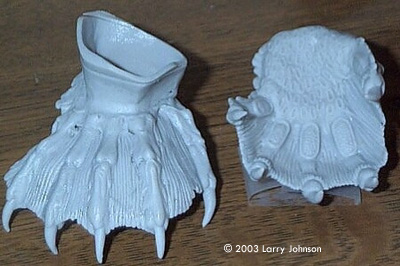
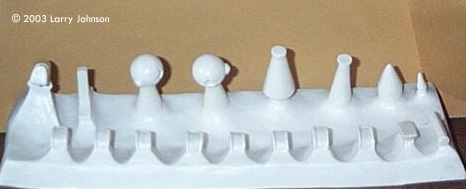
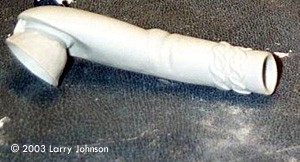
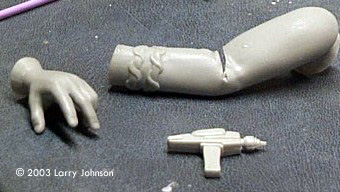
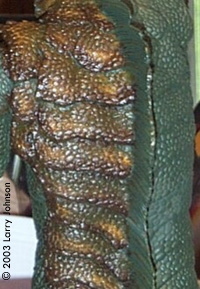
Preparation Like any model kit, we need to take care of some preliminary things like washing and trimming parts and in general just getting a feel for how it will go together. Inspection Open the box and look at your model. Examine all the pieces. Picture how you will put them together. Think of what colors you will use and what kind of paints. Look for anything special that cries out for attention.These are the contents of the Revell Batman. There are only 11 pieces (the two glove fins are cast to one piece of flash); let's examine them. The upper body consists of the chest and shoulders (one piece), the head, and two arms from the upper arm all the way down including the hands. The lower body is the torso down to the knees and then two lower legs. Also included are the fins for the gloves and a white metal Batarang. Then we finally have the cape. Most vinyl figure kits are like this - few parts that fit together easily. In general, like with any model, just get a feel for what is going to be the final piece. Construction here should be simple but let's notice a few little things. The back of the figure will need to be painted before attaching the cape which should more than likely be painted separately. All the weight of the model will rest upon a joint - the bent knees (this will be a crucial thing later as we see this modeler make a terrible mistake). Look at the positions of the hands. He is begging for a cable to be held in the left hand connected to the batarang he will hold in the right. ![[Washing]](lj_vinyl/pic05t.jpg) Washing Like any model, there are mold release agents on vinyl kits and a little scrubbing in the sink with lukewarm water, dish soap, and an old toothbrush is necessary. A VERY important thing to remember: With vinyl models, heat is your friend - but heat is your enemy too. Heat will soften vinyl. This is good sometimes and bad others. When washing the model it is bad so make sure the water is not too hot. Trimming Now, you may have noticed looking at the parts to Batman, there is always flash involved with every piece (well ok not with the white metal piece). Go back up and look! Or look at these hands. You can see the Horizon's Creature from the Black Lagoon's hands here and these hands are awesome (but we can spot a couple holes that need filling). We can see the flash on the left hand starting where the wrist should start. This is what needs trimming away. The flash is the vinyl model equivalent of sprue and like sprue you must remove the part from it. Look at these accessories for the Screamin' 1/4 Boba Fett. Many times the figure's accessories - weapons and equipment - come on large pieces of flash so they are not lost in the kit. This part looks even more like a styrene model tree.
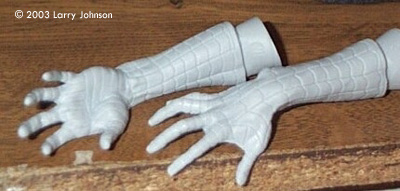
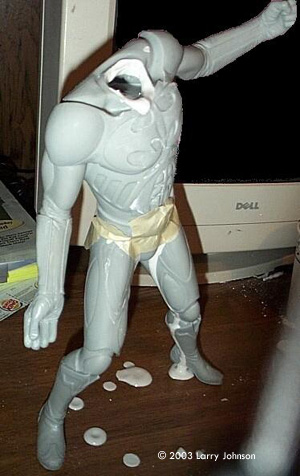
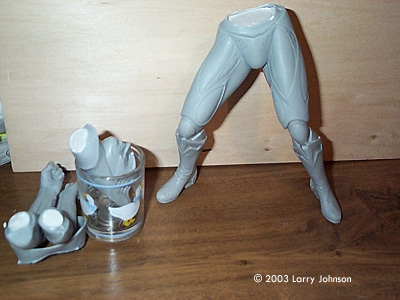
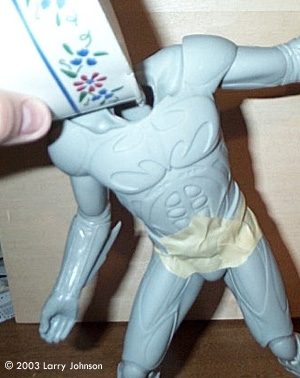
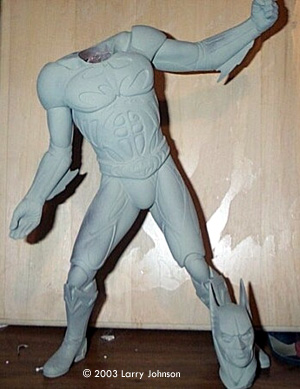
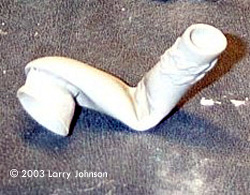
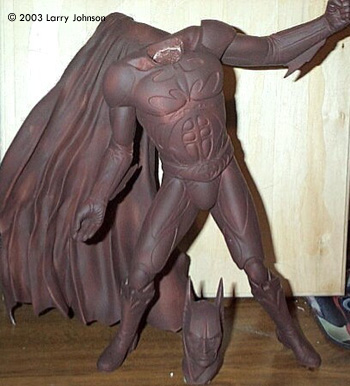
Important Note! Vinyl has memory. While heated it will always return to its proper shape but if cooled while held in a new shape, the new shape BECOMES the proper shape! Say we have the figure's arm in hot water to trim the flash off and we are inadvertently bending the hand at the wrist. Take a look at the hands of Horizon's Spider Man. In addition to another look at the flash on parts, we can see how delicate these hands are. The hand or a finger could be easy bent while holding it to trim the flash. If it should cool while you are holding it like that, the hand's new position will become permanent. Now I know we all see a usefulness for this but not now while trimming so just be careful! It's a good idea to have all the parts on hand and test fit as you trim for two reasons. One, sometimes a little flash left on the part might not interfere with the fit and provides additional surface for bonding. Two, since we have a danger of reshaping the parts, it's good to test fit as you go to make sure nothing has deformed. Construction As mentioned, vinyl figure kits generally are of few parts and tend to go together easily. Good kits require little or no seam filling. Just a few special notes need to be observed. Assembly First of all, regular model cement does not work on the vinyl plastic of these kits. CA (super) glue or 5-minute epoxy is required. A combination of both can get you a quick hold to fit the part and long term, durable bond as the epoxy dries. If you wish to fill the model with plaster for reinforcement (see below) you will want to use epoxy, especially if the figure has feet or legs in poses where the weight of the upper body may cause shearing forces that CA glue can't handle. Assembly is usually easy, as most vinyl kits have few parts and good fit in general. This Revell kit and most Horizon kits have this good reputation. Test fit the parts to find where they mate and apply a little adhesive. Then join the parts and secure them with tape until dry. Be careful with CA glue as it bonds nearly instantly, the thin stuff at least, and you don't get a second chance to position the part. And ask me one day how many CA fingerprints had to be sanded off the Batman when I was done putting it together. On later models, I used a combination of epoxy and CA. Some epoxy carefully applied and then a small amount of CA around the lip of the mating site can be the perfect bond. The CA glue holds the part and the epoxy dries at its leisure for a stronger bond. Alternatively, you may be able to reach the joint from inside after the CA bonds and spread some epoxy over the joint. Let epoxy dry completely. Another option is thicker CA which does not dry as quickly. Using this will give you a second or two to make sure the part is in the correct position, the zap it with some accelerator. Reinforcing Reinforcing the model is necessary to protect it from deforming. In hot weather, if you don't have an air conditioner, the model may sag and deform as the plastic softens. Heat is our friend - heat is our enemy. Two methods are commonly used - filling with plaster and filling with newspaper. Batman was filled entirely with plaster and let me tell you - Mistake! I cut out circles in the legs and shoulders to allow the plaster to flow into all areas of the figure. As you can see, I did not use epoxy and had gaps in the mating pieces. This lead to a plaster mess that had to be cleaned off the model. Fortunately plaster comes off easily. The other way to reinforce the model is to fill it with newspaper. Cut (or tear) strips of newspaper and stuff them in the model part. Use a dowel (or a paintbrush handle) to stuff the newspaper in and completely fill the part. I do recommend filling the feet and shins (or whatever parts come in contact with the base) with plaster. This gives the model some lower weight and balance. Keep in mind, assembly and reinforcing are not necessarily separate steps. Some parts need to be filled before assembly, others after. With Batman, I filled his arms and head separately. Then the arms were added to the body and the body filled with plaster. All-in-all, filling entirely with plaster, as I have hinted to up till now, turned out to be a nightmare. Let's compare all the previous steps to see how this nightmare occurred. Look at Batman fully assembled. In this picture, Batman is nearly finished, his head left off for the addition of the cape later after painting. He is filled with plaster to reinforce him against deforming and he is bonded solely with CA glue. The weight of the plaster filling the upper body is putting a good deal of shear strength against those bent knees and CA glue does not resist shear strength well. After this picture was taken and Batman left standing till the next day's work, I found him in the morning, his body laying face first on the table separated from the legs, one of which was actually still standing. In one comic, Batman got his back broken - never his knees! It took epoxy and brass rod to repair the damage and make him strong enough to stand again. A painfully learned lesson and I no longer use only plaster to reinforce vinyl models. I now use plaster in the feet and shins and then the rest is filled with paper. Plaster may be stronger but it's heavier. Seam Filling
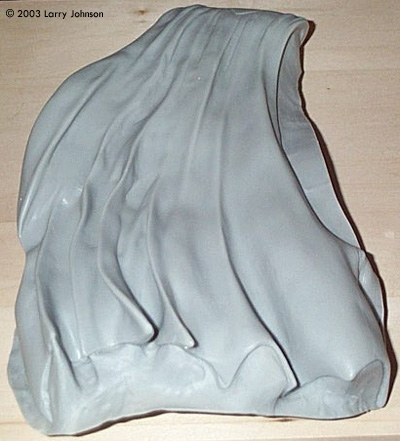
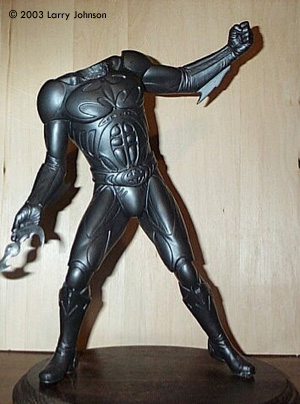
The cape was another issue and one of my first, semi-successful, ventures into epoxy putty. The gaps between the shoulders and neck where the cape joins the model were huge. I filled the neck gap with epoxy putty and smoothed with a brush dipped in alcohol. For the shoulders, rather than go for a smooth flush seam, I used the epoxy putty to build the cape up so it flared over the shoulders. - No you don't see blue paint there! No right-minded modeler would glue or putty a painted piece! You gonna believe me or your lying eyes? Altering Remember talking about being careful when trimming parts while heated as they can deform? This can be a useful method of modifying a vinyl model. I have a Horizon Captain America and the figure is posed with a fist in the air. The fist is horizontal and I wish to make it vertical and put an American flag in it. Heat the part in warm water and then twist the hand while warm. It should move easily and I want to be careful to keep the wrist looking as natural as possible. And folds are wrinkles that develop should be minimal and can be explained as the twist clothing. This ERTL Spock model demonstrates the technique. Now while hold the hand in the new position, run it under cold water. The part is now permanently modified. Obviously this technique can only be used for small changes. For example, if you took a straight arm and wanted it bent 45 degrees, the plastic would simply fold and not hold its shape. In this case, cutting and repositioning the part is necessary. You could combine the two methods by cutting out most of the elbow and then heating and repositioning the arm, then filling in a new inner elbow with epoxy putty. For example, this ERTL Spock figure is pretty nice but I want to convert it to a Mirror Mirror Spock. One of the many modifications will include altering his right arm and hand to hold the phaser that comes with the kit. Here we can see the cut made from the inner elbow and the arm heated and bent and cooled to be slightly raising the phaser. It only needs a little filler to make it complete. The hand still needs the fingers modified to hold the phaser. Mounting I almost forgot to mention, you'll want to mount you model on a base. The best way to do this is to drill holes in the feet and stick metal rods up into the legs and let the plaster harden around it. You can also glue the rods in place with CA, epoxy, or epoxy putty in a post construction mounting situation or if you do not plan to use any plaster. Then, epoxy the rods into holes drilled into the base to hold the model in place. Use a temporary base while painting to hold the model by and then mount the model to a permanent display base. Another option instead of rods is to puts bolts into the feet from the inside. The head of the bold will be in the leg and the screw will be sticking out the bottom. Then plaster, epoxy or putty the bolts into the place. Now you can simply bolt it to the temporary base with nuts, unscrew the nuts when finished and bolt it to a permanent base. Obviously, you will need oversized recesses in the bottom of the base to accommodate both the nut and room to get pliers or a wrench in to unscrew it. The head of the bolt and the screw pattern will also give the mount "bite" in the plaster so as not to work loose with handling and traveling to all those model shows. Finishing Finishing consists of priming the model, an important step with vinyl, and painting in the medium of choice with the paints familiar to most modelers and oils, normally only used by modelers for washes. Priming Vinyl must be primed in acrylics in order to later accept lacquer and enamel based paint. Some people will argue that enamel doesn't affect vinyl but many people will corroborate that a model beautifully painted with Testor's metalizer without an acrylic undercoat will begin to melt. I take no chances that enamel or oils might be safe and I undercoat with acrylics always. I don't want to find out even years later that enamels break down vinyl unless I am doing a performance model of the Wicked Witch of the West. It's usually a good idea to prime the model a different color than the plastic. This lets you see any spots you may have missed. Batman is modeled in light grey so I primed him dark brown to show any spots I might have missed. A little sanding (remember those CA fingerprints?), another coat of primer and he was ready for painting. Painting Once primed in acrylics, you can use any medium normally used for models to paint vinyl figures. For descriptions sake, I will divide painting between conventional, the mediums we modelers normally use, and oils which are a different beast altogether. Batman was painted conventionally and for an example of oils, we will use the Horizon Creature from the Black Lagoon kit. Conventional
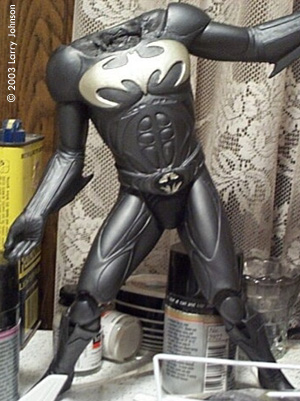
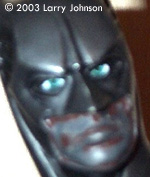
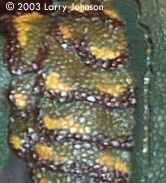
Next came the blue, in this case Tamiya acrylic Metallic Blue. The gunmetal areas were masked and blue was airbrushed over his cape, cowl, gloves, boots and shorts. A wash and drybush were applied with the same paint darkened with gunmetal and lightened with silver. Okay, lacquer, acrylics, ahhh yes, enamels! For the bat symbol on his chest and his utitlity belt I used Testors Champagne Gold Enamel in a rattle can, in keeping a theme of metallic versions of the comic book colors, gold for yellow. The belt received a wash of black for the contours. Continuing with enamels, the face was pre-shaded with Testors brown and then the cowl was masked and Testors flesh was sprayed. A light wash and drybrush followed with a little pinkish flesh drybrushed on the lower lip. Batman was very easy flesh-wise, showing nothing but his lower face, and good shaded flesh makes or breaks a regular human figure. The eyes came next and as figure people will tell you, eyes also make or break a model. I don't pretend to be good at eyes yet but I can at least put something in that doesn't look cross-eyed. Batman's eyes are another medium - gel pens. White went first followed by green iris and pupils made with a Sharpie black marker. Batman's eyes won't win any contests but I think they are alright. Figure modelers will often simulate the starburst effect of the iris with different shades of the primary eye color either painted carefully or using pens or pencils. You will most definitely need a magnifying glass to do good eyes! This picture shows Batman's simple eyes and the brown pre-shading but is very blurry so be warned (it was late, sorry). That was basically a step-by-step painting guide for the Revell Batman, you see that conventional model paints work on figures (again given a good acrylic base). Oils are a completely different way to paint. With conventional model paint, we paint and then use washes and drybrushing to show depth and light and color variances. With oils it's blending. Oils Again other people have extensively discussed oil painting elsewhere so I will just provide a brief overview. Oil paints take days to dry and therefore you can work with them for a long time. I am told that oil paint never truly dries and a little dot of turpentine will make dry paint pliable once more. So since it takes so long to dry (forever) we can blend oil paint right on our subject. Here's more examples of oil painting and blending with the Gillman's back. A stripe of brown followed by some tan spots and then the basic olive green. Now dab - dab - dab! Here is Gilly coming along. Conclusion In conclusion, although vinyl kits are almost all out of production and becoming harder to find, the secondary market (eBay) carrys a lot of these old kits. Horizon is the company for super heroes, Screamin' covers the Star Wars market, GEOmetric Star Trek TNG and AMT covers Star Trek TOS. Monsters, classic and modern, are covered by all the above companies. I can't help you with Anime but they are out there. As for quality, you can't go wrong with Horizon, although some of their earlier figures redefine boring with regard to pose. I have not built any GEOmetric kits yet (although I have 4), but they are quite excellent molding wise and fit looks promising. Screamin' products need a little more work. Their models tend to have surface blemishes and fit issues but then they are the prominent Star Wars guys and they do a lot of 1/4 scale kits if you like BIG! ERTL, with a few Star Trek and Star Wars subjects, are very nice in fit and molding areas but tend to look nothing like the subject in question. I can recommend the Spock model, however. With generally simple construction providing a three dimensional canvas for the artist, vinyl figures can be very rewarding. |
![]()
This page copyright © 2003 Starship Modeler™. Last updated on 15 May 2003.
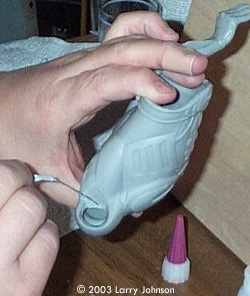
![[Trimming]](lj_vinyl/pic08t.jpg) Back to the sink! Or better yet stay there after you clean the parts. Using water that is hot but not scalding (you should be able to have your hands in it without pain), let the vinyl part heat up and then, using a very sharp knife (don't be cheap! Use a new blade and save the old one for less delicate work) cut away the flash. It is very easy to see where the part is and where the flash is but the knife will cut very easily through the heated vinyl so be careful and go slowly. Alternatively, if you don't like water, you can use a hair dryer to heat the parts. I prefer water because it has a cleaning action as you go (but you have to be careful not to let small trimmings go down the drain) and it's easily to judge the temperature instead of 'how long do I need to blow dry this?'. In any case, heat the vinyl, cut a little and when you feel the part starting to resist the knife, heat it some more.
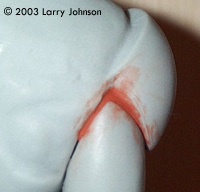
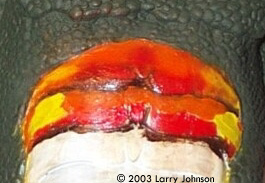
Back to the sink! Or better yet stay there after you clean the parts. Using water that is hot but not scalding (you should be able to have your hands in it without pain), let the vinyl part heat up and then, using a very sharp knife (don't be cheap! Use a new blade and save the old one for less delicate work) cut away the flash. It is very easy to see where the part is and where the flash is but the knife will cut very easily through the heated vinyl so be careful and go slowly. Alternatively, if you don't like water, you can use a hair dryer to heat the parts. I prefer water because it has a cleaning action as you go (but you have to be careful not to let small trimmings go down the drain) and it's easily to judge the temperature instead of 'how long do I need to blow dry this?'. In any case, heat the vinyl, cut a little and when you feel the part starting to resist the knife, heat it some more.![[Gap needs filled]](lj_vinyl/pic16t.jpg) You fill the seams in vinyl models the same way you would with styrene or resin models. Testors, Tamiya, Squadron, Bondo, epoxy putty, all work fine on vinyl. The nice thing about figures is the organic shape. Parts commonly fit quite well without filler and if filler is needed, the curves of organic shapes are very forgiving. With Batman
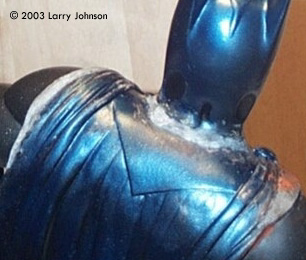
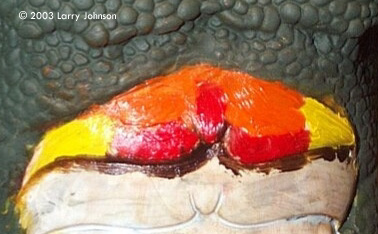
You fill the seams in vinyl models the same way you would with styrene or resin models. Testors, Tamiya, Squadron, Bondo, epoxy putty, all work fine on vinyl. The nice thing about figures is the organic shape. Parts commonly fit quite well without filler and if filler is needed, the curves of organic shapes are very forgiving. With Batman ![[Detail painting]](lj_vinyl/pic22t.jpg) At first I wanted to be a rivet counter, as the aircraft builders say, and make a completely authentic Batman Forever replica. Then I threw that to the wind and did honor to the original colors of the character. Batman is a mix of various conventional modeler mediums. I started by
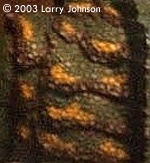
At first I wanted to be a rivet counter, as the aircraft builders say, and make a completely authentic Batman Forever replica. Then I threw that to the wind and did honor to the original colors of the character. Batman is a mix of various conventional modeler mediums. I started by ![[Oil pallette]](lj_vinyl/pic26t.jpg) Start with a palette to put small dabs of all your colors on. Good palettes include plastic lids such as those that come with Pringles or those AOL disks you receive in the mail all the time. Those even have a hole for your finger as you paint. The Gillman has been primed with two coats of Tamiya Olive Drab. Now we paint (thinly - you don't need a lot of paint for this to work - a mistake I made my first time) the basic colors we want the model to be. In this case, I wanted a piranha appearance with a red-bellied Gillman so
Start with a palette to put small dabs of all your colors on. Good palettes include plastic lids such as those that come with Pringles or those AOL disks you receive in the mail all the time. Those even have a hole for your finger as you paint. The Gillman has been primed with two coats of Tamiya Olive Drab. Now we paint (thinly - you don't need a lot of paint for this to work - a mistake I made my first time) the basic colors we want the model to be. In this case, I wanted a piranha appearance with a red-bellied Gillman so 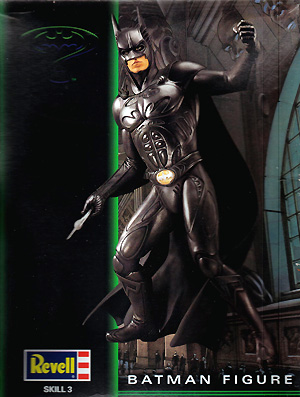