
By Chen Dewei - images & text © 2003
![[Intro]](cd_head/intro.jpg)
|
They say that the war is pulling closer. Though it seems inevitable that the war would eventually reach here, many are still hopeful that it would go away.
As the young lady stares at the remnants of machine built for destruction, it brings about more sadness than shock or fear. Peace never seems to be so far away. Yesterday, as so often said, seems so much simpler... The war is here now... Construction Before I begin, I must declare that this diorama is not entirely my original idea. The original picture that inspired me was from DHM November 1999 issue, featured among some great pictures titled M.S. Era. The picture of a young woman passing by a wreckage of a MS while doing everyday things such as shopping for groceries had a deep impact on me. |
|
It had a sense of sadness, yet somehow so poetic that I cannot get it out of my mind.
Finally, after years, I finally had the courage to take up the challenge to realise it in 1/35 scale. |
|
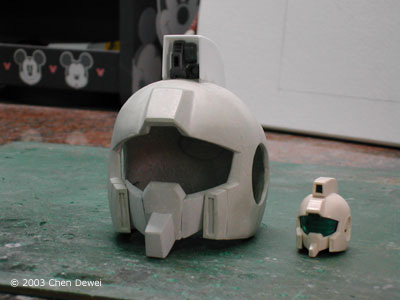
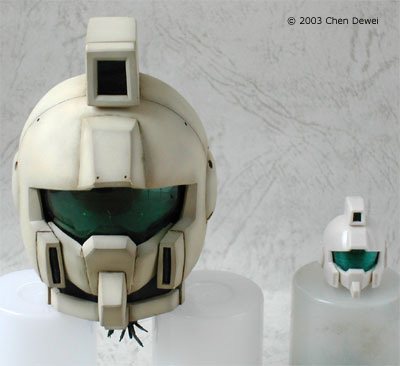
Image: Front view Image: Details. This was a real headache due to the lack of references. I was inspired by my girlfriend to introduce heights which I think works really well.Image: Completed head, in comparison to the head on which it was based. Image: Side view of the head. The bottom part is mainly from my imagination. |
Head Construction of the head pretty much follows the method I had used for Zaku: Epilogue. Technically, the GM head is more difficult. There is more angles and does not follow any smooth lines like the Zaku head. Moreover, there is more details and I had the scratch-built the underneath areas which I have no doubt that exist no pictures of. Oh well, as the great Shepard Paine advised, I used my imagination and gizmology, which rules the day. The transparent visor clear PVC is thermo-formed over a part of epoxy putty formed to the shape of the lens. Once again, in order to save cost, I searched a bit for the right thermo-forming material. I found that the plastic from those ID pass holder pretty suitable. Just remember not to get the soft type. Of course, I also salvage many pieces of clear plastic from thermo-formed product packaging such as those carded toys. These are considered the best. Buildings Initially, cock-sure as always, I presumed that the building would be easy. I had worked with plasters before so I was pretty confident. As always, I learn that it's not easy.
|
|
I decided not to use commercially available diorama buildings. Not just because they are not really suitable for my scene but I want to try building everything, something which I pride myself on. I built rough molds for the buildings from dense Styrofoam, pour plaster into the mold and get a rough shape. Sorry I don't have much photos here because my digital camera was absent during that week. Basically, what I try to achieve is rough shapes, not detailed buildings. I slowly add details and build on the buildings until I'm satisfied with the final form. I sealed the plaster buildings using generous amount of Mr. Surfacer 500 from the bottle (not spray). This helps to stop the buildings from crumbling whenever I handle them. I didn't manage much time to take pictures of the roof structures but it consists of a combined total of more than 400 individual tiles! In the end, the buildings took the longest time. |
|
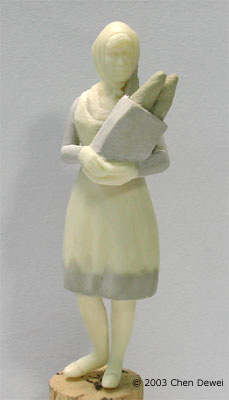
Figure The figure is once again from Custom Dioramics. They have the most number of non-military figures in 1/35 scale. Though they are pretty expensive to get here (Singapore), I don't have much of a choice. You can compare the original figure with my final product. Looking at the unpainted figure, you can see more clearly the specific changes. The yellow-grey parts are epoxy putty, my sculpting material of choice. I made her more feminine and less pitiful looking. I think she turned out rather nice. |
|
|
![[Click to enlarge]](cd_head/image7.jpg) |
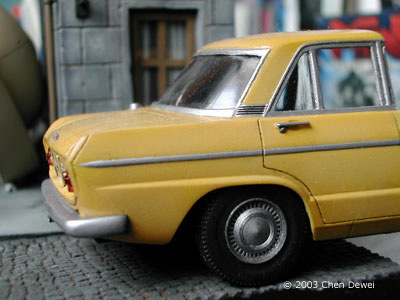
Final Touches The car is actually 1/32. I had originally given up hopes of finding a non-military car in this scale. But I was lucky enough to find a kit from a Japanese maker (LS Model). I believe the company is gone and this could be the very last kit! I therefore felt that it was almost sinful that I cut this one up into two pieces. Well, I could probably use the other half in my next diorama. The lamp post is from a HO scale working street light. It makes quite a suitable piece. I replaced the original 'glass', which was translucent plastic, with a thermo-formed clear part. You can even see the bulb in there! The wall lamp is fully scratchbuilt. The simplicity could give it away but frankly I wouldn't be surprised if someone thinks it's something I bought! The street is made of plaster too. I scribed/carved the details using a sharp metal tool. Additional details are the man hole and drain grate.
|
![]()
This page copyright © 2003 Starship Modeler™. Last updated on 30 January 2003.
![[Click to enlarge]](cd_head/image3.jpg)
![[Click to enlarge]](cd_head/image4.jpg)
![[Click to enlarge]](cd_head/image5.jpg)
![[Click to enlarge]](cd_head/image8.jpg)
![[Click to enlarge]](cd_head/head1.jpg)
![[Freshly casted buildings. Here shown in a mock-up of the diorama]](cd_head/building1.jpg)
![[Another view of the buildings. Note that some of the incomplete castings will become 'cracks' in the final building.]](cd_head/building2.jpg)
![[View of the building from the left. The drain pipe is just a styrene rod with the end hollowed.]](cd_head/building3.jpg)
![[Right side view]](cd_head/building4.jpg)
![[Not exactly glamour queen but she turns out much better than the original figure. Sorry about the poor kid!]](cd_head/figure1.jpg)
![[Can you guess what car it is? Look at those lights... Its a Skyline! Oh no...]](cd_head/car2.jpg)
![[The transparent part is thermo-formed over the original part which is actually white/translucent plastic.]](cd_head/lamp1.jpg)
![[Scratch-built wall lamp. Note the drain pipe. Also scratch-built.]](cd_head/walllamp1.jpg)
![[Another view of the wall-lamp.]](cd_head/walllamp2.jpg)
![[Click to enlarge]](cd_head/image9.jpg)