
By Clyde "Ent'il Zog" Jones - images & text © 2002
|
![[Box art]](cj_CPD_boxart.jpg) |
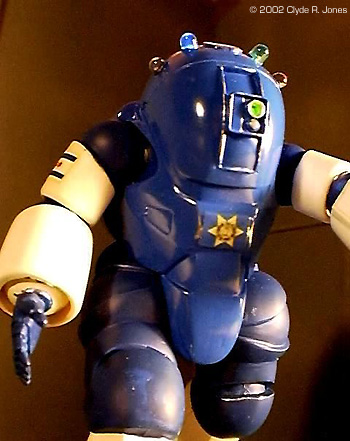
| Image: Closer look at the front of the mech. |
In these days of unrest and assault on our great City from outside agitators (Milwaukee, New York, etc) isn't it reassuring to know that the Chicago Police Department's newest anti-crime unit is standing by to protect Daley-ville? And not just standing! Striding, stomping, kicking butt, and generally taking charge. Those girls and boys in their pollyceramic armor power suits are fit, trained, and will take no guff from the likes of Packer Backers or Mets fans.
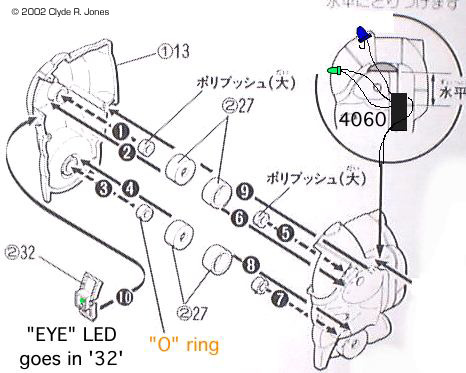
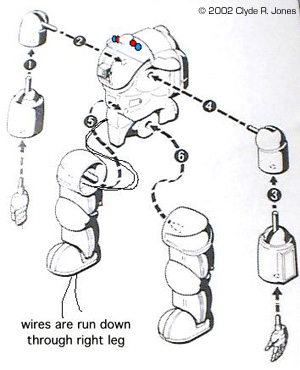
All HAIL, the CPD Power Armor Division. They're all that stands between ‘us’ and anarchy. (Uh huh. Right.) This CPD armor began ‘life’ as a Dorvak unit from the short lived anime of the same (or very similar) name. I like these designs because they look like a human could actually fit inside one and operate it. It's not a “Giant Electric Clown” as someone has described the ‘giant robot’ type of suit. It's something I’d expect to see at least on the drawing boards and possibly the battle fields within my life time. This is a fairly straight forward build up of an excellent kit. The joints are mostly poly cap O rings, so the arm and leg units slip on and off for painting or repair with little trouble, but hold their positions when fit together. Parts fit is excellent - if you glue carefully there should be only a slight sanding of seams and no puttying. If you use liquid cement, and clamp the parts firmly together so a little softened plastic oozes out of the joints, let dry thoroughly and then sand, the joints will be invisible. The paint scheme is based on the old ‘black & white’ police cars of long ago. Also, the white arms and legs are more visible to bystanders and the operator - they are powered and dangerous if they collide with anything like a soft squishy human. Or much of anything else. The departure from the normal simple build up is the inclusion of a 4060 self-clocking blinker chip driving the LEDs on the crest of the - er - helmet. Four 3mm holes were drilled in careful alignment on the top of the helmet, and the pre-wired LED pairs were superglued in place with the 4060 dangling on lots of spare wire. The ‘eye’ lens of the front plate was gently drilled out and a green LED was SG’d in place from the back. The body was glued together around the wiring, with the power leads run out the right hip socket, and later through a crescent shaped hole in the recess of the right leg ‘hip’ joint and down the leg. The wires finally exited from the bottom of the right foot. A 1/8” dia hole was also drilled in the bottom of the foot and a 1/8th “ dia plastic rod glued in place to later anchor the figure to the base. Rather than a simple boring mass ‘blink’ I wired the LEDs in two sets of one red and one blue LED, on opposite sides of the helmet. Each set flashes twice, then the other set flashes twice. This is like the marker strobes on modern emergency or service vehicles. Much more interesting than just a simple pulsing. This way, the LEDs have only about one quarter of the normal “all lit” power drain. The ‘TV’ lens at the front of the helmet has been replaced with a green LED which turns on only about 25% of the time helping keep power consumption down. Because of the efficiency of the 4060 and the wiring of the LEDs, the suit can flash for two straight days at a model contest on one (tired) 9 volt battery. And did. The art for the decals was run up on a Mac computer, using real CPD insignia and badge for reference. The badge is accurate, even to the teeeeeny lettering. The decals were then printed with an Epson inkjet printer on ‘JetCal’ paper and applied normally. JetCal takes ink and encapsulates it in a layer on the surface of the decal film. About an hour from the time you print them, they’re ready for application. (Assuming ‘normal’ humidity.) No overcoating with a sealer is needed. The actual decal turns transparent when wet, but becomes white again when it dries. Unless.... The paper is normally white, but can be made permanently clear if sprayed or painted with Krylon clear or clear urethane, or Future (Klear). That’s the good news, and the bad news. If you spray the decals with several light (very light) layers of Krylon or Future you’re just sealing the surface and the decals stay (or return to being) white. If you overdo the clear coat, they stay clear. If you do as I did on some experiments and goop on the Future (a heavy layer brushed on) the ink can smear. Decal setting solutions can also cause some ink release. Some combinations of colors (black on red for instance) can cause running and smearing just from the over application of ink. |
|
(Printed Red is actually Magenta printed with Yellow, Black is often Cyan, Magenta, Yellow, AND blacK ink combined. That's for an inkjet printer using CYMK subtractive inks. Most are.)
The unique base for the model is an aluminum piston from a deceased lawn mower - degreased, polished, and Krylon’d. The 9 volt battery and push on/push off switch live in the base. The 4060 occupies the main body cavity. This was a fun, and relatively quick, build. One way to combat AMS. |
![]()
This page copyright © 2002 Starship Modeler™. Last updated on 20 February 2002.
![[Click to enlarge]](cj_CPD_front_too.jpg)
![[Click to enlarge]](cj_CPD_BACK2.jpg)
![[Click to enlarge]](cj_CPD_left_cu.jpg)
![[Click to enlarge]](cj_CPD_RS_MCU.jpg)
![[Click to enlarge]](cj_CPD_base.jpg)