
By John Lester - images & text © 1999
|
![{Hiiiiiiiiiiiiiiiiiiiiiiiiiiii-ya!]](../hygogtn.jpg) Bandai's 1/144 "Hygog MSM-03/C" is another one of those kits I bought because they just look cool. |
|
|
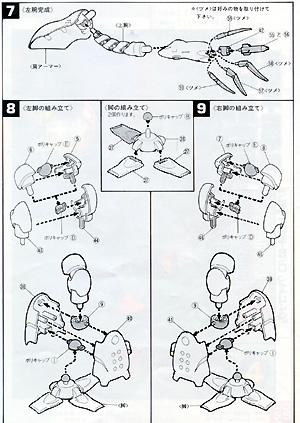
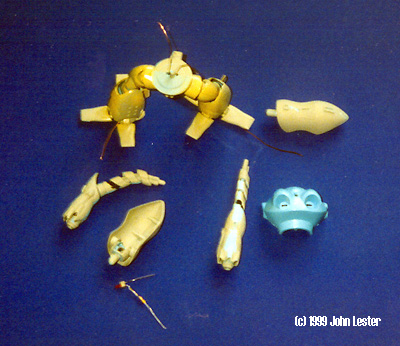
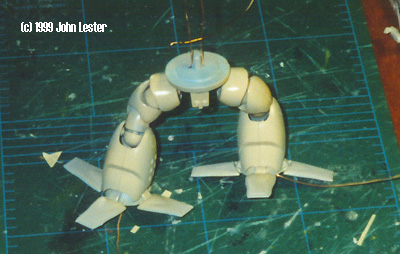
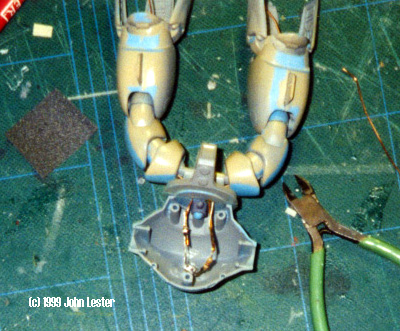
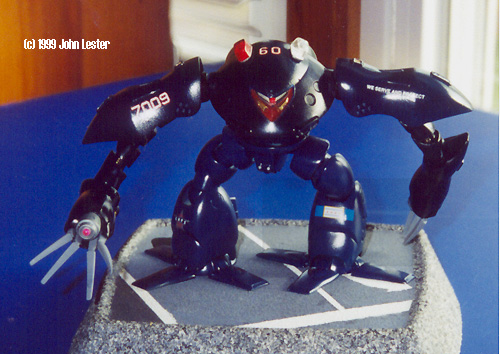
I have no idea where this robot (mech?) fits in the Gundam universe - nor do I much care. The box art lured my attention, and at 500 Yen (under $5 USD) the price was oh-so-right. Even if the kit turned out to be a stinker, it was worth the cost to me just to feed the spares box. The kit is not a stinker, though it is one the older in BanDai's Gundam line. This means fit and detail are merely exceptional, rather than the near-perfection of their current models. In many ways, this review could cover any one of their mech/robot kits. Quality and assembly are pretty much the same in every one I have built so far, anyway. Like all their other robots, this one is molded "in color": you get two sprues of baby blue parts (main body, arms and legs), one of bright orange (jet pack and missile container), one of translucent black ("fingers" and rocket) and one bright, clear pink (eye) - plus, of course, the polycaps that give the model much of it's posability. There are some 80 or so parts in all, not counting the polycaps. All were flash free, with no sinkholes or ejector pin marks to mar visible surfaces. Step-by-step pictorial instructions (with Japanese notes) are clear and easy to follow. Color photos provide paint references - if you want to do a baby blue and orange mech, that is. On the back of the instructions is what appears to be specs, vehicle "history", etc - all in Japanese. I decided early that the ease of building would allow me to do some extra with this model. I wanted to replace the plastic eye with a glowing red LED, to make it look as malevolent as the box art depiction. I also wanted to use the model in a diorama. One of my regular visits to the local hobby shop netted a set of DML SWAT figures for $2, which inspired me to do a police diorama (do I care the figures are 1/35, and the robot is "really" 1/144? Nope. With my magic wand, I made the Hygog 1/35 scale too). I found some Chicago police decals and stole the "flashers" from a 1/24 police car gathering dust in the closet, and I was set. I generally followed the assembly sequence in the instructions. Sub-assemblies were glued, seams fixed, and interior parts (especially on the arms) painted (black, in this case). Powering the LED was the only tricky part. I decided to run one wire through each leg, connecting them to a resistor and LED in the chest cavity. I used the wire wrap tool to join the resistor and LED, soldered the connections and wrapped them in a slice of electrician's tape, and superglued the LED into the eye hole. I then drilled out the necessary polycaps and plastic pieces so I could run a thin copper wire (22ga) up through the legs and torso, into the chest. That complete, all I needed to do was glue the lower body parts in place around the wires, then solder the wires to the LED assembly. After that, I closed up the chest cavity and dressed all seams. I tossed the orange parts into the parts bin for use on other projects. |
|
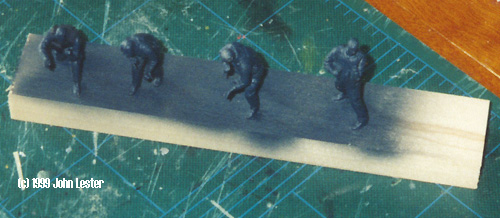
After masking off the eye, I primed the model with my standard cheap grey spray paint. This revealed a few more flaws to fix. Then came the "final" painting. I painted the area around the eye chrome silver, with British Crimson accents (unless noted, all paints used were Testor's Model Master enamels). The outer shell received several coats of Copenhagen Blue Metallic over a base of Blue Angel Blue, for a nice, deep glossy metallic finish that screams "COP!". While that was drying (gloss + metallic means longer dry time - I usually let the enamels cure for three-four days before handling), I turned my attention to the figures. DML figures are very finely molded and fit together almost as well as the robot did. The weapons they carry are also well done - but I wanted my SWAT guys to carry something beefier than an MP5, so I dug out M16's, M203 grenade launchers, and an M1170 shotgun from the parts bin - and if I could have found a bazooka or STINGER SAM, I'd have used them instead. I wanted to use heavy machine guns, but the figures' poses limited the size and configuration of the weapons they could carry .... and I didn't want to spend too much time cutting and repositioning arms, legs, etc. Once assembled, I used white glue to attach the figures to a piece of wood to make painting easier. I used several shades of blue for the clothing and flak vests, with semi-gloss black leather bits and holsters. Weapons were painted gunmetal and dry brushed silver. Flesh areas were painted .... well, flesh color, using Polly Scale Acrylic "Skin" with various brown/red/yellow washes to bring out detail and make them look less like zombies. After washing and drybrushing highlights, I affixed each figure's weapons and personal gear, and added a few details like slings made from slivers of paper and a microphone cord for the sergeant fashioned from very, very thin wire. I didn't want to hollow out a wooden base, so I looked around for something else I could use. A large Styrofoam take-out container was the right size and shape, but too flimsy. What to do, what to do .... |
|
|
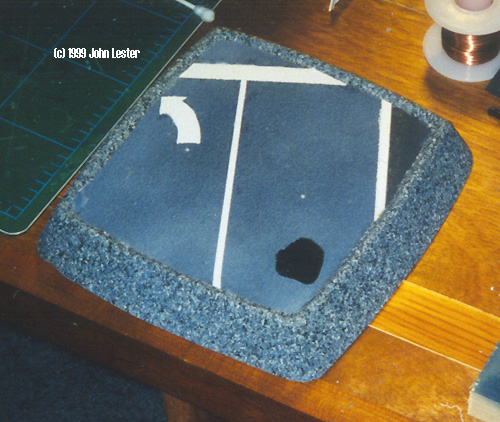
I hit upon cutting the two pieces apart, pouring resin in one, then placing the other on top of that to make a sort of hollow mold. Worked like a champ, except that I didn't use enough mold release and one tray wouldn't come unstuck from the resin shell. No worries - I just poured a little acetone on the offending Styrofoam - and in minutes it was gone. The resin shell was then sanded down so it sits level. The top was masked and the sides painted with Fleckstone faux granite spray paint. When that was dry and overcoated, I sprayed the top to look like a city street, complete with recently filled pothole. I then figured out where I wanted the robot to stand so I could drill holes through the base to connect the wires with the battery cap. All that was left was to finish the robot and glue everyone into position. The flashers were glued to the robot's head. Decals were then put on - numbers and bare minimum of text ("We Serve and Protect", "Emergency - Dial 9-1-1" and the Chicago Police CAPS program symbol). Once that was dry and overcoated with a clear semi-gloss, I glued the robot and figures in place. The final touch was to add a few scraps of paper to represent litter, as well as a square cut from a business card to represent a protester's sign being trodden on by the robot. All-in-all, it was a fun project - a chance to exercise the imagination while actually getting something built (for a change). I highly recommend these kits to anyone looking for a change of pace, or a quick build to restore your modeling fervor. |
![]()
This page copyright © 1997-9 Starship Modeler™.
Last updated on 24 June 1999.
![[Da Posse comin' atcha]](jl_hy8.jpg)
![[Da posse goin' away from ya]](jl_hy9.jpg)
![[Protestor's-eye view of BIG trouble]](jl_hy10.jpg)
![[Any way you look at 'em, these guys are BAD!]](jl_hy11.jpg)
![[Ah, Houston, we have a problem ....]](jl_hy12.jpg)
![[Good thing the robot's in FRONT of us...]](jl_hy13.jpg)
![[Another view of the figures]](jl_hy14.jpg)