
By Jeffrey Griffin - images & text © 2008
|
![[Please click to enlarge]](jg_mineral_Min06.jpg) Back in September of 1978, a great many people tuned in on a Sunday night to watch what promised to be a great space saga - "Battlestar Galactica". As most of us are well aware, it was the story of the last battlestar, Galactica, leading "a rag-tag fugutive fleet on a lonely quest for a shining planet, called Earth." |
|
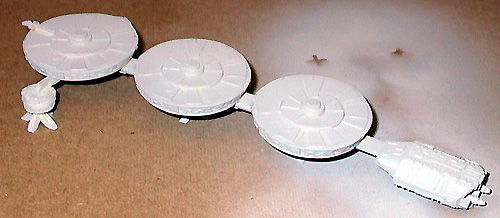
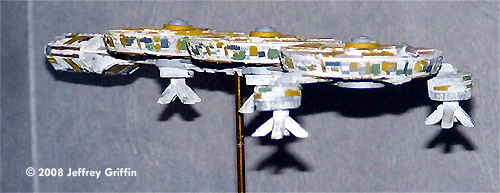
Image: Assembled and primed, top Image: Underneath Image: Top/left Image: Completed |
There were 220 ships in the RTF, though we only got to see a little over one dozen of them close up. The Mineral Ship - or Livery Ship as the folks at APOGEE called it - is one of the most easily identifiable ships in the RTF. The original studio model was build using three disc-shaped items for the main hull components - and Studio Scale officiando's argue back and forth whether they were some sort of film cannisters or if they were wooden parts skinned in plastic - , four landing "feet" and an aft engine section. Called a "Livery Ship" by the model makers at Apogee Studios, the ship is readily identifed as a Mineral Ship in the pilot episode, "Saga of a Star World", so that's what I prefer to call the design. There are two similarly designed ships - done in CGI - which are also part of the new, re-imagined "Battlestar Galactica". One of these two ships has Yellow - and is named Majahaul - as its primary color while the other has Blue. But, I digress in my geekiness.... What I Got The kit comes packaged in a ziploc bag with the instruction sheet and a nice label at the top. The model parts themselves are of a yellow-tan color and the smaller parts are packaged separately from the larger parts. You get a total of sixteen (16) resin cast pieces: three of the "cannister" type hull pieces, two connecting pieces, an engine section, a "bridge" piece, a "sensor" pieces (for lack of better nomenclature), two "arms", two "base" parts for two of the landing pads and four total landing pads. |
|
The resin pieces have only a touch of flash and some very few voids and airbubbles - I think I originally counted about half a dozen. While some seam lines are apparent, they're easy to take care of with a bit of Xacto and sand paper and those few aforementioned voids are easily dealt with using putty (I prefer Tamiya Modeling Putty). Detail is crisp and clean and consists of mostly raised surfaces on the exterior of the hull. The details on the various parts are nicely done, but mostly consist of various squares, triangles or rectangles - or variations on those - with the occasional circular flat piece. The actual engine detail isn't accurate, but the overall engine section is nicely detailed. The detail on all the parts is layered, and regardless of how accurate it is, and lends itself nicely to giving more depth to the model. Assembly and Finish I started off with washing the parts. I almost always use Comet cleanser to clean my models, followed by a good rinse and then another cleaning using Scrubbing Bubbles. After a final rinsing the parts are allowed plenty of time to air dry. Afterward, I started filling any airbubbles and voids I found, filling again where shrinkage was a problem and finally did a light sanding with 600 grit sandpaper. For the actual assembly, I used Duro-brand Super-Glue Gel. I rather foolishly completely assembled the model before hitting it with primer (Rust-oleumÖ Automotive Primer) and should have only glued the sub-assemblies together. More on that, later, though. For a base coat, I chose to hit the model with multiple light passes of Rust-oleumÖ flat white paint. I was going for an old and faded paint job, as well as "dirty" look overall. I figured this would also help me with not having all the raised details in a uniform white pattern. I got the effect I was looking for, as there were plenty of "faded" spots, as well as shadows on the surface of the model. Next, I chose to hand-brush Testors Enamel Zinc Chromate 1184 for the panels on top & bottom of the three circular sections, as well as a couple of the engine section panels. I then used Model Master Medium Gray, Light Ghost Gray, Pale Green, Medium Brown and Black to paint various panels different colors. I tried to keep as random as I could, but a few areas ended up getting nearly identical colors in the same places. I used Testors Alumunim for the "bridge" section in an attempt to replicate the look of glass similar to the studio model. I don't think I did such a good job replicating the studio model, but for the scale I think it turned out alright. After taking several days to paint the various panels and allowing plenty of time for the paint to cure, I then set out to do some weathering via dry brushing. I first used some Testors Gloss White in a few of the flat white patches to give the impression that those sections had been repainted with whatever was on-hand. Next, I used Model Masters Graphite Metallic, Flat Black and Aluminum, drybrushing those colors on in very small amounts in most areas, using repeated passes as needed to achieve the effect of burn marks, scuff marks, paint pealed to bare metal and the like. I did a few tests for weathering during some of this paint, as you can see in some of the pics. It was about this time that I realized something: This kit has two issues that bugged me. The first is that the two feet that are the middle supports are set to where they're lower than the two on the "arms". I could have corrected this, I supposed, by using some thin sheet stock added to the bottom of each of the two middle pads that those landing legs go on, but declined since I was almost done with the model. The other thing that bugged me is that the back to sections of the "spine" had started to sag a bit. This was easily corrected by carefully snapping the spine in to three sub-assemblies again, heating with hot water, bending carefully to shape and then putting the parts in cool water. It doesn't look nearly so bad. Of course, I also took nearly two years to complete this model, so that didn't help much, either, I'm sure. Finally, I sealed the model with a dullcote to dull down the gloss and metallic paints a bit. The only real problem I had during the overall painting process was because I had assembled the model completely before painting. I also realized during the hand brushing period that my hands aren't nearly as steady as they used to be for this sort of work. Conclusions I'm very happy to own this and feel that it looks great with my own RTF collection. My Rag Tag Fugitive Fleet is that much more complete now. If you're a fan of canon Battlestar Galactica ships, be it from The Original Series of The New Series, this is definitely one to get! While it might be considered a bit pricey when compared to some similarly sized kits, it's well worth it. And if you're trying to complete your RTF, you almost can't afford not to purchase this one. |
![]()
This page copyright © 2008 Starship Modeler™. First posted on13 May 2008.
![[]](jg_mineral_Min01.jpg)
![[]](jg_mineral_Min05.jpg)