
By John Ulshafer - images & text © 2000
|
|
| Image: Cockpit CRT display ^ Three views of the finished cockpit, in place. Image: Close-up of the completed pilot figure ^ Three views of the completed pilot figure. Image: Looking down into the cockpit. |
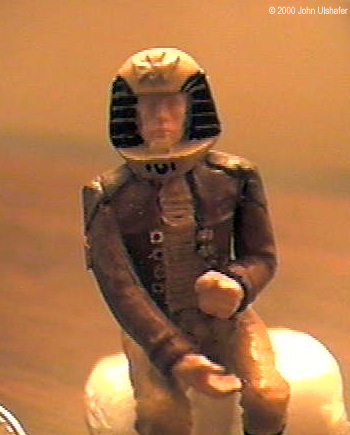
I mesmerized by Apollo, Starbuck and the other Colonial warriors doing battle with the evil, albeit cool-looking, Cylons. It didn't matter that there were the same nine Special Effects shots replayed every week, Colonial Vipers were just COOOL! And when Monogram reissued the Viper in the mid-nineties, I snatched one up and did a what I thought was a bang up job..... until I saw the detail set by Millennia Models Inc. I thought wow! That is too cool! I obtained my cockpit set and pilot from John Green's who at the time had not only the cockpit set but male AND female Colonial Warrior kits. I decided on the male pilot and ripped open the boxes as soon as I got in the car. The Cockpit Set My kit was free of any warping, bubbles, or any significant defect. Only some minor flash was present. Very little work was involved in assembling the cockpit itself, just some minor sanding to attach the head piece or canopy base located behind the pilot's head. Most of the work involved with the cockpit itself revolves around painting the various instruments and panels. The instrument panels themselves are photo-etched brass and come on a single fret. They are individually numbered on a separate reference sheet. I had never used photo-etched brass before, but the instructions made it very easy. The instructions even offer an easy but effective technique to paint the individual panels by sticking them to a piece of tape that has been secured to your work surface. The canopy itself is a single piece of vacuformed plastic. You are given the option of an open or closed canopy. By the way, I just have to stop and give a little thank you to the guys at MMI, the canopy I had in my kit had a tear in the plastic. I wrote to MMI and asked if replacements were available, they e-mailed me back shortly thereafter to inform me that a replacement was already on it's way to me! THAT'S CUSTOMER SERVICE! Thanks Guys! The single piece of clear vacuformed plastic and is very detailed indeed. You can actually see the rivet work on it! Trimming it off the rest of the plastic is tricky and requires patience and a steady hand. I would recommend small scissors (manicure scissors or the like) for this task, as scissors make straighter cleaner cuts. It's a little slower but worth it. Once cut out, all you have to do is mask it off with Scotch magic tape, paint it, peel off the tape, dip it in Future floor wax and that's it - canopy done! Next came the hard part. To actually fit the cockpit inside the viper fuselage, a little surgery is required. But this too is made simple thanks to the instructions. They provide a 1:1 template that lets you know how much and where to cut on the fuselage. The only real time consuming part of this whole kit was the puttying and sanding to smooth out the fuselage once the cockpit is installed. I was a little disappointed with how much you can actually see once everything is installed (even less once the pilot is installed!) but what you can see is worth it. Besides, as those of you who have built interiors for your ships before know, you know it's in there. Even if you have to squint to see it! Bottom line.... Great kit. Seated Male Colonial WarriorThe second kit: the seated male colonial Viper pilot, also from MMI. The kit is made up of 15 parts consisting of a seated body and torso, two sets of arms, two holstered laser pistols, a small fret of photoetched brass which contains the buckles and uniform insignia, a small imitation leather strip with adhesive backing, and three heads - one helmeted and two bare headed. These last are presumably Starbuck and Apollo, and are pretty good likenesses at that. I chose the helmeted head as my canopy would be closed. I'm sure it would be possible to dremel out the helmet and set it beside a bare headed pilot with the canopy open. The detail on the Photo-etched parts is remarkable, from the insignia patch to the teeny-weeny buckles that go on the Warrior's jacket, to the boot buckles. There are even two tiny brass pieces that make the ear phones on the Colonial helmets. As previously mentioned, the kit comes with two sets of arms and two holstered laser pistols, which gives you the option of a right or left handed pilot (Apollo was left handed). The instruction sheet is pretty straight forward and includes detailed painting instructions, right down to the stripes on the sides and back of the pilot's helmet. As with the cockpit kit the detailing on the Colonial Warrior is outstanding, making this kit an exercise in patience and painting. But in the end it's well worth it, as the result is a very detailed replica of a Colonial pilot which adds the perfect finishing touch to your tricked-out Viper. |
|
In conclusion, I had alot of fun with both these kits and highly recommend them to anyone who wants more than the usual black painted canopy on their Vper. MMI has also recently released a launch rail display stand, and has plans to release a landing gear set as well as a complete launch bay diorama set which I am eagerly awaiting. Great work MMI! |
|
![]()
This page copyright © 2001 Starship Modeler™. Last updated on 14 March 2001.
![[Click to enlarge]](ju_viper_01.jpg)
![[Click to enlarge]](ju_viper_pit.jpg)
![[Click to enlarge]](ju_viper_pit2.jpg)
![[Click to enlarge]](ju_viper_nose.jpg)
![[Click to enlarge]](ju_viper_pilot.jpg)
![[Click to enlarge]](ju_viper_pilot_side.jpg)
![[Click to enlarge]](ju_viper_front.jpg)
![[Click to enlarge]](ju_viper_02.jpg)