
|
By Michael Dentzer - images & text © 1999
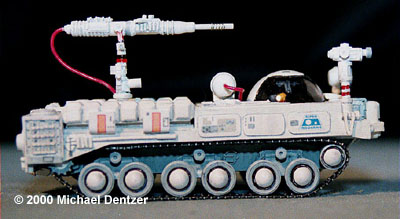
The laser equipped tanks seen too briefly in only one episode of Space:1999 (The Infernal Machine) have always been what I think are some of my most favorite designed vehicles seen on the show. If you have the more eagle-like and most popular of the designs produced by Scale Model Technologies, like myself, you might like the other two to add to your collection. Earlier this year I had some conversations with Colin which indicated that he had plans to do the other tank designs as well, and in a recent correspondance with Jim Small he revealed plans to produce for sale through Small Art Works all three versions of Alpha's laser tanks. If these plans don't come through, you could build them yourself. If you want to build the more eagleish version, see E. James Small's article on "how to" at the Space: 1999 Cybrary. The article presented here will give a basic overview on essentials and tips for building what I'll refer to as Tank #2. GETTING STARTED: REFERENCEI only found one photo on the web (in the Cybrary) of this tank that showed any kind of detail and only gave one view of the studio model . This is adequate to give a general color scheme for painting, but is far from complete or clear enough for building purposes. Thankfully there are multi-view sketches of the studio model by Martin Willey on his Space: 1999 Catacombs site that are very detailed and show accurately all plan and profiles needed. Until I found these I thought I would have to settle for just a vague similarity to what the actual studio model might look like, so these sketches were a godsend. Note: The tank as it appeared on the show is single-piloted. I decided to build a two-pilot version for a couple of reasons: The original tanks seen on screen were built by Martin Bower on the chassis of 1/25 scale British Chieftain tanks. The SMT kit, and the one by Jim Small are built using the 1/72 scale version. Airfix makes such a kit and I ordered mine online from Phoenix Models. This is the same kit used by SMT for their tank. You will also need another tank kit to provide the necessary vent and grill section shown on the top rear half of the model. It took a bit of research on the web, visiting many modeling sites devoted to armor till I found a close enough match to what I wanted. It's a 1/72 scale PzKpfw V "Panther" Ausf.g (Sd.Kfz.171) by Ravell, again ordered from Phoenix Models.(order 'em both at the same time, you'll save on shipping.) This kit will also provide most of the detail parts used overall. You'll also need some evergreen sheet styrene to build the body, and a well stocked parts box. BUILDINGBuild the Chieftain chassis as per the kit instructions. Then build the body out of sheet styrene. Jim Small's article covers this aspect pretty well; although it's a different version, the basic principles, tips, and techniques are applicable, so I won't go into detail here. Experienced scratch-builders will have their own techniques and preferences on how to go about this, anyway. The grille and vent area that the laser gun is mounted on is from the Panzer tank kit, as are the four circular detail bits on the top rear section, the vent areas on both side rear areas, the two round bits flanking the rear grill panel, and the front anti-glare(black) panel. The cockpit is built from parts from both the Panzer and Chieftain tanks, and bits from the parts box. The seats are Apollo astronaut backpacks from an Airfix Lunar Module kit, and the pilots are 1/100 pilots from a Monogram Lunar Hopper kit, as are the turrets for both the front camera and the laser gun. The gun itself is built from about 20 parts from the parts box, and tipped with a styrene rod on which I slipped a small section of the thin flint spring from a Bic lighter. The large oxygen tank behind the cockpit is a section of thick sprue, tapered, shaped, and detailed with a length of thin wire for the strap. |
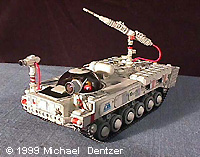
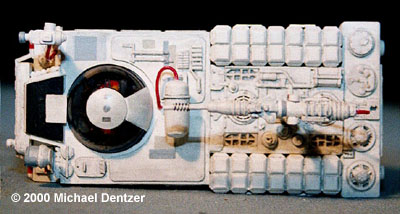
Another view of the rear deck, showing the storage boxes and engine grilles.
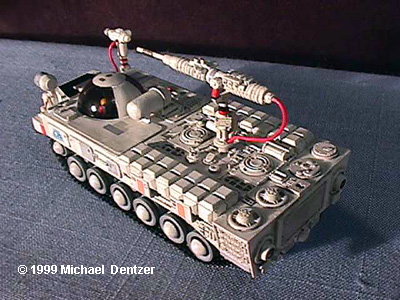
Overhead oblique, showing the top decking details. Same view, from a distance.
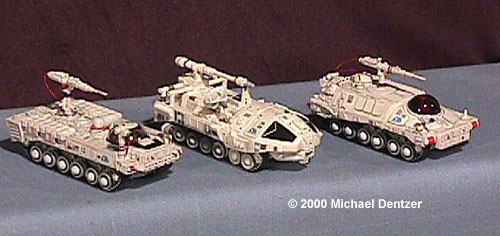
Another view of the tank twins. |
|
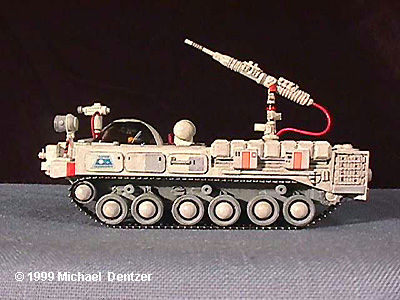
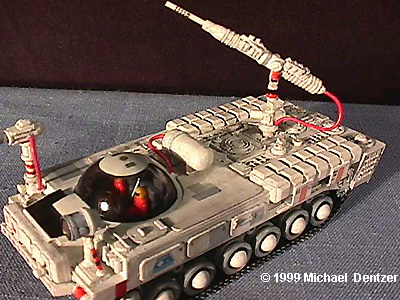
The cockpit canopy is from the local grocery store bubble gum machine, cut down a bit, the top covered with a little bubble indicator cut from a soft drink lid. I brushed on some Future floor wax mixed with a couple of drops of fountain pen ink added for tinting, giving it a glass-like shine. The red cables and hose on the gun, camera, and O2 tank are lengths of wire from an old computer speaker I had laying around. They should actually be orange, but red was what I had. The tiled structures on the rear area flanking the laser I built from tile-textured Evergreen sheet styrene. Just break the individual tiles off, taper the sides down with a file, and glue them on rectangular boxes made of sheet styrene. There are 32 tiles per side, and took about an hour each to build. The wheel hubcaps are plastic doll eyes that I found in the doll section of the local craft store. PAINTING/FINISHINGI used Testors Model Master acrylic flat white overall, gray for the wheel areas and body paneling. I then gave it a light wash of Testors enamel flat black and thinner to bring out the detail, and weathered with pencil. The orange and black stripe details are permanent marker, and finally decals from the Tangents Eagle Decal Set. Well, there you go. A nice little companion for your SMT Tank and /or Ertl Eagle. Enjoy, and as always, Happy Modeling! Special thanks to E. James Small and Martin Willey. ADDITIONAL IMAGESImage: Left side. Image: Right side. Image: Overhead view. Image: All three of Michael's tanks. LINKS: Jim Small's Tank Article: http://www.cybrary1999.com/publications/art87.htm |
|
![]()
This page copyright © 1997-2000 Starship Modeler™. Last updated on 8 February 2000.

![[Rear]](md_tank2_6s.jpg)
![[Side]](md_tank2_9s.jpg)
![[Rear]](md_tank2_10s.jpg)
![[Cockpit exposed]](md_tank2_13s.jpg)
![[Scratchbuilt and SMT tanks]](md_tank2_15s.jpg)