 |
|
|
|
By Marcel Bastien - images and text copyright © 1998. |
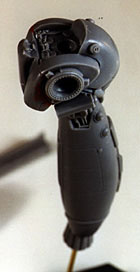
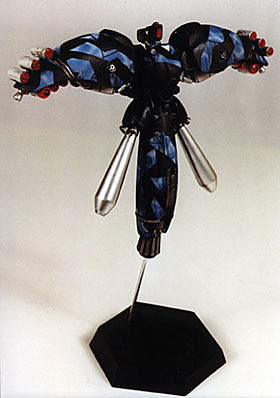 The completed Syreen model sporting an orbital |
Value: 10 (uncommon - look at that quality!) |
| Detail: 10 (crisp, engraved panel lines, plus numerous mechanisms) |
Accuracy: 10 (built from the original schematics, under the actual designer's supervision) |
| Parts Fit: 9 (one or two joints look better with just a hint of putty) |
Ease: 9 (a beginner could put it together w/o problems, but it's not quite as easy as a snap fit kit) |
| Overall Rating: 9 |
|
The Syreen model kit was the second release from Fusion Models, an up-and-coming model kit manufacturer. It is a 1/200 scale model of a combat spacecraft found in Dream Pod 9's Jovian Chronicles™ science fiction universe. The kit consists of 26 parts molded in a gray-colored resin that is very similar to styrene in texture and general feel. The quality of the casting is really impressive: all the details (and there are lots of them) are crisp, and all the components are distortion free. One of the nice features of this kit is that most rough spots and seams are hidden when you assemble the components together. This kit requires minimal cleaning time and brings you almost immediately to the painting stage. Assembly and Priming Initial assembly was limited to gluing the back pack to the main body, with a small amount of putty added to make the joint line disappear. I decided to prepare all other parts but leave them off until after painting. It is advisable to drill holes and add pins to strengthen the main components. The instruction manual suggests to do so, and it will definitely make your model a lot more sturdy. Trust me, gluing those cooling tanks back on more than twice is really annoying. 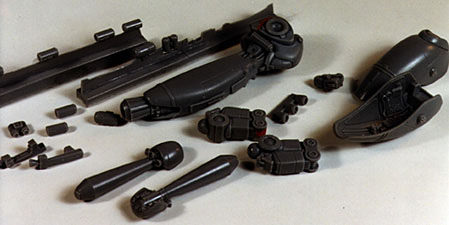 The raw, unfished parts of the kit, showing the gray resin. The castings were typically very clean. Even if the resin looks like styrene, it is still a resin, so it is necessary to take some basic precautions to obtain good paint adhesion. First, make sure that you wash the parts in warm soapy water to clean off the mold release agent. All parts should then be primed. The fact that resin is more resistant to solvents than styrene allows you to use lacquer-based paints without problems, so I recommend using a gray automotive primer as a base coat. The quality of the bond will be better than using regular hobby paint, and the neutral color will make painting easier if you decide to use light colors on your model. Painting the Syreen In science fiction, color schemes are almost always a matter of personal taste. You could simply go for the suggested "official" military colors (a dark Soyuz-like green) and get a very satisfying result, or jump on the occasion and try something different. Looking at my model, l could not help wondering what it would look like with a camouflage on it. After a few days of reflection, l came up with an idea for a paint scheme using blue and black as the base colors. The idea behind that selection is to make my spacecraft hard to see in low orbit combat. Assuming that you are orbiting around the Earth, if you look at it from space you will see only the black segments against the backdrop of the planet. Inversely, if you look at it from the atmosphere, you will see only the blue segments. Either way, the silhouette is completely disrupted, making the vehicle hard to identify. I started the paint job by applying a chrome color over the auxiliary coolant tanks (to reflect sunlight and prevent excessive boil-off). l used a Krylon® brand Chrome spray can, but Humbrol® Chrome Silver is also a good alternative. Next thing, painting the blue base color: I used a flat blue enamel (Humbrol® 109) over the gray lacquer base coat. Using enamel over lacquer is a technique that makes potential painting mistakes easy to fix. If you have a problem with the color you just applied, it will be easy to remove using mineral spirits, leaving the gray lacquer base coat unaffected. l also planned to use acrylic paint to do the weathering later: if I overdid it, it would be easy to go back one step without having to redo everything. Once the blue was completely dry, l randomly airbrushed some diffuse white stripes using Humbrol® Flat White. There was no need to be extra careful with the white stripes, since I was planning to paint over most of the body surface with black later. 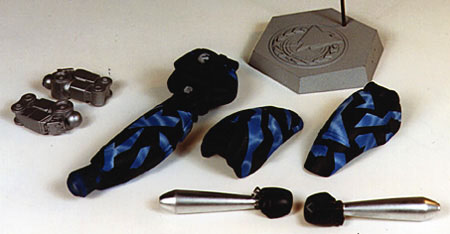 Here's a look at some of the main assemblies after the basic paint and cammo has been applied. Creating the Splinter Pattern For masking, I placed a piece of 20 mm Tamiya masking tape over a piece of glass, then I cut a series of straight lines connected together at different angles using an X-acto® knife. I selected the best looking sections and combined them on the blue and white surfaces. It is essential to press down carefully the masking tape pieces over the raised details, since it gives sharper edges and will prevent overspray problems. For the black paint I used Humbrol® Flat Black, carefully applied so that it will not build up around the edges of the masking tape. As soon as the paint was dry to the touch, I removed the masks and then let the model dry overnight. Don't forget to mask the coolant tanks to paint the top section of the side skirts. Once everything was perfectly dry, I used a piece of an old T-shirt to lightly rub the painted surfaces. It gives a slight sheen and makes the surface look more even. The next step was to mask around some of the details that I wanted metallic, such as the stripes on the shoulders, the "belt" line and the cockpit hatch on the main body. I used a graphite-colored acrylic paint (Polly S® Metalline) to paint these details. I chose the darker metallic shade because the coolant tanks were already flashy enough with their chrome finish; I didn't want my Syreen to look like some kind of spaceborne Christmas tree, with glitter all over. l picked up a pair of small white triangles from my spare decals box and put one on the front and one on the back. The use of leftover decals, like numbers or stripes, gives the model a little more personality. I painted the folded arm pieces using a Tamiya Gloss Aluminum spray lacquer. Once the base color was dry, I highlighted some of the surface details with various shades of metallic paints. Next on the list, the missiles. For these little canisters, I decided to use a mixture of white and aluminum instead of a regular flat light gray. To complete them, I painted all the tips with a red-orange color. The inside of the shoulder pieces is really something to be seen: these parts bring you a perfect opportunity to go insane with your paintbrush. The instructions call for a zinc chromate green for the base color inside the shoulder. I did follow the suggestion because it looked industrial. Besides, from the outside you can't see the color showing, so it won't disturb the color scheme used on the outer surface. While you paint the details inside the shoulders, keep in mind that after assembly is completed very little will show. I decided to leave the shoulder parts unglued to the rest of my model so I could show them off. The fit is good enough to let them rest on top of the arms pieces. Weathering After I completed the shoulders' detail painting, it was time to start the weathering. I applied a dark wash using some tube acrylic paint diluted in water. As an aside, if you don't already have tube acrylic paint and plan to buy some. Don't buy the cheapest brands; they usually give disappointing results when diluted with water. It doesn't mean that you have to buy the most expensive ones, but stay away from the cheap starter sets. Better for you to buy primary colors with black, white, and if you still have some change, a tube of burnt sierra. 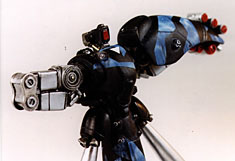 For the application of washes, the basic rules is to avoid solid black. Cut your black with a bit of white, and if necessary warm up your mixture by
adding some brown to it. Since most of my model is quite dark, I went for a light gray wash first. Later on, l adjusted my washes with darker tints
applied to specific sections of the surface. Let your weathering dry for a while. If you find that your model looks too dirty, you can always remove
some of your patina by using a cotton swab slightly wetted with rubbing alcohol. Be very careful in your clean up, because if you put too much
alcohol it may affect your enamel colors! To obtain the best results, it is necessary to do your weathering in multiple steps. By adding and removing
the various washes, you will be able to balance properly the look of your spacecraft.
For the application of washes, the basic rules is to avoid solid black. Cut your black with a bit of white, and if necessary warm up your mixture by
adding some brown to it. Since most of my model is quite dark, I went for a light gray wash first. Later on, l adjusted my washes with darker tints
applied to specific sections of the surface. Let your weathering dry for a while. If you find that your model looks too dirty, you can always remove
some of your patina by using a cotton swab slightly wetted with rubbing alcohol. Be very careful in your clean up, because if you put too much
alcohol it may affect your enamel colors! To obtain the best results, it is necessary to do your weathering in multiple steps. By adding and removing
the various washes, you will be able to balance properly the look of your spacecraft.
Later on, l came back picking up details with the paintbrush to highlight some of the surface features, like maneuver jet nozzles and head sensors. The last step was to glue together the smaller components to the shoulder assemblies. So after a few enjoyable hours of modeling fun, my little Syreen was installed on its display base and was looking quite good. That modeling project was very straightforward, practically no putty, no time wasted on tedious clean up, just a nice model to paint and enjoy. |
![]()
This page is copyright © 1998 Starship Modeler. Contents copyright Marcel Bastien.
"The Jovian Chronicles" is a trademark of Dream Pod 9.
Last updated on 24 March 1999