
|
By Brad R. Torgersen - images & text © 2001
|
|
Image: Aft portion of saucer Image: Rear of secondary hull
Image: Perspective view: engineering hull Image: Perspective view: bow-on
Image: Bottom of the saucer Image: Deflector dish
Image: Top/rear Image: Top/rear of saucer |
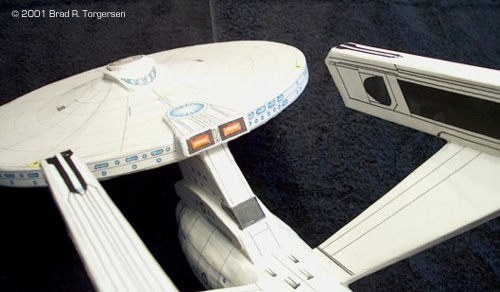
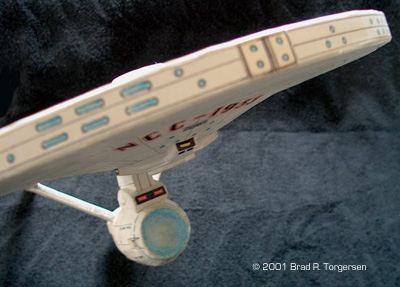
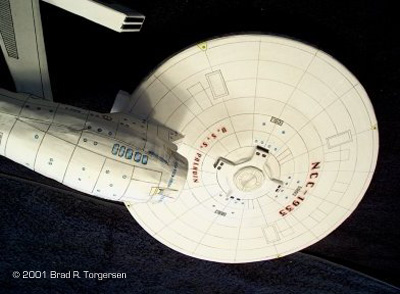
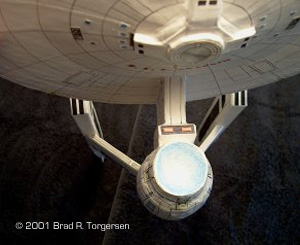
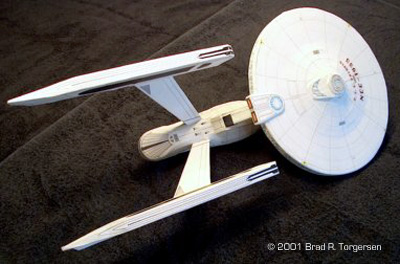
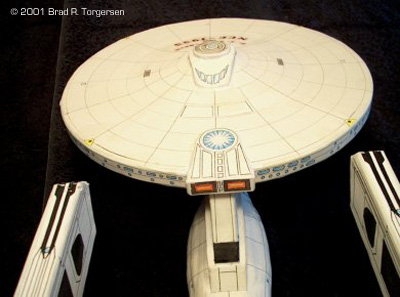
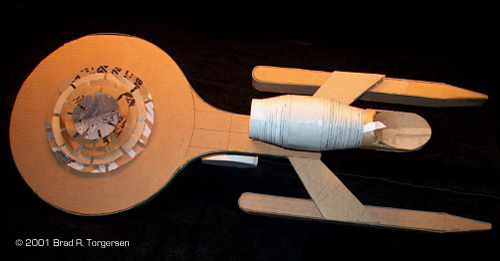
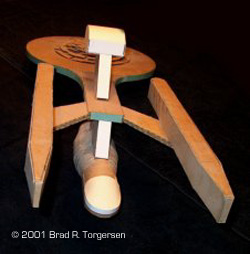
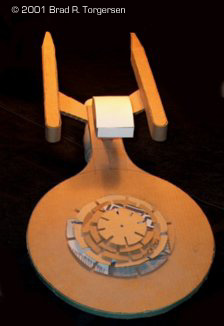
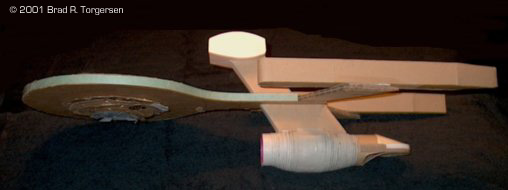
The U.S.S. Paladin, NCC-1933, is my latest incarnation of the so-called Constitution-class '2270 Refit' design, first seen in "Star Trek: The Motion Picture®". I built the Paladin in 1995. I've been building and rebuilding this design (my favorite among all the various Enterprise designs, from film or television) since 1987. With each new version (I think the Paladin is #5?) my technique, scale, and detail gets a little bit better. But as many other modelers out there can probably attest, the quest for perfection never ends, so this probably will not be my last attempt at the motion picture-era Constitution vessel. The whole reason I first started building Federation ships from scratch was because I was very unhappy with the plastic model kits. A seasoned military airplane modeler, I was not pleased with the flimsy plastic NCC-1701-A models I had bought in stores. I wanted something that I could throw around the room a little and not have it fall to pieces. I also wanted something a bit more manageable as far as size goes, and that I could fit on my desk. So, I set about trying to piece something together with what little material and tools I had back in 1987. I still use pretty much the same materials and tools to this day, and so far as I know my methods and application are pretty unique. The U.S.S. Paladin is one of my best 'paper and cardboard' ships, though I have built Excelsior-class and Miranda-class ships, as well as a host of my own 'Fanship' designs, using the same processes and materials. To give you an idea of what these beasts look like with their skins off, I have included images of my self-designed Archer-class Fanship design in its nude form, prior to paper-and-glue 'whitewashing'. As you can see from the photos, [click to see: (1) (2) (3) (4)] these ships really are built from packing box and cereal box cardboard stock! No fancy art store grade stuff here. These models are glued together using waste product I scrounge from the paper recycling bins at work and at home, meaning zero out of pocket expense. The Paladin began like so many of my Federation designs: with the saucer. I used a compass to draw out 10" circles on flattened cardboard carton boxes, then cut the circles out using ordinary scissors. Next I glued together several stacked sections of that same cardboard, and used the stacks as spacers between the top and bottom 'hulls' of the saucer to yield good thickness. My adhesive throughout the project was ordinary Elmer's brand white glue, and I let each 'module' of the ship dry at least several hours to a full day before incorporating it into the overall build. Also, most modules had to have pressure applied to prevent warping during drying. To this day, warping is a big drawback to this kind of model building, and I've had lots of models go south on me as they warp during drying! Best solution: be patient, let individual pieces dry thoroughly between glue sessions, and stack books or other heavy stuff on them during drying so they hold shape. While the saucer was drying, I set about building the warp nacelles. Using a 10-1/2" long cardboard pattern which I had designed around the basic shape of the nacelles from the NCC-1701-A schematics in "Mister Scott's" I drew up four copies on cardboard box carton stock and then cut them out. Again, using more carton board, I created 'stacks' which gave the nacelle's some thickness, and then set them aside with the saucer to dry. While the nacelles dried, I went to work on the secondary hull. Now, I will say here and now that I really HATE the secondary hull. If for no other reason than trying to render its curvy form using 'straight' paper stocks of varying stiffness is just plain HARD. And it's impossible to get things totally smooth. You will have, no matter how hard you try, some degree of 'bumps' when you're all done. The secondary hull on the U.S.S. Paladin is probably the least 'bumpy' I've ever built, and that is saying something considering that it is still pretty irregular. Alas, that's the nature of the beast. My method for creating the curves on the secondary hull is to take cardboard carton stock and crimp it in-line with the natural 'accordion' shape inside it, rolling the properly crimped board into a more or less cylinder. (I have later used the cardboard tubes from tinfoil and plastic wrap packages, which work really well!) Once the rolled board is stuck more or less into its cylinder shape, I start wrapping strips of much thinner card stock around the main tube, gradually thinning the width of each strip as I go, so that I build out the forward bulging of the secondary hull in an almost pyramid-step fashion. (the pictures of the unfinished Archer-class show this build technique pretty well.) This was a protracted and exhausting process that took several days to get finished, because you need to let the glue dry as you go. Wanting to get away from the secondary hull before I went bonkers and tore the thing up, I went back to the saucer section and began its almost-as-annoying central bulge build. Again, this is tough to do because paper and card stock do not lend themselves to curved shapes very well. The trick is to cut successively smaller 'circles' of cardboard carton stock that will stack on top of the main saucer itself, then use a scissors or other blade to 'gut' out that accordion paper stuff inside the cardboard itself, and do so along the edges of each smaller circle while leaving the middle intact. Then clip little notches in the edges of the circles, and then stack then larger-to-smaller on top of one another, and glue that stack to the main saucer. (These stacks can be seen on the Archer-class very well!) What you end up with is another pyramid-step style of build, kind of like the secondary hull. I made sure to use a sharpened pencil to poke through the holes left in the center of each circle by the compass, making sure all the circles aligned properly. It's best to do one side of the saucer and then let it dry before doing the other. And if there is ANY time when the saucer will warp and ruin, it is during this phase! In my experience it's not rare to build two or even three saucers in a row before I get one that does not warp at this stage! While the nacelles, saucer, and secondary hull were set to the side to dry or otherwise 'cure' for several days--in order to control or avoid warping--I did the relatively easy chore of cutting out cardboard for the dorsal structure. This would be used to connect the secondary hull and saucer. I also cut cardboard for the warp nacelle pylons, used to join the nacelles to the secondary hull. These are super-easy to make because they are flat, angled constructions. They are also 'laminated' in that I used super-thick card stock, like the kind they make hardbound book covers out of, at the center of both pylons and in the center of the dorsal structure. On top of that super-thick and sturdy board I then glued down thinner board as well as carton stock for thickness, giving great strength to items that had otherwise been way to flimsy on the plastic NCC-1701-A models that I had built. |
|
Getting back to the saucer, the final step in completing and smoothing out the central bulges is to glue down the gutted and notched paper edges of the successively smaller circles of card stock centered on the dorsal and ventral surfaces of the saucer proper. This begins the 'smoothness' effect. Next step is to smear glue all over those central bulges and then paste down wedges of thicker card paper, spoking radially out from the centerpoint of the bulge and the saucer. Card paper stock is best because it really yields a nice smoothness that will almost entirely conceal the true step-built structure beneath. Using lots of glue also helps because it softens the cardboard and will harden everything into its newly 'curved' and 'smooth' shape when dry. With all of these primary parts in place, it was time to start putting them together.Step 1: Mate the saucer to the secondary hull with the dorsal structure. This is much tougher than it looks because you don't want to wind up with odd angles that have the saucer 'drooping' in regards to the lines of the secondary hull. There is a side-on picture of the U.S.S. Paladin here that reveals that there is still some 'drooping' going on; a fact that will probably drive me to attempt this design again at some stage. Anyway, along with trying to avoid drooping, I was trying to keep the secondary hull centered on the dorsal structure when looking at the ship face-on. It's too easy to have the secondary hull be too far to the right or left. Once it was just right (or as good as I could make it!) I let it sit in place, using elastic bands to hold the components together while the glue dried. I used LOTS of glue on the joints between the saucer and the dorsal structure, and the dorsal structure and the secondary hull. This pays off because when the ship was done, I could literally drop it on its beak and the thing would not even crack. Again, I build these things to be sturdy so I can throw them around. I hate being delicate with models! Step 2: carve out the sloped shuttle bay doors and the concave portion beneath them. I used a serrated kitchen knife for this. I just cut angles at the rear of the secondary hull, one from the top and one from the bottom. Paper card stock was then glued into the wounds until nicely curved surfaces remained. As with the curved saucer section surfaces, lots of glue helps because it softens the cardboard to the shape you want, and then dries that shape rock-hard when done. Step 3: Mate the warp pylons to the secondary hull. This was perhaps the trickiest part, and it all had to be done by eye alone. It's easy to place the Pylons too far forward or too far aft, give them the wrong angle, or not seat them deep enough into the cardboard of the secondary dull. A carpet razor was nice because it carved good, deep notches in the secondary hull into which I could stick the small ends of the nacelle pylons. I dumped in a ton of glue too so that it would all set up right when it dried, and then I played with the angling for a few hours (at least) to get it looking the same as the schematics in "Mister Scott's". If I recall, even after this all dried up, I realized my angles were wrong and I had to tear it all out and start over again! ARGH! Step 4: Mate the nacelles to the pylons. Again, easier said than done, and all by eye. Same as the last step, with similar frustrations. Case in point: the Paladin has a port nacelle that is placed wrongly, perhaps a quarter of an inch further aft than the starboard nacelle. What's more, the port nacelle is drooping ever so slightly!! ARGH! Flaws I did not see until months after I was totally done with the ship. I probably could have ripped the nacelle off and tried again, but I did not have the energy for it. I figured I'd try another ship at some stage. Step 5: Finish the 'open edges' off. This whole time the ship looks pretty ugly because the entire edge of the saucer, the dorsal and ventral surfaces of the nacelles, and other structures, all were wide open with only the stacked board in between the main panels to give them proper thickness. Using stiff card paper stock, I scissored out long strips of edging material that was glued along these open surfaces, to totally enclose each component. Likewise, I used the same card paper stock to create a shallow cone which was placed point-aft into the front of the secondary hull to form the concave navigational deflector dish. At this point, the ship was really starting to come together, and was looking nice. The unfinished Archer-class ship photos show what the Paladin looked like at this point, with all open space closed up by finishing panels glued along joints. Step 6: Cosmetic structures. The bridge. The ventral saucer sensor arrays. The impulse deck. The tail 'fins' on the warp nacelles. And especially the photon torpedo bay at the base of the dorsal structure. All card stock, all easy to cut, glue, and forget about. But I had to wait until the entire thing had dried totally for three days before I dared to touch it. Step 7: Whitewashing. I learned early on that even heavy typing paper is not thick enough to get rid of the dark browns and other colors of the cardboard. Like house painting, it takes two 'coats' to get a good 'finish', so before ANY artwork or other drawing could be applied, I had to paste on a layer of plain white paper from bow to stern. This was very time consuming, but therapeutic. I'd smear and wipe one whole side of paper section after paper section, pasting them to the ship one at a time. Each section overlapped with the others so that the 'whitening' would have no gaps. When it was all done and dried, this initial whitewash increased the overall strength of the model quite a bit. By this time I could drop it, knock it around, and it would stand up just fine. Step 8: Artwork. This is where "Mister Scott's" paid off big time because I could literally copy each and every line from the schematics onto the outside of the ship. Using more typing paper, I began to shape and cut out 'panels' upon which I drew in the details of the ship--in full color! Obviously these could not be tactile details, but they would look good if done well. The compass was used again, with a black pen taped to it, so I could draw out the perfect circles of the shield grid on the saucer. A circle and oval template out of my old drafter's kit was helpful too when doing portholes and other windows. Each completed paper panel was then smeared with glue on the clean side, very much like a wet decal, and then carefully placed and pressed into the hull of the ship. The glue would let each panel slip around for a precious few seconds, necessary to align each panel correctly in its place. Again, like decals. This entire process took many evenings, if not more. Where I could duplicate drawn panels, I used a photocopier at work. This worked especially well in the case of the panels for the warp nacelles, though after six years the toner is flaking off. Annoying. As always, the ship was allowed to dry. Overnight. In the morning, TA-DA! The U.S.S. Paladin, ready to explore strange new worlds!Well, that's about it. I adore the Constitution-class and have enjoyed making these 'cardboard and paper' models for over fourteen years. Each one gets a little bit better, and each one is just a bit more frustrating while also being a bit more fun! |
|
![]()
This page copyright © 2001 Starship Modeler™. Last updated on 23 October 2001.
![[Warp speed, Mr Sulu!]](brt_constitution-refit_fore05.jpg)
![[Click to enlarge]](brt_constitution-refit_aft02.jpg)
![[Click to enlarge]](brt_constitution-refit_angled04.jpg)
![[Click to enlarge]](brt_constitution-refit_angled05.jpg)
![[Click to enlarge]](brt_constitution-refit_bottom01.jpg)
![[Click to enlarge]](brt_constitution-refit_fore06.jpg)
![[Click to enlarge]](brt_constitution-refit_fore03.jpg)
![[This gets no bigger]](brt_constitution-refit_fore04.jpg)
![[Click to enlarge]](brt_constitution-refit_fore07.jpg)
![[This gets no bigger either]](brt_constitution-refit_side01.jpg)
![[Click to enlarge]](brt_constitution-refit_top01.jpg)
![[Click to enlarge]](brt_constitution-refit_top04.jpg)