
|
By Jack Wendt - images & text © 2001
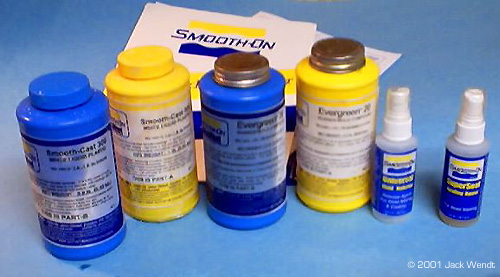
Whereas I have been vacuforming for many years, I just recently got started in working with resin. This is a messy and costly form of our hobby, but can have some surprising good end results. The product I used on the recommendation of fellow contributor to this site, Vince Hoffman is a resin and rubber produced by Smooth On. Specifically, Smooth Cast 300 (resin) and Evergreen 20 (rubber) were what I used for the purpose of the ship and this article. The urethane rubber is sometimes referred to as room temperature vulcanized rubber, or RTV. If you are already proficient in casting, then skip the article and go straight to the pictures. If you want to learn what I have learned read on. First, some terms that I will use:
Of course, you would generally think of the only mold being made of the rubber, but other things can be used. All resins and rubbers come in 2 parts, a part "A" and part "B" resin and the same for the rubber. Some resins and rubbers are measured by weight. Others are an equal mix of part A and part B. Equal mixed resins and rubber will be easier to use. There are at lest 2 vendors, Smooth-On and Ace Resin that have a starter kit that comes with equal amounts of resin and rubber, as well as a sealer spray and mold release spray. Smooth-On is the only one I have tried so far. Smooth-On has distributors in various states, and they send you a very complete guideline to getting started in this hobby. Ace has not updated their site in over 5 months (at the time this was written) so some of their information is incomplete. Synair Corporation, who develops Poly Cas,t does not list a starter kit. Once you have your resin, you need to acquire some measuring spoons and cups, as well as a digital timer. You do not want to "guestimate" proportions. The mixtures to properly cure must be equal 50/50 of part "A" and part "B." The mixing time must be strictly adhered to, so you need the accuracy of a digital timer. If the resin or rubber do not cure, it will remain tacky forever! You mix the two parts of your resin for at least 1.5 minutes. You then have 1.5 minutes to pour your resin. A couple of minutes later you should see a white film beginning to appear. While you are mixing the resin, you may feel heat generating in the bowl, if the bowl is thin enough to transfer the heat. Once the total of mixing time and pouring time has passed, you should be able to remove the cast in about 5-10 minutes. The urethane rubber is another story. If it is not mixed right, you just wasted your time and money. What to do the mixing in? You should start saving up some of those disposable microwave dishes as well as yogurt cups, sour cream/whipped butter canisters, and of course everyone's favorite: the trusty film canister. Actually you can mix in about anything; it is just whether you want to reuses the same mixing bowl again. The types of mixing bowls just listed are made of the same type of plastic that can only be bonded with epoxy glue. This means that once the resin or rubber has cured, the left over amount in the bowl can be easily removed, but do not throw the leftovers away. You can also use essentially any container that has a flat surface. The purpose of the flat surface is that on small lightweight blanks, you will need to anchor them to the bottom of the bowl with a drop of glue. If you do not anchor the blank, it may float up in the rubber before it is cured. The glue can be epoxy, white glue, or "CA" superglue. Unless you are doing an extremely big project, you do not have to wait to de-mold as required in the literature. According to the literature, the Evergreen mold will cure in about 15 hours. On all the parts related to this story, I never waited more than about 6 hours. So how do I know how much rubber or resin I need to measure out? Ah don't worry about it. If you follow the mixing instructions precisely, then you can add layers to your resin and rubber. Just remember to mix/stir for the entire time that is recommended. In addition, you can keep little blister packets, such as for medications, cosmetics, film canisters etc, for your left over resin. If you have a lathe than a few film canisters of left over resin can be turned to produce new blanks. For wood or plaster blanks, you will need to spray a sealer that is included in the starter kit, to fill the pours or the rubber will stick to every detail of the porous object and ruin the mold. For all blanks, a light coat of release is needed. Do not use too heavy of a coat of release or your cast will come out looking like an orange peel texture. The aerosol spray is easier to control than the little squirt bottle that comes with the starter kit. Orange peel is a term that refers to having sprayed in heavy coats of too much paint on a model resulting in a rough texture. This is perfect for a shadow ship, but not a '57 Chevy. Take a small brush and brush the release in to the crevices that the spray might miss.
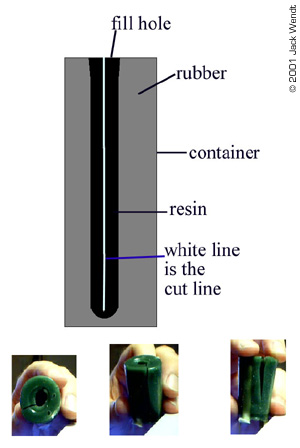
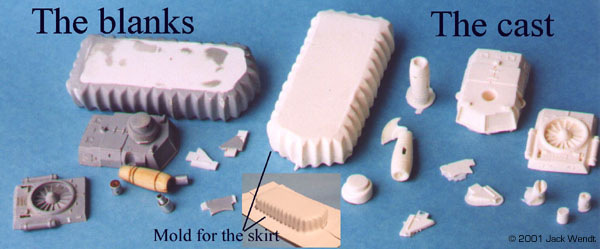
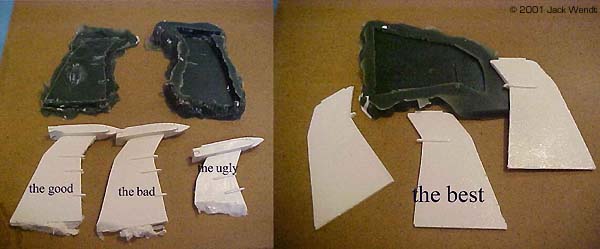
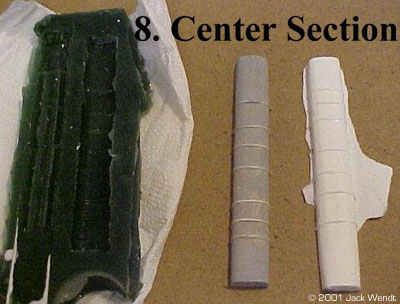
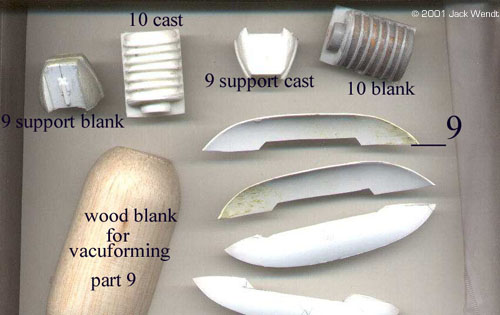
According to the manufacture, the rubber and resin once shipped should be used right away. The spokesman stated that although the bottles are sealed, oxygen and water vapor would eventually enter the sealed containers and ruin the product. Therefore, I suggested that you bag the bottles inside of one or two Zip lock bags. Store the casting material in the coolest, driest part of your house. Reseal the lids immediately after pouring out a measured amount. These tricks seem to work somewhat, as I have some resin and rubber that are about 6 months old, and I am in Texas. Now there are 2 types of molds: One sided and 2 sided. If a part can be produced in a one sided mold, then do it. It will be a lot easier, and there will be less cleanup. If it has to cast in a 2-part mold, be prepared for some flash cleanup. One part molds are more susceptible to the blank rising into the rubber. This is the reason for attaching the blank to the bowl with glue. ![[2-part mold]](jw_excal17.jpg) When making a 2-part mold there are a few thing that needs to be done. First the blank has to have clay pushed around it so that the rubber will only cover approximately half of the blank. Second, you will need to put some locator pinholes with the end on a pencil or popsicle stick so that the 2 molds will align properly. You do this my making a few shallow gouges in the clay. Once one side of the rubber is dried, a coating of mold release or petroleum jelly is sprayed on the blank and the mold, otherwise the newly poured mold will bond with the previously poured rubber and blank. Rubber bands hold the 2 sides of you mold together when you are ready to pour your resin. For most things, there is an easier way to cast 2 sides with a one mold. Again, it is far easier thing to cast as one side then trying to cast something two sided. Look at this drawing and imagine a cigar. The end of the cigar is where you would light it will represent the hole in which the resin is poured. The end of the cigar is attached to the bottom of the bowl with glue or a screw if the item is light in weight. The cigar is stood on its end and rubber is poured all around the cigar from top to bottom. Once the rubber has cured, the rubber and the cigar are removed from the bowl. Take a new, sharp blade and cut down one side, a clean cut, touching the blank. Cut down the side at least 90% the way down to the opening where the rubber is poured. What we want to accomplish is to have a straight cut running down one side of the cigar, almost to the point where the cigar would go in your mouth. Doing this may result in a cut, or scratch to your blank, but you now will only have one seam with little or no flash. In this insert, you will see a model of a hover tank. The engines for this tank were cast as one piece. The only significant area of clean up is the spout, where the resin is poured. The mold for these engines is the picture inserts in this image. The bowl for these engines was a film canister. In such a cast as the one illustrated, cut the bottom off the film canister, and use it for keeping the molds shape and containing leakage. In the preceding paragraph, I showed a part cast in 2 part molds. Where the pour hole or spout is located, I could have anchored the same part to a bowl with a dab of glue. Then I would have poured the rubber around both sides of the blank, covering the top. Once the mold cured, I could have cut a slice along the backside that is covered up by one of the pieces. On to Building Excalibur Part 1 was made in layers and sanded to the right shape. The small fins on both sides of the top of the engines actually casted fairly well considering how small and thin they were - .015". Part 2 consisted of 2 layers of .040" thick plastic sheet, sandwiching a slightly smaller in diameter but thicker piece of .075". Then small strips of styrene were used to detail between the 2 .040 pieces. I tried casting part 2 as a 2-part mold. I then cast it as a one-part mold, and finally tried casting part 1 and part 2 as one piece. 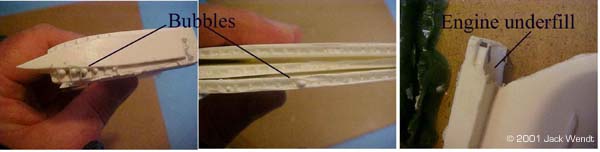 To be very honest, the part I needed the most, part 2, was the hardest to cast. If I were to do this model again, I would cast the engine as two one-sided pieces, or a one-piece cast as described using the cigar example. The problem with the wings, part 2, was the indented area always trapped air, making it hard to fill consistently with resin. To do something like this, I would suggest leaving off one of the .040 ends, and casting the rest, then use sheet plastic to attach the other .040 side. Removing part 2 from either a 2-sided mold or a single sided mold can lead to warping. This is a common complaint from model builders who buy resin kits. The warping comes generally from thin/long/wide pieces. This is also seen in the above picture. In my case, a heavy weight will reconfigure the wing. Hot or warm water or a hairdryer is suitable for reshaping most resin pieces that have been warped in the mold making or shipping process. Earlier I showed you a picture of the hover tank. The entire skirt blank was vacuformed and used to hold the resin. As long as there is minimal detail, you can cut corners as far as cost in the mold department. With something like the skirt of the tank, I made 2 cuts on the tip of the skirt at both ends. Scotch tape held the area closed until the resin hardened. After the tape was removed the mold was flexed, and the cast popped out. Minimum flash was found at the 2 cut areas. I also vacuformed a box that was put inside the skirt so as not to use as much resin. Remember a sheet of styrene .040 thick, 4'x'8' in size, is only about $15. ![[Parts 10 & 4]](jw_excal09.jpg) Part 10 exists in 2 places but are of different sizes. Part 8 is the long thin section that runs the length of the ship. These were cast as single sided molds. Part 12, which consist of the tubing that runs under part 8, was scratch built, and cast as a one-sided mold. I used .015 for the little fins that separate the tubes in part number 12. Due to the fins being so small, they did not cast well.
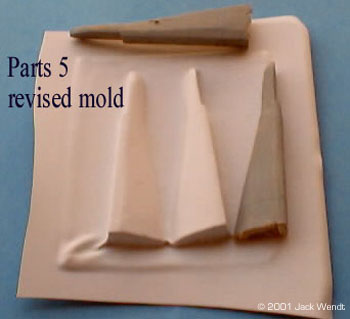
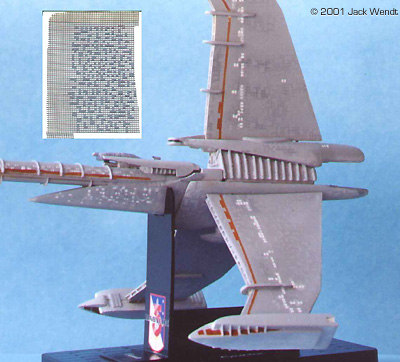
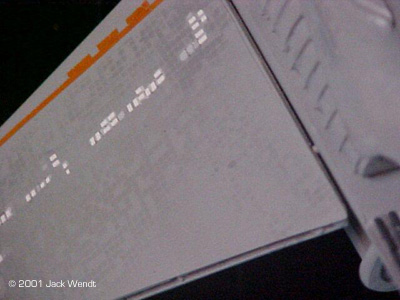
Part 9 and part 11, which are the shielding to parts 10, were vacuformed. The mold for the vacuforming was made out of balsa wood. Attaching part 8 to the forward part 10 required an aluminum pin, as I did not want the front part to break. In fact, if someone builds a bigger version of this, they should probably run an aluminum or brass rod the full length of part 8. This can be seated in the resin before curing. I also used pins to hold the wings (part 2) to the fuselage section, (part 5 and part 3). As you can see in the photos, the wings are not attached and were left that way on purpose. Molding part 5 was extremely difficult but challenging. This is because it has a "v" shaped section at the front of this part. Before I proceeded too far with his piece in casting, I made a copy of it by vacuforming. The forward section of part 5, where the landing/docking bays (part 7) attaches are an open "v" shaped area. This open area proved fragile in casting in rubber, and then pouring resin. Part 5 was built, then split down the middle with my band saw. Due to the unleveled area of the rear of part 5, rubber did not work. I then re-vacuformed both individual sides of part 5 and poured resin in these molds. I was still not happy with the finished product, but went ahead and cleaned it up. Later after this model was finished I redid part 5 a different way. After all the parts were cast it was time to clean up the model. This was not as hard as you might think, because resin is easy to sand. Gluing is another thing. Lots of superglue and accelerant was used. Lots of Squadron Putty was used. I cleaned up most of the areas fairly well, but I know the finished product will not win any awards. Painting and Marking the Excalibur Painting the ship correctly was a challenge. Here is the primary site in which I found the most reference images: http://hyperspace.isnnews.net/3dsupplies/excalibur/. I found some people's personal cgi's they had made. Unfortunately, a lot of these were not very useful. This is probably because the series only consisted of 13 episodes so references for making their own personal cgi's was limited. The over all color of the ship is various shades of gray. I used Light and Dark Ghost Gray, with a little black or white paint mixed with the grays for shading. The ship has a final coat of Future Floor Wax. I made a little template using nylon window screen. I filled various square holes with white glue. Once dried, I used this template to painting varying shades of panels on the model. The template can be used many times. White waterslide decals, designed for stripes on model trains, were cut for all the windows. I sprayed a sheet of white styrene with the color I thought the brown trim should be. This was scanned in to the computer. Lettering for the ship is in a "Kelt" font. Once lettering and colors were done, the finished image was taken to Kinko's, where they put the image on a waterslide decal sheet. The first Excalibur took around 200 hours to build. This does not include research time, (surfing) or waiting for the rubber molds to dry. The ship is 14" long, about 8" wide, and about 9.5" tall. From what I can tell it looks fairly accurate in size. I do not have any major changes that I would make in a second model, other than the 3 intakes, parts 13. Again, accurate photos were not available, and I mainly used screen captures. The second ship built to the point you see in this picture took less than 6 hours including pouring the resin. You will note that part 5 was cast without the forward "v" shaped area. The "v" shaped area was bent and cut to length from styrene sheet. This 6 hours also includes all the other resin pieces with the exception of parts 13 and the vacuformed pieces. Due to experimentation, I went through about $80 in resin and rubber. The starter kit was about $25. The future purchases were $20 for resin or for rubber. A lot was wasted on experimentation/learning, though as said earlier, some bits can be recycled into other projects. I learned a lot working in resin, and hope that the article will help others. |
![]()
This page copyright © 2001 Starship Modeler™. Last updated on 14 November 2001.
![[Click to enlarge]](jw_excal16.JPG)
![[Click to enlarge]](jw_excal22.JPG)
![[Click to enlarge]](jw_excal01.jpg)
![[Click to enlarge]](jw_excal04.JPG)
![[Click to enlarge]](jw_excal07.jpg)
![[Click to enlarge]](jw_excal12.jpg)
![[Click to enlarge]](jw_excal21.JPG)