
|
|
|
|
By Steve Neisen © 1998 |
|
I built this model with the same kits ILM used to build theirs. It's exactly the same size of the studio model. Special thanks goes out to Tim Ketzer, a fantastic sci-fi builder who helped me locate kits for 'kitbashing' this project. STEP 1 COLLECT YOUR RESOURCES. It is very important to study the model from published pictures. I used the 'Star Wars Chronicles' book since it has the best pictures of the studio model available. You can also find reference material in Shane Johnson's 'Star Wars Technical Journal'. |
 All pictures (c) 1998 Steve Neisen |
|
STEP 2 BATTLE PLANS. All right model generals it time to begin planning. Get out your check book and be prepared to spend over $100 on kits alone - if you do it the same way the studio did. I chose to build this one as the ILM guy’s did but hey, you can find 'greeblies' that fit from lots of kits you probably already have on hand (or from similar kits that cost less)! ILM (and I) used:
STEP 3 GETTING STARTED. To begin I gathered all the pieces from all the kits that were to be used. You'll need
|
|
STEP 4 WINGS: The first thing I did was add about 1 cm of thin sheet styrene to the outer diameter of the Darth Vader wings. I also added short lengths styrene tubing around the add-on pieces to simulate the same detail of the studio model. |
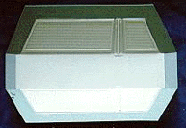 Before assembly |
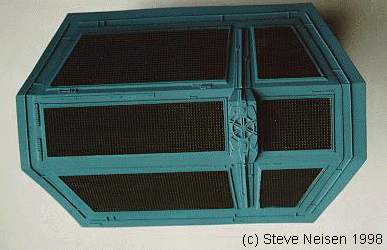 After assembly |
|
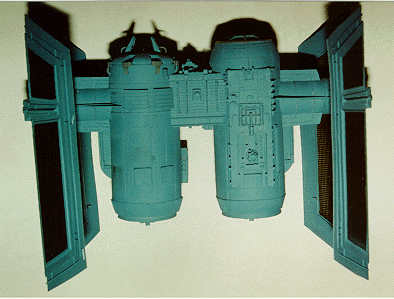
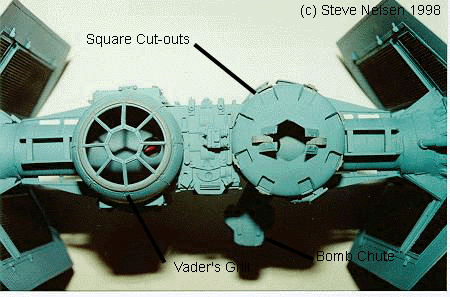
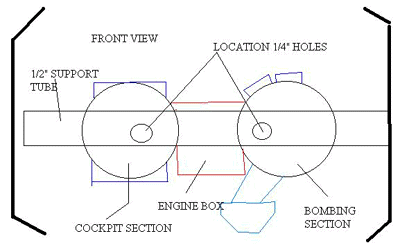
STEP 5 WING SUPPORT/BODY TUBES: Next, I cut the 1/2" tube to about 9" long. This became the center support tube running through the two body parts and engine box. Then I cut 2 sections of the 2" tube in equal 4" lengths. I drilled 1/2" inch holes through the 2 bodies leaving about 1/2" to the front of the body sections. When I finished drilling the holes in each I slid them on the support tube temporarily. I then marked the support tube for two 1/4'-diameter locating holes - one in the cockpit section the other in the bombing section. STEP 6 COCKPIT: This is made from one of the 4" tubes, a 2" hemisphere, and the 'grill' from the Vader's TIE fighter. I cut off the top of the hemisphere so the grill fit snugly on it. Then I took a scribing tool to the 4" tubes and scribed all body panel lines on both, sing my references as a placement guide. I placed the cylinders into a door jamb and used the edge as a guide to achieve straight lines lengthwise on the body tubes. I used a flexible plastic ruler as a guide to scribe lines around the circumference of the tubes. |
 The business end |
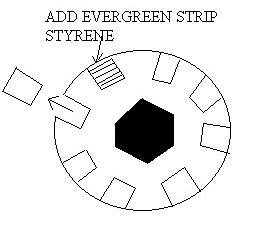
STEP 7 TORPEDO LAUNCHER/BOMBER BODY FRONT: Once again, I thoroughly studied my reference pictures. I cut out 8 equal squares from around the edge of the 2" flat dish. After this I cut a hexagon shape from the center of the dish (this is were the torpedoes are fired). After I finished cutting, I sanded the dish smooth and placed small sections of lined styrene behind the little squares I cut out - checking my references for placement. |
|
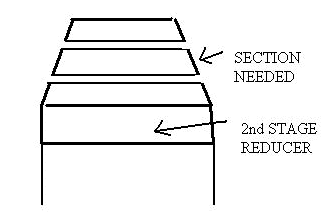
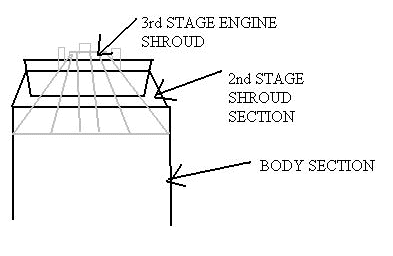
STEP 8 ENGINE BOX : This is the box located between the two bodies. I have checked various references and they all agree that this is the engine. I placed both the bodies on the support tube and marked their inner placement. I then used sheet styrene following my reference pictures and built up a basic box. I marked each piece accordingly TOP, FRONT, REAR and BOTTOM and set them aside. STEP 9 REAR BODY ASSEMBLIES: This is where the parts mentioned from the 2 Saturn V kits are used. I measured and cut the appropriate sections from the 2nd stage reducer to match the diameter of the body tubes (these are the pieces that have all the ribs). These pieces gives the bodies the taper in the rear section. When this was done I took an LEM base ring, inverted it and slid it into the ribbed sections. The end stuck out but I sanded off the extra to achieve proper size. Before gluing the two pieces to the rear sections I placed the third stage engine shroud in the rear of the body tubes, then attached the other assembled pieces. I dry fit all the pieces together before using any glue to get a understanding first of how they fit. |
|
 Bombing shaft |
STEP 10 BOMBING SHAFT: I scratched this using sheet styrene. I drew the basic shape from resource pictures and made blueprints on tracing paper. I then transferred the drawing to styrene and cut the pieces out. I added bits and pieces of evergreen and small pieces of styrene to match details as closely as possible. |
|
STEP 11 ASSEMBLING THE MAIN PIECES: I slid the TIE Bomber's body and bombing sections on the center tube and glued them into position. I then assembled the box between them from the styrene I just cut. Next I sprayed the inside of the body assembles and the section of 1/2" tube Flat Back. When the paint was dry I ran a RED and Blue wire so that it is visible behind the cockpit grill. (I don’t know why it's there but its what’s on the ILM model). I attached the cockpit and dish sections to the front of the body tubes, then puttied and sanded everything for a smooth surface. Finally I scribed details on the cockpit section to match photographs. STEP 12 WING ATTACHMENT POINTS: After once again checking my references I built up the wing connectors using strip styrene. I use bits and pieces to match the ILM model to the best of my ability. I started with the detail on the inside of the wings (Tamiya 1:35 scale cut track) then glued them to the 1/2" support tube. STEP 13 BOMBING SHAFT: I attached the bombing shaft on the bombing section next, ensuring its correct placement by ... you guessed it...CHECKING MY REFERENCES! |
|
 Aft End |
STEP 14 DETAILING: "Here's where the fun begins". I assure you that if you buy the kits I told you about you will find the parts needed to finish your TIE Bomber. If you can't find them, look in your spares box for ones that are similar -your imagination is the limit! Once again I made blue prints on paper and transferred them to styrene, cut out and built accordingly. For example to two boxes on top of the bombing section are scratch built as are the two rectangle structures on the cockpit body. Most of the other detail is from the kits I told you about!! Happy Hunting! |
|
STEP 15 PAINTING\WEATHERING : Hmmm what a unique color: 'blue grey'. I used 20% POLYSCALE Lt Gray (36270) 70% USSR Underside Blue (15200) Acrylics and added 10% distilled water for the air brush. I had to mess around by adding a drop of this and a drop of that to get the colors where I wanted them - just wing it the best you can. I sprayed the entire ship the blue grey color. I hit the inside lightly to accent the tube running through the two bodies, being careful not to paint the wires. I masked random panels and sprayed them with a lighter mixture of the blue grey last. This gives a nice depth feel to the finished model. I then masked off the solar panels and hit them with PLOYSCALE Flat Black. The Empire keeps their ships cleaner than the Rebels but any ship suffering the intense temperatures extremes of space must show some signs of weathering. I made small leaks along panel lines by masking the front panel off then lightly - I "MEAN LIGHTLY" - hit it at a 45 degree angle with Flat Black. Presto- there’s your leak. REMEMBER the Empire can only keep them suckers so clean when in the bay ... but after a long bombing mission on a Corrillian Corvette you might see signs of wear and tear. The Tie Bomber was a lot of fun building and special thanks goes out to Tim Ketzer who inspired me to build it. Stay tuned for Steve's next project - the Empire's All Terrain Armored Transport!! It measures 48 cm tall and is fully armatured, with articulated metal ball-and-socket joints suitable for STOP MOTION photography. |
|
| Copyright Notices |