
By Erin Lantz - images & text © 1999
|
![[Completed model]](el_merc_Overall.jpg)
|
|
^ The completed kit, from the back side. |
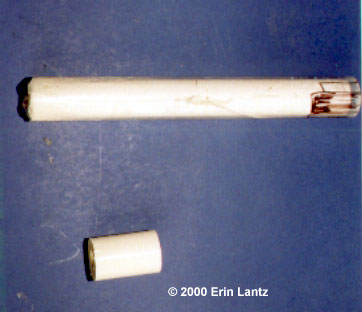
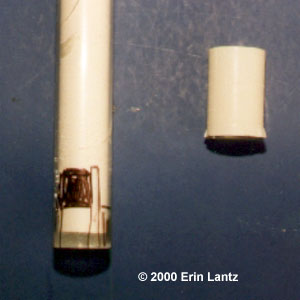
I opened the box to find inside 10 beautifully cast resin pieces, one photoetched sheet, one acrylic tube, and one short, small gauge piece of metal rod. The parts were all well packaged and none were broken or missing, and the resin parts were perfectly cast with not a bubble in any of them. The photoetched sheet for the tower section was etched from what appeared to me to be an unusually thick sheet of brass, but my experience with PE parts is limited at best. The ends of the acrylic tube were rough as a result of cutting it from a longer piece, but acrylic is notoriously hard to cut so this is to be expected. The three decal sheets provided included two of the same design for the rocket body and one small sheet for the capsule markings. All were beautifully printed and in perfect register.
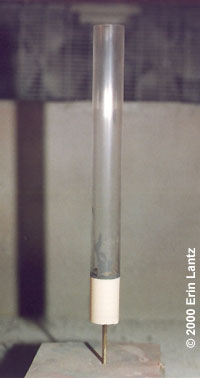
After cleaning and prepping the parts for assembly I studied the instructions to figure out how best to approach this kit. I decided that the capsule would best be built separately from the rocket fuselage to facilitate painting. The rocket's fins would also be easier to paint if left off, so I mounted them to some masking tape strips to be painted and so that they wouldn't get lost. The tiny parts of the escape tower also were mounted to tape strips to avoid losing them as well. I started the kit by painting all of the base color onto all of the kit parts. Red on the tower parts, and blackish blue for the capsule. The fuselage parts still had to be assembled, so they were painted later. Capsule painting was pretty straightforward with the only other colors used being a powder blue color for the single viewport and red for the stripe around the bottom of the capsule. I did some minimal drybrushing with flat black, but nothing really noticeable. Next I tackled the PE parts. After carefully cutting the parts from the trees with my modeling nippers, I sanded the tiny tabs left from cutting off with a file. Next I used two exacto knives to carefully bend the parts to the correct shape. Holding the part down with one knife along the fold lines, I pulled up and bent the part with the other. Once the correct alignment was achieved the part was glued to itself with superglue and a touch of accelerator. The prepainted rocket motors and fuel cell were then assembled as per the instructions and glued to the top of the mast. The small wire was then glued into the hole on the very top of the assembly. The only addition I made to this kit was the tiny conical cone to the top of the wire mast. It could be seen in my references and I figured the rocket wouldn't look right without it. I made the part by filing up a piece of styrene rod into a tiny cone, then gluing it to the mast top. My references (the few I found on the web) all showed a pretty plain escape tower, so I gave the whole assembly one more coat of bright red and left it to dry. Now that the capsule parts were all taken care of, I turned my attention to the fuselage and fins. Here's where I started experiencing problems. My first mistake was to apply superglue to the engine part and acrylic tube, then spray it with accelerator. DON"T DO THAT!!! Apparently acrylic doesn't like superglue, and it doesn't like accelerator even more! It was looking fine until about 10 minutes after spraying the parts. That's when the whole tube just started cracking from the bottom to the top. Not sure what caused it, the heat or the expansion, but it basically ruined the tube and the engine pod. I wrote to Glen at RealSpace, told him what happened and he sent me replacement parts in two days time. Excellent service, especially considering it was my fault. Once I had the new parts I decided to use JB Weld epoxy putty to assemble the parts. The tube was just a smidgen larger than the engine pod, so careful alignment is necessary to get the parts to look right. Mine slipped during curing so the parts weren't perfectly aligned when it dried. Oh well, at least it didn't crack again! Once the fuselage parts were dry I attempted to fill the seam around the engine pod and tried to fill the rough edge of the tube top. None of my usual putties wanted to stick to the acrylic so I chanced it and used superglue minus accelerator. Once the glue dried I sanded the parts smooth and the roughness of the tube end was gone. The engine to tube seam was rough but Ill just have to live with it, I'm all sanded out and the paint scheme hides most of the seam anyway. Next up was painting. I'd love to say it was as simple as spraying some white and black on the tube, but it gave me fits! I repainted the fuselage/engine pod 3 times before I finally found a paint that didn't either crackle, peel off, or curdle. Painter's Choice spray lacquer crackled as soon as it hit the acrylic, DAP brand white curdled and then peeled, and Krylon white primer didn't even want to stick! Finally I tried Living Color brand spray acrylic white and it dried ok, but the can I got was all chunky when it sprayed. I decided to just coat the thing until it was white and opaque, I was growing weary of painting it over and over. The chunks of paint were sanded off with a fine sanding pad and the finish finally looked decent. Once I had the white finished the black roll patterns were a breeze, if not a little confusing. You must really study the instruction sheet and figure out where the black goes before you start masking. I used the destroyed tube to figure the design out and I suggest the same technique for everyone else. I used a Sharpie marker to draw the design onto the spare tube and to figure out which design went on each fin. I numbered each fin and it's place on the engine, then masked and painted the black areas with flat black using my airbrush. Even after carefully masking the black areas I still got one stripe wrong! Thankfully the Living Color white covers well and it took only one coat to cover the remasked mistake area. Once the fuselage dried I sprayed a finish coat of Testors Gloss clear over the whole thing and let it dry overnight. The next day I applied the decals with very little trouble. I had anticipated some problems in applying the markings to the capsule's ribbed side, but with a little help from Micro-sol it laid down perfectly. One problem I had was if all four of the MR decals went on the ship or just two of each. I couldn't find any reference photos with two or more of these markings showing, so I only placed the MR7 decals on opposite sides of the rocket. |
|
If anyone reading this knows what they are and where they go, please let me know so I can fix it. Another problem was that the roll pattern and black stripe decals were just a tad bit too short to reach all the way around the rocket body, but it's not really noticeable when finished. I filled the gap in the stripe with a piece of the black stripe on the extra decal sheet and didn't bother with the roll patterns.
The final step of putting the parts together went well, with only slight rebending of the tower parts needed for a snug fit. The finished rocket was once again sprayed overall with Testors Gloss, then affixed to the base I had made for it before I had the kit. My problems aside, this kit is beautiful when done. For such a tiny box it sure does build into a nice size rocket, standing at 14" tall when done. It should look great next to my 1/72nd scale shuttle stack, that is if I ever get around to building the monster! Please do not let my experiences keep you from buying this kit, just learn from my mistakes and build it right from the beginning. I had never used acrylic tubing before and didn't know it was so touchy to superglue and certain paints. The kit itself is great and I highly recommend it to anyone looking to fill a gap in his or her real space rocket collection. If this one is any indication of RealSpace Models' kits, I'm a definitely a future customer! |
![]()
This page copyright © 2000 Starship Modeler™. Last updated on 11 February 2000.
![[What you get]](el_merc_Parts.jpg)
![[Capsule]](el_merc_Capsule.jpg)
![[engines]](el_merc_Engines.jpg)
![[Another look at the capsule]](el_merc_Front.jpg)
![[From the backside]](el_merc_Backside.jpg)