 |
|
|
|
By
Rob Caswell
|
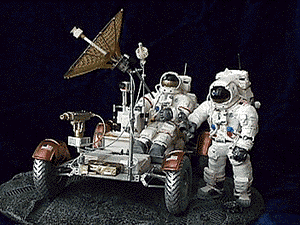 The manufacturer's buildup model. Our review buildup will displayed on the Building the Kit page.  NASA's "One-Gee Trainer", for astronaut Driver's Ed. |
I'm going to kick this review off in an unusual (but helpful!) way. In any review, be it a model
kit or movie, it's useful to know something about the reviewer and where they're coming from.
That way you get a sense of whether or not the reviewer's rants and raves are things that mean
something to you, or whether they're just part of the reviewer's tiny, obssesive world.
That said, let me give you some perspective. I was born in 1960, the year before Gagarin and Shephard rocketed into history. I was raised in an era when NASA's achievements were always on the front page. My exposure to the LRV was probably in My Weekly Reader (a nationally distributed school newspaper, of sorts). I was fascinated with it from that second, on. Back then, space models were a given. When a new piece of NASA hardware rolled out, you knew that it was only a matter of time before Monogram, Revell, or Aurora would put out a kit. So I waited, knowing that LRV kit had to be right around the corner. I must have more patience than I thought, given I had to wait 28 years! |
|
Sure, there were other LRV attempts. The first I remember was a rubber-band driven toy that came packaged with TANG. It was just about 1/48 (in scale with Monogram's LEM!), but it sorely lacked detail. In the early nineties, we saw the cottage industry take its first stab. Lunar Models released a REAL LRV kit, in 1/25th. However, its detail was not great for its scale. For instance, it had a cast resin High Gain Antenna dish. That just ain't right! Finally, in 1998, an LRV kit hits the market that gives the subject the treatment I always wanted to see - and then some! EVA Model's Lunar Roving Vehicle kit arrived in the mail... Opening the Box |
|
My first thought was, "Wow. I expected a bigger box." Contrary to the hype surrounding Godzilla, size doesn't matter. On opening the box, I found it stuffed with instructions and tiny parts. The total contents of the box include: six page illustrated instruction sheet, four bags of kit parts, one bag with mesh screen and resin HG antenna former, two bags of astronaut figure parts, a standard EVA Models decal sheet, a list of web links for LRV reference pix, and one bag with the huge resin base, a photoetched sheet, and thin styrene stock. In short, the box is packed. |
 The LRV box is densely packed and well-designed. |
|
My second thought was, "Wow. This is not a kit for the timid." There's a LOT of parts in this kit! And things like making the HG antenna are little projects within themselves. This kit is the cutting edge of contemporary modeling. It uses a variety of media to give you the best results possible. It's a complex kit, but it won't require any scratchbuilding. You get everything you need. It's just very intricate. My third thought was, "Hmmm. Some air bubbles and flash." But y'know, the only reason that stood out is because EVA's past kits have been so pristine. The airbubbles and flash on this kit are REALLY minor, and easily filled and trimmed. The casting is not as clean as, say, God could do... but it's pretty good for a mere mortal. (Poor Rob - my kit had no pitting or bubbles at all - Ed.) |

|
|
Fourth thought: "WOW! Look at the detail!" Yessir, the detail on the parts is quite stunning, in areas. One region of note (which isn't shown off on the EVA Web page) is that the sample bags are open on the top and full of rocks and soil. "Ooooooooooo." And each sample bag has a different collection of soil debris in it. That's the kind of detail we're talkin' about. Oh - and the mesh pattern over the wheels made me giggle like a delighted idiot. Man-o-man-o-man... The decals and photoetched parts. |
|
Thought number five springs into being - "Hey. Nice instructions!" The fully illustrated instructions are a step up for EVA. Unlike the chicken scratchings that accompany many cottage industry kits, these illustrations are detailed and rendered with care. They remind me of Revell's '60s-era treatments. They also include painting call-outs (Thank you, Chris!) and helpful hints. These are better instructions than you'll find in most mainsteam kits, as far as being useful to the modeler. Even before you begin construction, there are two steps I'd recommend. First, take an inventory of the parts to make sure you have everything. Second, hop on line and check out all the LRV references that the kits lists. Save those images in a directory so you can easily refer to them during construction. Also, grab the pix of the completed model off the EVA web page - it it could help solve construction and painting mysteries. By looking at these pix in advance, you'll familiarize yourself with the look and lines of the vehicle which can make construction easier. So, with the $120 price tag, I bet you're wondering how good a value can it be? Well... good! I'd say it's a fair price to offer for this kit. It's not a steal, but it's not over- priced, by any stretch - especially when you consider the care and research that went into EVERY level. Also consider that you get two figures and an EVA decal sheet. That's $50 worth of stuff, right there. As far as overall treatment, this is one of the best I've seen from a cottage industry company. It's very professional and the ball doesn't seem to have been dropped, anywhere. It's one of those kits that, the more you look at the components, the more impressed you become. It's going to be a while before I can start this kit (have to clear out the bench of current projects), but when I do, you'll be able to link to the Building the Kit page. Just watch for the announcement of its activation in our What's New Here section. |