
By Steven S. Pietrobon - images & text © 2003
|
![[Click to enlarge]](sp_mr1.jpg) Wow, what a trip down nostalgia lane. |
|
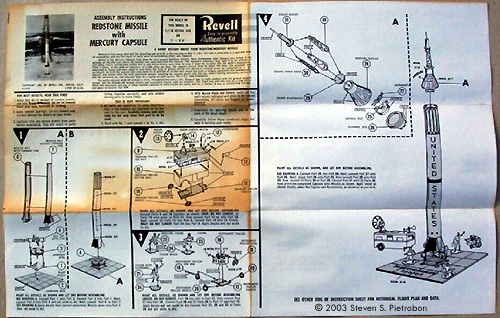
Image: Decals have yellowed with age Image: Instructions |
My kit is an original issue of the Mercury Redstone from Revell's famous Missile and Space series of kits, series number 1832, adapted from the Jupiter-C (1819) which was adapted from the Redstone (1803, 1832 in the Selected Subject Program, SSP). Also included with the kit is a small four page booklet on the Freedom 7 from McDonnell Aircraft Corporation (claiming the "First manned space flight in the free world."), a 12 page booklet on the Freedom 7 flight (Volume II in Revell's Master Modelers Club), and a small V-2 Master Modeler Stamp. All the parts were in a plastic bag, with no sprue in sight. My SSP (by coincidence I have the same initials!) Redstone kit has the parts attached on sprues. Most likely, the parts were pulled from the sprue in the past and the sprue thrown out. I put all the small parts in small plastic bags to make sure I don't lose any. The parts are slightly yellow, but otherwise look fresh and new. The kit includes the figures, instrument trailer, and tracking trailer from the Redstone kit. The figures could be used, but the two trailers might not be appropriate. They would still look good next to the vehicle though. The figures are meant to be glued to small flat stands, so that the figures can be moved around, although it won't look too good. It would be better to glue the figures directly on the base. One of my figures had a broken arm, which I thought was a bit of scrap plastic. Lucky I didn't throw it out. |
|
Accuracy Issues The launch stand is on a square base, which is missing the water nozzles and railway tracks for the gantry. The exhaust vanes on the Redstone are there, but not the rocket nozzle. The vanes go underneath a flat botton, which would need some sanding around the sides in order for the vanes to fit underneath. The top half of the Redstone is much shinier than the bottom half, showing where it had been adapted from the pointy nose Redstone missile. The Redstone is covered with fine detail, showing all the panels and bolts. The top 32 mm has no detail, as this is where the vertical B&W decal goes around the rocket. At 1/110 scale (Revell picked some weird scales back then) you can't expect too much detail on the capsule, but an attempt at the shingles was made. There are also what look like scratches that go across the hatch and sides of the capsule. This is probably due to parts getting stuck in the die and being forced out with some sharp implement. I could not see a porthole. In a major inaccuracy, the sides at the bottom of the capsule are vertical for 4.5 mm, where they should be at an angle next to the heat shield. Strangely, the instructions don't show this vertical part! This was probably done so as to fit the seat and astronaut. If the capsule is glued to the Redstone, these sides would become the adaptor section, which is not part of the spacecraft. My recommendation would be to glue the capsule to the Redstone and fill in and smooth the gaps. The launch tower trusswork is also much too thick. It might better to build the tower from scratch using thin wire. The clear part of the decals have yellowed with age and should not be used. The decals that don't have a clear part could be used. The small red decals with white writing are unreadable. Since I can't read the writing, I would have to guess what the correct writing is. The Freedom 7 decal is also much too large. Conclusion This kit would look great next to Revell's 1/110 Mercury Atlas (available as an SSP), although I somehow would feel guilty about building up a rare and expensive 40 year old kit! For collectors this a great kit to get, although it has some problems (which can be easily fixed) in a buildup. For those not wanting to commit sacrilege or with smaller budgets, an alternative is the 1/144 Mercury Redstone from RealSpace Models for only $20. RealSpace also has a 1/72 Mercury Redstone for $40. A more expensive option is the New Ware 1/48 Mercury Redstone Conversion for $15. You'll also need to get a Glencoe 1/48 Jupiter-C for $10 and Revell 1/48 Mercury Gemini for about $30 on eBay. The RealSpace 1/48 Mercury Porthole Detail Set for $25 should also be used. Altogether, that's about $100 including postage, about what you would pay for a Revell Mercury Redstone! Many thanks to Steven's wallet for providing the review sample. Manufacturers and retailers, interested in getting your wares reviewed and publicized on a site averaging 3500+ readers a day? Contact us! |
![]()
This page copyright © 2003 Starship Modeler™. Last updated on 7 August 2003.
![[Click to enlarge]](sp_mr3.jpg)
![[Click to enlarge]](sp_mr4.jpg)