
By Vince Hoffman - images & text © 2003
|
![[Click to enlarge]](vh_luna_done_1.jpg) |
|
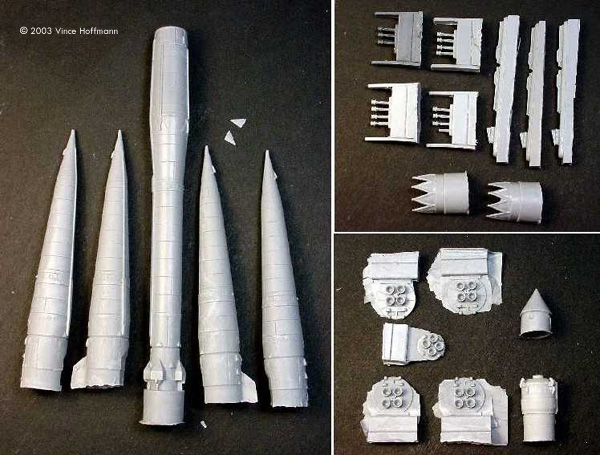
Image: What you get Image: The straps had some flash that needed to be cleaned
Image: Payload stage under construction Image: Small brass antenna added Image: Small pins help hold the strap-on boosters in place
Image: Building the stand Image: Mounting the booster stages Image: Comparison with one of the START kits |
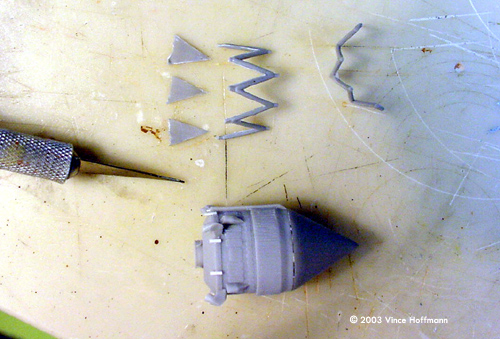
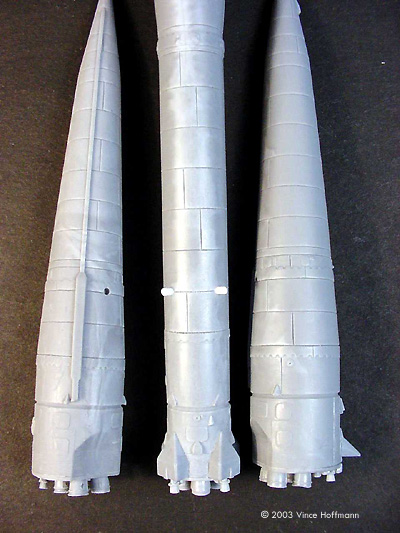
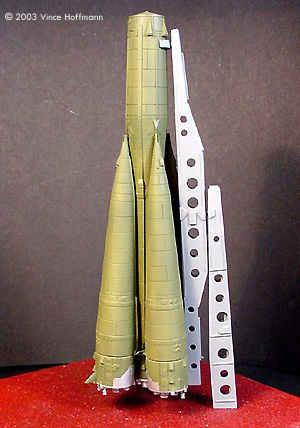
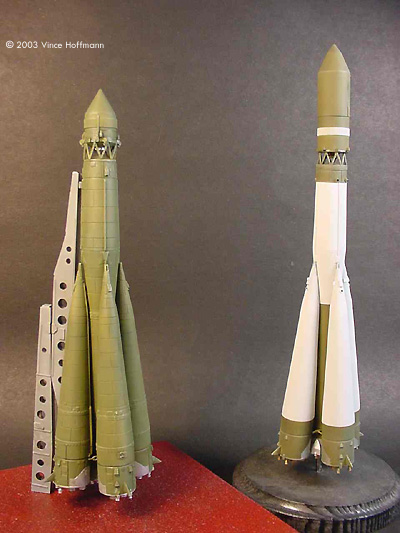
The R-7 missile was designed and specifications written in 1953, serving as the basis for the most famous family of boosters ever developed. It was originally built as the Soviet's first ICBM, but it was never deployed in significant numbers. The missile was found to take too long to fuel and launch to be an effective weapon. It also required large above ground launch facilities that were very vulnerable to attack. The missiles were taken out of service by 1967 and new launch facilities with an enclosed service structure buildings were built to serve as space launch pads for the R-7 booster. With redesigned engines and additional, strap-on boosters the R-7 would power most of the Soviet Union's space launches. The Luna program was one of the most successful for the Soviets. Luna 1 was the first spacecraft to reach the Moon; Luna 2 was the first spacecraft to "land" on the Moon (impacting the lunar surface east of Mare Serenitatis); and Luna 3 was the first to return images of the lunar far side. Cutting Edge's 1/144 kit of the R7 booster with Luna 1,2,3 payloads depicts the vehicles used for the first three missions, all flown in 1959. What You Get This kit is one of the latest offerings in Cutting Edge's new "Lift Off" series of real space subjects. As expected from Cutting Edge, the resin castings are very nearly flawless with no mis-aligned mold seams, air bubbles, or other typical resin casting faux pas sometimes found among today's resin kit manufacturers. All of the parts are still attached to their casting sprues or plugs, which will certainly make an impressive pile of scrap after they are removed. My kit came in two bags, large parts in one, small parts in the other. My only complaint about the kit is the lack of packing material. I found several broken pieces from the kit parts banging into each other, the strap-on booster fins and small details around the 3rd stage booster. Construction The first step is the removal of all pour lugs and sprues. I cut the large lugs off the bottoms of the boosters using a band saw, with cleanup on the bench-top belt sander. The smaller pieces were liberated using an x-acto knife and a little sandpaper took the parting lines and flash off. The bottom pieces of the boosters were slightly warped so they were all wet sanded on the mating side to make a nice flat surface. They were then glued onto the bottoms of each of the boosters and the edges puttied and sanded. The broken fins on the strap on boosters are also re-attached. The small vernier rockets are cut off their sprues and attached to the bottoms of each booster, 4 for the central core and two for each strap-on. At this point, the third stage assembly was given some scrutiny. The tiny tabs around the lower circumference of the booster were all broken somewhere in between the factory and my house, so they are replaced with very small strips of plastic. The nose cone and the two halves of the truss work were liberated from their generous sprues and given a good sanding to remove flash and seams. These parts were all glued together and set aside to dry. Two small vents were attached to the central core, along with a tiny brass wire antenna bent to fit into tiny holes drilled into the side. Fit Problems I noticed almost immediately that the strap on boosters would need some help staying put when attached to the central booster. Tto complicate the problem, the detail that rings the central booster stands out too far, thereby causing a noticeable gap at the top attachment point of the boosters. I cut the raised detail off, but the problem persisted with the top attachment. To solve the problem of the weak joints, I drilled holes into the boosters and installed small pegs which, when assembled, would hold all of the boosters together without compromising any of the other glued joints. Finishing With the strap-on boosters, third stage and central core assembled, I washed all of the parts using a grease cutting cleaner (my preference is Formula 409 because it does not leave a residue) rinsed, and dried with a towel. The parts were primed with Duplicolor sandable primer and polished with a soft cloth to remove the rough surface texture. Peter Alway's book "Rockets of the World" was used as the painting reference. All of the parts were then painted olive green acrylic, lightened 4:1 with white. The lighter color will counter the dark wash applied later. When the base color was dry, the lower parts of each booster were masked and sprayed with chrome silver enamel paint. Then, the rocket nozzle interiors were painted with a 2:1 mix of gold and bronze enamel paint. After all of the parts were painted, the strap-on boosters and third stage were all glued together securely. Weathering Very little weathering is required because these rockets had only a short exposure to the elements. A simple light green drybrush for the highlights and a dark wash around some of the heavier details and interior spaces gives a nice accent. Building the Stand I could not find any type of reference for the early R-7 transport or launch structure, so I ventured off the path of being 'historically accurate' to being 'just plain neat looking'. I found a unique looking transport gantry in one of my reference books, which actually pictured the Proton-Mir stack. Being the only clear photograph of a Russian transport and support structure, I decided to use it. |
|
Construction was simple and straightforward. The two parts of the stand are basic box assemblies using .030" plastic and 3/16" "H" beams. Lightening holes were drilled into the boxes using my drill press and small forstener bits, and then small strips of plastic were added for surface detail. Both assemblies were connected with brass wire and attached to the display base with steel wire which runs up through the stand and down into holes drilled into the base. Another small brass rod securely connects the rocket to the stand. Conclusion Although the fit problems with the strap on boosters presented a technical (if not accuracy) problem, the entire kit went together very well. This is an easy enough model for any novice resin kit builder to successfully tackle. I am very happy with the level of detail on this model, especially when compared to the Start kits which for so long were the only kits of Russian rockets available. Many thanks to Meteor Productions for providing the review sample. Manufacturers and retailers, interested in getting your wares reviewed and publicized on a site averaging 3500+ readers a day? Contact us! |
![]()
This page copyright © 2003 Starship Modeler™. First posted on 3 November 2003.
![[Completed model]](vh_luna_done_2.jpg)
![[Pour stub surgery]](vh_luna_sprue_cut.jpg)
![[Wet sanding]](vh_luna_wet_sanding.jpg)
![[Click to enlarge]](vh_luna_engines.jpg)
![[Top]](vh_luna_top_done.jpg)