 |
|
|
|
By Joe Hank Copyright 1998 |
|
Background:
The Kazon - called the Klingons of the Delta Quadrant - pursued Voyager throughout the first and second seasons of the show, desperate to get ahold of the Federation's advanced technology. Since they didn't have transporter technology, they had to find some way to get on board the ship. Directly attacking Voyager didn't work, nor did 'negotiations,' so the Kazon came up with an ingenious solution - ram a ship directly into the hull and sneak aboard. In the second season episode 'Maneuvers,' a group of Kazon-Ogla attack Voyager, bringing the shields low enough that the Torpedo can fly in and firmly lodge itself halfway into a cargo bay. Two Kazon warriors then climbed out, stole valuable transporter technology, then used Voyager's own transporters to beam themselves back to their own ship. This one-show wonder was only seen for a few seconds onscreen and later the front end of it was seen sticking into the cargo bay. Nevertheless, Revell/Monogram made a model of it, got it in stores within two months and stuck a $20 price tag on the 9 inches of plastic. Did they really expect it to sell? I guess so, since there haven't been any more Voyager releases since this kit. Maybe R/M used this kit as an indicator of the market. Anyhow, it is a pretty small kit and can be put together in a weekend, or maybe a week at most. Parts: The kit itself is four large injection-molded body pieces, a nose- and end-cap, two engines, six fins, and several smaller detail pieces. The instructions were easy to follow, but how hard is it to screw up a kit this simple? Two small Kazon insignia were the only decals included. There were no clear pieces or windows in this kit. There were only slight, raised panel lines on the kit which pros may want to rescribe as recessed panel lines, but lots of 'greeblies' were molded in the plastic. Assembly: The four main body pieces were glued together first, and they fit very well. Most of the seams were hidden by other fins that go on top, or they were along the raised portions for easy sanding. In addition, two bulkhead pieces fit inside and added support. On larger kits, you may want to reinforce inner structural seams with CA glue, but on a kit this small, it's really unnecessary. |
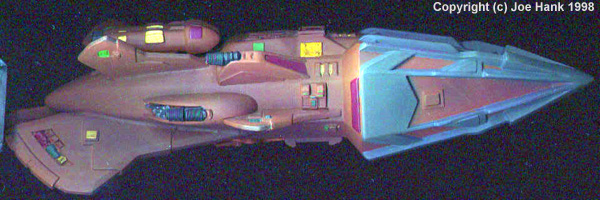 Right side view of Joe Hank's Torpedo 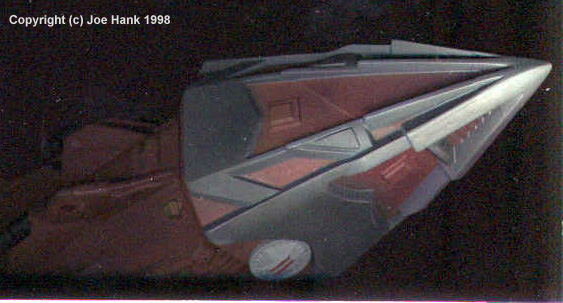 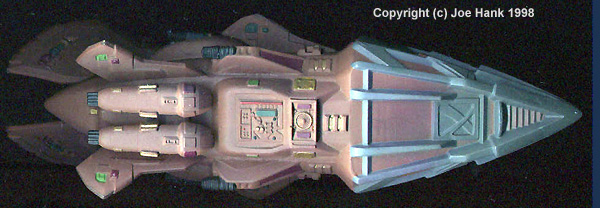 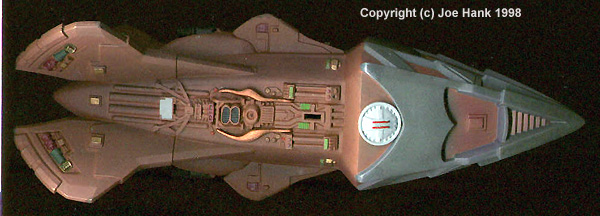  Back end |
|
I glued the nosecap and endcap on next, and they fit well also. After a little putty and sanding, you can't tell they're there. All of the fins were molded in two pieces, one on the main body part and the other side as a separate piece. You can just sandwich them together and use a clothespin while drying for best results. Then simply use putty of CA glue to blend the fin into the body. The engine pods on top of the model were also molded in two pieces, and then fit on top of the model. All that is left as this point is some simple detail pieces, which were the same color as the ship, so I glued them on next. The ion collectors, radiator supports, radiator, and plumbing all glued on easily. I deliberately left off the hatch, copper expansion chambers on the bottom, and the ion discharge vents, since they were all a different color than the ship. I decided to go ahead and paint the kit at this point, and glue those pieces on after the body was painted. Preparation for Painting: After a little more sanding, the model was ready to be painted - but what color? On the TV screen, the ships are a very dark reddish-brown, with a tinge of purple. The boxtop picture shows an excellent view and looks this way as well, but the 'professionally built model' shown on the box side and instructions was a light tan. I decided on the dark red-brown color as seen on TV for my kit, so I started with Testors Military Brown and added Insignia Red to make is redder and darker. Builder discretion is always the deciding factor when mixing paints. I used regular enamel paints for the base color to allow detailing with acrylic paint. Painting: Once you have the 'right' color, airbrushing is a snap for such a small model. Just remember that the panel lines are very faint and a heavy coat will obscure them completely. If you want to get really detailed, you can rescribe the lines, but this is such a simple kit, it's probably not worth it. The model is also fairly irregularly shaped, with few flat areas, so the best way to ensure that you have it completely covered is to apply several coats. After 2 light coats, let the model dry for a while, then coat it with Future Floor Polish to protect the base coat. Detailing: Now you can move on to detailing. The metal framework around the front of the model (reinforcement for piercing hulls?) I painted Dark Ghost Gray as per the instructions. The exposed greeblies around the engines looked pretty good with a medium Metallizer brushed on. ( If it's a small area and uneven, you can simply brush metallizer on without having to drag out the airbrush.) Small details on the underside and sides were Purple Pearl, Euro I Green, Green Zinc Chromate, and Gold. The four ion discharge vents which were painted flat black can now be glued on, along with the bottom hatch, which was painted Light Ghost Gray and Insignia Red. You can apply the decals at this point. There's only two of them, and they're very small. Note: R/M says that the decals are not compatible with Setting Solutions or Solvents. I have had a terrible time getting R/M's decals to lay down on any model, so how are you supposed to make them stay down? One solution is to apply a light coat of paint to the area (if it's small) and simply press the decal into the drying paint. You can then paint the area around the decal, overlapping the edges some. I know it's a lot of trouble, but it looks fairly good (better than a lot of silvering). On this model, you can probably leave the decal off with no visual appeal lost. Lastly, comes the weathering. It's unclear if this ship was made only for U.S.S. Voyager (which is the only ship around with transporters to get the Torpedo's crew off the ship) or if there are a ton of them around and they get scraped up all the time bashing into ships. Since it's never been seen again, I assumed that this was a one-time specialized Voyager-ramming design and didn't do much weathering on it. I oversprayed the brown/red paint with Purple Pearl is some places to give it a purplish and metallic look, and used Gunship Gray to darken the rear edges of the front metal framework. This done, I dullcoted the entire model and let it dry, them glued on the last two copper tubes to the bottom. Dullcote will ruin the effect of any metallizers or highly metallic paints, so do these colors after you have protected the details and decals. Voila! It's done. |
![]()
This page made possible by Starship Modeler - copyright © 1997-2000.
Last updated on 6 December 2000