
|
By Adam Rehorn - images & text © 2015 Gundam. Macross. Layzner. Dougram. These are all some of the big names one thinks of when one thinks of mecha from the 1980's. From giant robots to fighter planes, to fighter planes that turn into giant robots, these animes, and many of their legendary stablemates, have got you covered when it comes to sci-fi fighting machines. On that note, there are many animes that do NOT come to mind when you think of mecha and other sci-fi equipment. One of the chief ones in this category is likely the classic 1980's coming-of-age/romantic comedy "Kimagure Orange Road" (KOR). This is the story of a young man, his ESP powers, and his struggles growing up and trying to choose between two girls. It is an awesome show for sure, but not one you watch when you're in the mood to see high-tech hardware. That having been said, however, there is ONE episode of Orange Road in which there are fighting machines. It is the New Years "filler" episode, and it is a parody of all the old Toho monster movies. In this episode, the cast is fighting to stop a giant-sized version of their (already very fat) housecat, Jingoro, from stomping Tokyo. The only organization that can stop these monsters (although you'd never know it) is the T.A.P. Gun team. These intrepid airmen/women fly their fighters from the deck of a landlocked aircraft carrier and try to stop monsters from ever making it out of Tokyo bay and onto the mainland. Granted, the episode itself isn't much to brag about. It does nothing for the plot of the whole series, and is rather self-indulgent on the part of the creators. If it wasn't for TAP Gun's neat fighter planes, I doubt I would even watch the episode when I rewatch my copy of series (which I do regularly, because, as I said, it rocks). |
 |
|
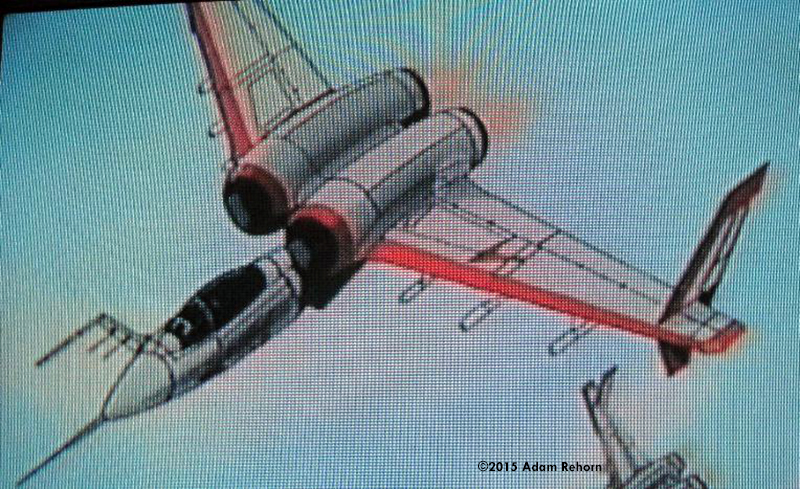
The Fighters of TAP Gun The pilots of TAP Gun are equipped with a very interesting aircraft. It is a parasol-winged, twin jet aircraft armed with a cannon (likely a Vulcan) and 6 underwing hardpoints. The engines are closely coupled in the center of the wing, have a splitter plate in the middle of the inlet, and are mounted on a pylon on the aircraft's back. The wings are mounted at the shoulder of the jet pods, and have endplate fins. In some ways, the machine looks like a jet powered version of the British Pterodactyl aircraft from WWII. The machine has fuselage mounted airbrakes and a flight refueling probe/air data boom on the forward starboard side of the nose, opposite the cannon bulge to port. Despite there being many shots of the plane in the anime, the shape, size and details of the aircraft tend to change. This is an old anime, after all, and it is drawn by hand. Thus, the separation of the engines, wing length and fuselage length all tend to be somewhat variable. So too does cockpit shape and colouring; clearly, this aircraft was never intended to be anything more than either a throw-away design, or an homage to something I'm unfamiliar with.
^A photo of my TV showing the TAP Gun Fighter in action. |
|
Building the TAP Gun Fighter Since Orange Road is one of my all time favourite shows, it only makes sense that I would want a kit from it. Unsurprisingly, however, there is no record of a kit of this fighter. Thus, it occurred to me that there was only one thing I could do; make my own! Looking at the Fighter (the only thing I know to call it - it never got a name), I was struck by the fuselage's similarity to an He-162 Salamander from WW II. Since I am also a Luft '46 nut, I have a pretty good selection of 162s in my stash. I found an old Ceiji/Revell kit from lord knows when (it was boxed in the '80s but was likely older) and decided it would suffice. It wasn't a great kit anyway, and since it was going to be hack 'n' slashed anyway, it was the perfect choice.
^Some of the source material that went into the Fighter. The ZZ Gundam parts were going to be for the endplate fins, but scratchbuilding was easier. |
|
With a fuselage starting point, all I needed now were wings and engine pods (never mind weapons, fins and the other details�). The wings came to me from another old Revell, the 80's boxing of the FW-200 Condor. This was similar to the 162 in many ways, but was a worse kit, so sacrificing it was an easy choice. The outer wings of the Condor are just about the right shape and aspect ratio for the Fighter, and thus they were chosen. The engines were more difficult. I tried using spare airliner engines from a 1/144 Boeing 757, but that wasn't going to do it; they were too short. Then, I found my old, dusty and decaying Monogram 1/72 B-52D. I built it at the end of Grade 8, and it was not that great a job (okay, it sucked by my current standards), but it has sentimental value. However, with some work, I figured that I could use one of its engine pods to make the Fighter's twin powerplants. |
|
Wings I cut the Condor's outer wings off, and began to sand down the trailing edge, where the flaps would attach. I had a lot of grinding to do, but luckily the plastic was thick, and it all worked out. I made one wing first, and then copied it on the other side. I etched in the flaps and other lines (especially the leading edge paint demarcation line) and cut a slot for the endplates. These I made from scratch, out of thick sheet styrene. I contoured them so they had an airfoil cross-section, and etched them according to my screen caps. I then slotted them, so they would mate with the wings. When I laid them out by the fuselage and the engine pod, though, I noticed that they seemed too long. Thus, I had to cut quite a bit out of the inboard section of the wing, re-etch the flaps and recontour the trailing edge. However, this time, I got it right, and I then glued in two pieces of thick sheet styrene to use as mounting tabs. I hand made 6 small, simple pylons for the missiles, and glued them onto the underside. They were just sheet styrene sanded into an airfoil section as well; nothing fancy, since you barely see them anyway, and they're not well detailed in the anime to start with.
^The original wing and the new, shorter one. As you can see, there was a lot taken out of the shortened version, but it was definitely for the better. . |
|
Engines The B-52 engine pod was too long and too tapered for what I needed. I cut about ¾"/ 18mm off the exhaust end, and then proceeded to fit the exhausts from the 757 engines into them. I also had to recontour the pods significantly, to make them more tubular. I also had to have a mounting point for the pylon. Thank goodness for Aves Apoxie Sculpt. I have heard of this stuff forever, but only recently was able to get some. It is definitely something you should have, if you don't already! I used it to build up a receiver for the pylon, as well as a whole new rear-end structure around it, not to mention filling in the gaps around the exhausts and even a hole worn into the now-top of the engine pod. Once the putty was dry, I sanded it to the right shape, cleaned some details up and I was done. This makes it sound easier than it was; it was a lot of work, but it went well. I cut receiver holes for the wing mounting posts before I glued the pod together, so I knew the positioning was right. I added some sheet styrene sanded to an airfoil section for my intake splitters, and I was done! The pod came off the plane easily and in no time I had it apart. (20 year old glue is pretty easy to break, especially that old Testors tube stuff!)
^Here's the wing/engine assembly undergoing work. You can see the amount of Apoxie Sculpt already sanded, with a lot more to go!. |
|
Fuselage The bulk of the top and rear of the 162 had to go, so go it did! I cut the engine and wings off, leaving the cockpit and lower fuselage. This would all have to be filled in, solid. However, that much Apoxie Sculpt is not only expensive, it's heavy. So, to make things lighter, I used Crayola Model Magic modelling medium (a cross between clay and styrofoam, and very useful for bulk filling like this) to fill in the bulk of the body. I even rooted my engine pylon in it first, so it wouldn't escape! As a note, Model Magic kicks major backside for modelling. It is light, flexible and can be packed into places very easily. Best of all, it only shrinks a tiny bit when dry and it can be glued using a variety of standard modelling liquid cements! With the Model Magic dry, I plastered on the Apoxie Sculpt. Once it was dry, it was sanded to shape and the etching began! I used a hollowed out piece of sprue for the cannon pod, and the sight from a 1/100 00-Gundam for the body of the FR probe. The strakes on the belly (actually part of the main gear doors, according to the anime) came from a 1/72 MiG-21 drop tank, the same Matchbox kit that also donated the stand for the Fighter. I used one of the three (yes, THREE) canopies that came with the Salamander, although it had to be heavily sanded for clarity, and the front windscreen needed that flat panel etched into it.
^Here's the fuselage, all set for primer. You can see the Apoxie Sculpt, new strakes and cannon bulge, a well as the homemade engine pylon.. |
|
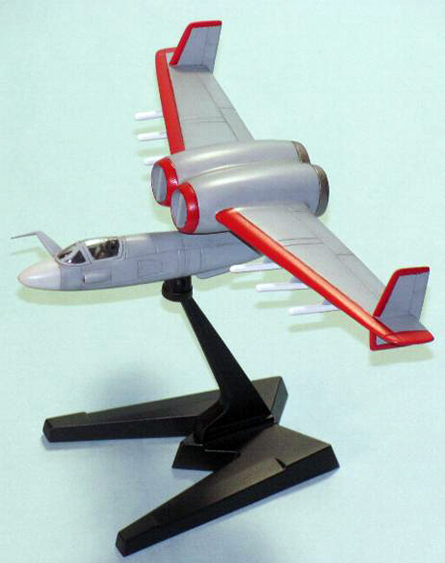
Painting and Finishing In the anime, the fighters are mostly some kind of air defence grey, with red leading edges on the fins and wings. I used Testors Model Master acrylics, and painted the entire thing by hand. I used Light Ghost Grey for the bulk of the Fighter, with Guards Red for the leading edges and Light Grey for the nose cone. I chose to do the radome a different colour just to break things up a bit. I found 6 rockets from an old 1/48 Lindberg F-100, cut them down and reshaped them to be approximately right for the missiles carried by the Fighter. I painted them white and glued them to the pylons with CA. I painted the stand black and applied a light coat of Future floor polish to give it a bit of a satin sheen. I also coated the whole aircraft with Future clear closs acrylic. To highlight the panel lines, I brushed on some grey pastel dust, which I then held in place with more Future. At first, I wondered if I had gone too heavy with the pastels, but in the end, I think it works quite well. I h After the Future was dry, I then airbrushed on some Delta Ceramcoat indoor/outdoor matte urethane varnish. This stuff works great as a flat coat, and costs nothing compared to buying expensive Gunze or Tamiya flat coats. A bottle can last for a dozen or so kits, and I rely on it totally. Also, since it's indoor/outdoor, it's hardened against UV, so it helps to protect my models' paintjobs. The problem with the Ceramcoat is that it is TOO flat. To correct this, I mix a bit of it with some Future, to create a satin finish. This is also airbrushed on, and when it's dry, you get a very tough, very smooth finish.
^All done!. |
|
Conclusions The TAP Gun Fighter project is one of my most ambitious projects to date, and I'm still shocked it came out as well as it did! The only way I was going to get a kit of this thing was to take the initiative and build it myself, and I'm very pleased with the result. This is my first major conversion of any kind, and really pushed my boundaries as a modeller. For that alone, it's a great success. However, having a model of a plane from one filler episode of a show very few people know is even better! I hope that there is someone out there for whom this little project jogs a dim memory watching Orange Road and seeing a giant housecat invade Tokyo. If it does, then my mission will indeed be accomplished!
^From the top. Note the re-etched front windscreen and the splitters in the intakes, both clearly present in this view.. The only thing I wish is what I knew what the name of this fighter was. I've never run across any kind of official name for it, but with its big, long and slightly sagging wings, I'm tempted to use the name Vulture. It seems doubly appropriate, given the number of dead kits it consumed! So, for now, until I'm told otherwise, this aircraft is an F-29 Vulture. So be it. (If you have any information to the contrary, or any comments, please post them in the forums.) |
Please note that the opinions expressed in this article are those of the reviewer.
![]()
Go back up | Robots & Vehicles Main Page | Starship Modeler Home | Site Map | Feedback
This page copyright © 2015 Starship Modeler™. First posted on 13 May 2015.
![[Parts]](ar_Tapgun_SM1.jpg)
![[]](ar_Tapgun_SM2.jpg)
![[]](ar_Tapgun_SM4.jpg)
![[]](ar_Tapgun_SM3.jpg)
![[Left/rear view, completed]](ar_Tapgun_SM6.jpg)
![[]](ar_Tapgun_SM7.jpg)