
By - images & text © 2002
|
![[Click to enlarge]](es_necron_012.jpg) Lately I have been hearing complaints that you can't purchase a decent kit from Games Workshop for their Warhammer 40,000 line without dropping a small fortune. |
|
Image: Basic skinner assembly
Image: Rear view Image: Top view |
Well, that did not sit well with me, so I decided that I would find and build kits you can get from Games Workshop for less then twenty dollars.
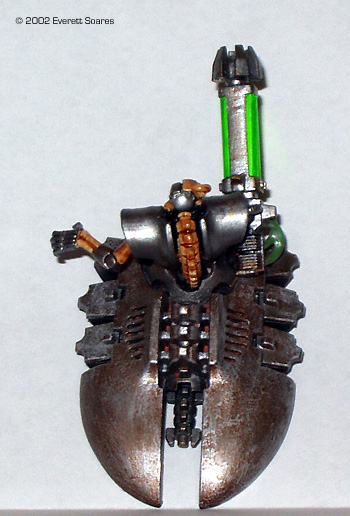
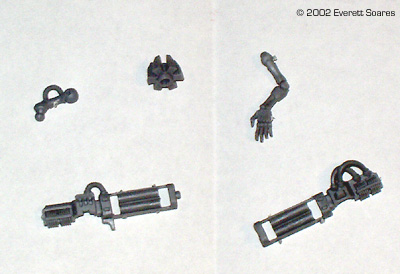
The Quest Begins After collecting my twenty-dollar allowance I made a beeline to the local game store to look for the subject of my first review. That's when it hit me: I had a bad case of Molders Block! All those kits, and the money to pay for one of them, but nothing jumped out at me and yelled, " Build me!" A few had some nice detail on them, a few I thought would be under twenty bucks turned out to be in the thirty and forty dollar range (ouch!). Was my first review doomed? Then I spotted it: nestled between an Ork Battle Force box and Space Marine Lanspeeder was the Necron Destroyer kit.Prep Work After a speedy purchase, and even speedier getaway, I ended up back at home with the new kit. I opened the box for a quick look to see what my $14.99 bought. The dark gray plastic parts were attached to two halves of a sprue that has been broken down the middle. You also receive a sheet of sheet of golden colored Nercon glyph-like decals, a clear plastic base and stand rod, and four small green colored rods. All parts were accounted for according to the instructions, and not one scratch or dent in them. After the inventory, the sprues received a bath in dish soap and Windex, then a quick scrub with an old toothbrush (Note to self: need new toothbrush) and then a good rinse. Now the parts are ready go under the knife. Assembly Sitting at my model bench I studied the two sprues that contain the parts to the destroyer. Sprue one holds the parts for the bottom and top part of the skimmer. Sprue two has the all the parts needs to build the upper torso and the main weapon. The parts do have some minor molds lines that can be easily scraped off with the back of a hobby knife. Be careful when removing them from the sprue; some parts are thin or small and can easily be nicked beyond repair. I started by removing the four parts needed for the bottom of the skimmer. The top and bottom of the skimmer were clipped off with no problems; the lower spine need a little more care due to were the sprue attached on the hip area, and then the front plate for the hip area. Dry fitting the two parts for the skimmer was a breeze. I just need to point out that the lower spine and hip area must be dry fitted and glued to the lower part of the skimmer before you glue the top part on, if not you are going to need to clip the hip pistons off. After these parts are positioned and glued the front plate is to be added. Now remember, small parts and super glue means something is going to get glue were it doesn't belong, namely the front of a shirt, the table top, or your forehead (don't ask about that one). So to avoid this I broke out my tweezers and took my time with the front hip plate. The fit for the front plate was good, though there was some over glue and some light seams did show. These problems were quickly addressed with the hobby knife. |
|
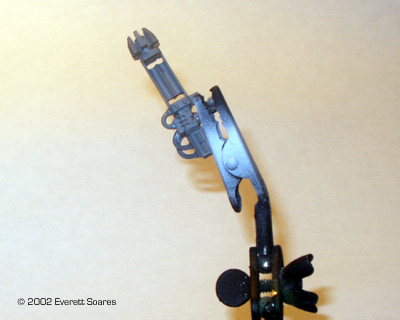
With the skimmer section complete I started on the upper torso. The chest is made of two parts, the front chest and back plate. The dry fit showed that the shoulder area would have a visible gap in it. Now the thing to remember about GW kits is that the plastic is soft to start with, if you use any type of putty it is going to melt the plastic before it sets. To avoid this I settled on gluing the front and back together, and then with a sewing needle I started to fill the gap in with very small amounts of CA gap filler. When enough layers had built up I sanded the area smooth. The head was easy to snip off and clean up, yet another small part that needed careful handling. The main gun for the right arm consisted of four parts: the cap for the gun, the main body halves (left and right), and the arm it would be mounted on. The dry fit showed no gaps to worry about. After deciding what position the arm would remain in, I glued the two parts of the gun together. There were some minor seam lines that were easily sanded clean. The finishing touch was the cap of the cap of the gun that fit with no problem. The body of the gun has four slots; this is where the four small green plastic rods come in to play. I dry fit them, and they snapped in and out with out the use of glue. Carefully I set them aside for after painting. The left arm is a standard arm that glued in position with no problem. Next step: on to painting. Painting Before I started painting I did a little research into my subject by logging into the Games Workshop website. There I discovered that the Necrons are the oldest amongst all the races in Warhammer 40k. I decided to give the destroyer a skeletal look. I picked my colors and began the painting. I kept the model in two parts, the completed upper torso and the lower skimmer part. I gave both sections an even coat of black primer. Most of my paints are from Games Works, so I am only going to refer to them by color and not by the name given them to cut down any confusion. The upper torso was taped to a thin plastic rod with double-sided tape in area that would not be painted (the bottom part that connects it to the skimmer). After the primer dried, I broke out my airbrush and gave the lower skimmer a base coat of dark gunmetal gray. While that was drying I started work on the torso. I gave half of the head, the rib cage, the spine, and parts of the arms a coat of a dark brown. The shoulders and the other half of the skull were lightly dried brushed with the same gunmetal gray I use for the lower skimmer. When the colors set I drybrushed an off-white color over the dark brown areas. The final touches for the torso were to give a light wash of dark brown to bring out the details. Looking over the torso I felt like something was missing. It was staring right in the face all the time: the eyes were just black and lifeless sockets staring at me. To correct this matter I used my light green paint and add just a dot to each socket. That did the trick.Since I was giving the destroyer a skeletal look I decided to make the skimmer show its age. I started with applying some masking tape to the body to mark off some areas, them I airbrushed another layer of the gunmetal gray on it. This gave it some raised areas for the next stop. When the second layer dried, I added a light coat of dark brown ink to give a rusted look. The ink brought out the raised areas. However I was little heavy handed with the brushing of the ink, to the point that the gunmetal barely showed through. I corrected this by dry brushing a lighter metal coat over it. Decals I wanted to first test the decals, since GW decals are not what you call the best there is. A upon first inspection of the sheet, the decals do not seem to be separated from one another like most standard decals. There also seems be some space between the glyphs, and the gold lines that make up the marking are very thin. I started the test by spraying a sheet of plastic with a gloss coat. After I'd placed the decal and let it set, I sprayed a cost of dull coat on it. The major problems that showed were the thickness of the transfer paper it is printed on and the empty space between the markings. Very careful cutting could cure the empty space, however the thickness is not something that could be corrected. Oh well looks good without them anyway. After the decal test I sealed the Destroyer in a gloss coat and inserted the green rods into the gun. You can use the stand that comes with the kit; if you do you need to drill out the hole in which it fits. I had an extra base kicking around from an older model I did up long ago that seems to fit nicely. Conclusions Yes the model is small, but it has some good detail to it. The kit has some gap problems, but they can be easily filled and sanded out. The decals are not the best that are out there, but if you are skilled enough you could either mask off some alien marking or do with out. The instructions don't come on a separate sheet; big deal, if you can't figure out the basic picture instructions given on the side of the box, please turn in your airbrush. The kit is a great weekend or one day project for all you veteran model builders out there. I spent a weekend doing the kit because of my mistakes (and the wife wanted to go to Yankee Candle). I recommend this kit for people who want a break from the standard Trek kits and cookie cutter mecha kits that are out there. |
|
![]()
This page copyright © 2002 Starship Modeler™. Last updated on 11 November 2002.
![[Click to enlarge]](es_necron_5.jpg)
![[Head/torso]](es_necron_22_.JPG)
![[Left side - Click to enlarge]](es_necron_25.JPG)
![[Front - Click to enlarge]](es_necron_11.jpg)
![[Top/rear - Click to enlarge]](es_necron_20.JPG)