
|
|
|
By Rob Caswell
|
|
|
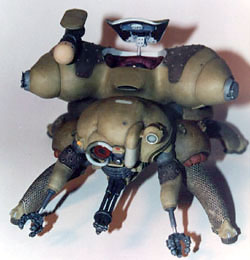
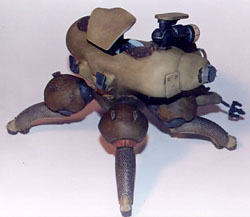
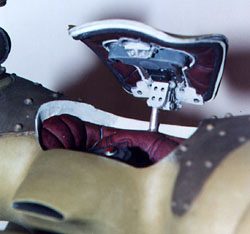
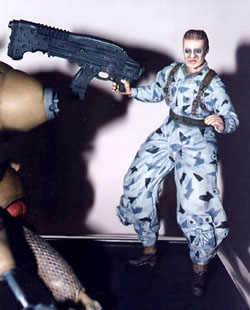
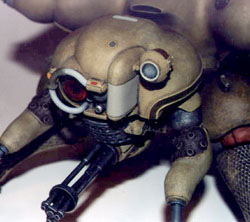
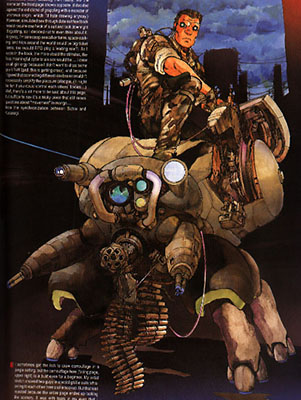
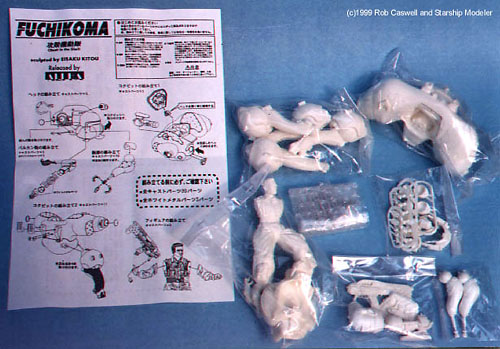
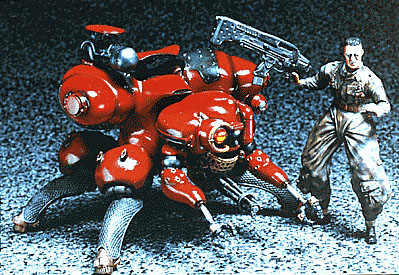
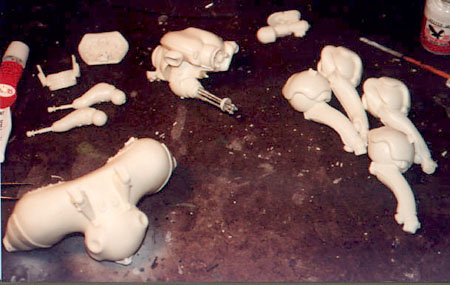
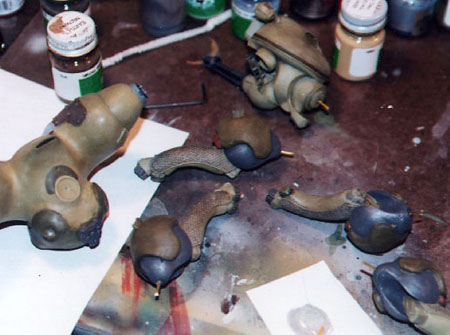
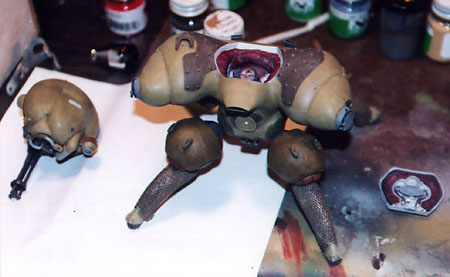
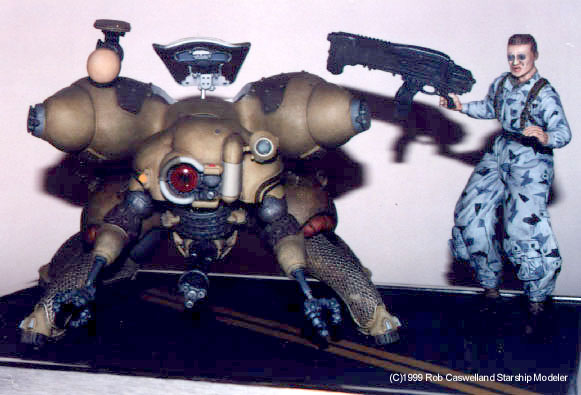
First thing's first: "What the heck's a Fuchikoma?". It's from Masamune Shirow's near future sci-fi tale, Ghost in the Shell. They are best described as "AI vehicular companions", or in other words they're smart robots which can carry a driver/passenger. They can act autonomously or can be connected, via remote neural links (kinda like a cellular phone wired into your brain), to their cyborg cohorts. Fuchikomas are seen in the Ghost in the Shell comic and game, but not the movie. Accuracy? We Don't Need No Steekin' Accuracy! This kit is best described as "inspired by" by Shirow's Fuchikoma. Detail for detail, it doesn't match either the comic or game versions. Between the gattling gun, pop up "sensor", and choice of figure, it's clear that Alpha's primary source of inspiration was this Shirow painting. This is the only image where all those details come together. In part, the master seems to have been a kitbash. I recognized a number of parts, such as motorcycle cylinder heads and WW2 aircraft intakes. It's really odd that Alpha chose to be so lax on "accurate" detail, given that they seem to have (by all appearances) purchased the license to make kits from Shirow's world. While the hardware details seem fudged, the figure that comes with the kit isn't. A figure of Batou, one of the story's main characters. The head is a perfect match for the character. He's standing, carrying a HUGE gun (they invented the word "unwieldy", just for this piece) , and is wearing a pair of ballooning "parachute pants". His feet seem a tad tiny, but once painted, it's less noticeable. Checkin' Out The Goods I got my kit from Hobby Link Japan, when the Yen was taking a whomping in the summer of '98. The kit comes in a cardboard box with a color-xeroxed label. Popping it open, you'll find two large body parts and a collection of plastic bags holding the smaller parts. Overall, there are forty-five parts: 40 resin, 5 metal. The kit is cast in a high-quality white resin, which is easy to work with. The resin casting quality is quite good, with no airbubbles. However it appears that a few parts were cast from molds that were on their last legs, as there was some deterioration of details. A few cast metal parts make up the gattling gun. Slammin' the Bug Together While the parts fit in most areas is pretty decent, there are a few large construction challenges lying in wait. Some of these could be averted by more useful instructions – or at least instructions in English (when you buy direct from Japan, I guess you can't complain), but linguistic differences aside, some of the parts placement illustrations are a little vague. I found I had to also reference the box cover photo and pictures of the build-up on Hobby Link Japan's page. You'll want to make sure to dry fit parts and double-check their placement. Some parts come with placement pins, to help fit and align them. Good idea, bad execution. In many cases, the pins don't line up. Just trim them off and fit the parts by hand. I approached the kit in sub-assemblies: the head, body, and legs. Each of these areas presented their own unique challenges. Let's start with the head. All the sticky points with the head revolve around the area of the gattling gun. The gun is made up of the five metal parts and two resin "spacers". The fit of the gun components is not great. You'll need to do a lot of part cleaning and dry fitting. Even being slow and methodical, I wasn't able to get the gun assembly to be perfectly straight, but it's good enough that most viewers won't notice the irregularity. Attaching the "screen" above the gun is one of the kit's biggest difficulties. It appears that the attachment pins for this part were missing from the main body. I had to make some out of styrene. Even when you have a set of pins in place, the parts fit is off. Take your best shot and hope no one will notice any irregularities. To cap off the head assembly, I substituted the kit's opaque resin "main eye lens" for a clear plastic lens by EMA. I back-painted this with a black dot in the center, the red on the outer edges. Once attached, this lens really lends more life to the subject! The body was far less problematic than the head. All the parts fit reasonably well. When you look at the cockpit, you're bound to wonder how anyone could fit in there. I didn't spend a lot of time worrying about it. My philosophy was, "if it looks neat, I'm happy". Besides, there's some real nice detail in the cockpit and its hatch. Painting Without AMS Pressure I painted all the sub-assemblies before attaching them. Given that the accuracy of the kit's physical details were so… "relaxed", I didn't feel any great pressure to adhere to an established paint scheme. Besides, there weren't any painting instruction included. For colors, I looked again to that Shirow painting. I decided to do a scheme that captured that same spirit, sticking to grays and earth tones. The most established color scheme for the Fuchikoma is bright red, but that just didn't seem as interesting. I primed all the parts, then sprayed the whole thing with a base coat of Polly Scale German Armor Yellow. I washed the kit with enamel Scale Black (sorta "Panzer Gray"), then went back with a slightly lightened version of the German Yellow and drybrushed the whole model. This added a nice "painterly" texture to the surface. I then continued with detail painting, using the same technique. I painted Batou with an multi-tone gray urban cammo scheme. I finished his flesh with enamels, but given what I've recently seen about using oils, I think I'd take that route, if I had to do it again. As it was, I didn't put much effort into Batou. I settled for "good enough", since I'm not big into figure painting. |
|
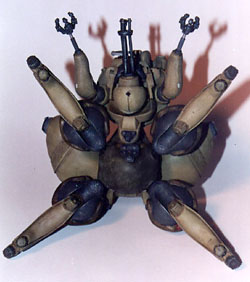
The Final Step The last big hurdle in putting the thing together is attaching the legs and head to the body. The sub-assemblies are rather bulky and have little attachment surface. As a result, you really need to pin these in place. Anything less will result in frustration and a kit that easily breaks apart when handled. I used 1/16" brass rod for pin stock, then drilled holes the "neck" and "hip" areas. The model surprises you, once you attach the last of the sub-assemblies. As a collection of parts, you may think you'll know what this will look like when finished, but when you actually see it, it's quite striking. It's big! It's buglike! It's…just plain odd – but in a cool way. Givin' It a Place to Live I decided to mount the Fuchikoma and Batou on a base. Most of the action in Ghost in the Shell takes place in a cyberpunky urban environment. For that reason (and the fact I was being a bit lazy), I decided to have them standing in the middle of a city street. My main diorama base was just an 8" x 10" metal picture frame. I cut some masonite to size and attached some textured drawing paper to it with spray glue. I painted the street surface on the paper, then drilled holes for figure/vehicle attachment pins. Last Word While this kit had its frustrating moments, it was a fun, relaxing build, overall. It's a sizable beast, sitting almost 6" high and about 11" long. It's got real heft, to boot. I can't wait to bring this one to a show, if only to lurk nearby as folks wander past and exclaim, "What the heck is that thing?!?". I would have found a little more satisfaction in building a kit that was closer to Shirow's details, but it still pretty cool looking. This review, and the spirit behind all else I do on this site, is due in part to Chris Connors (1964-1999), my ex model shop partner and friend. Together we learned of IPMS snobbery, quality local Boston bands, and how to clean those pesky airbrush parts. I won't miss his knocking my freshly finished kits to the floor, shattering them into a thousand pieces, but the rest... life's less for not having. Sorry you left the party early, bud. |
![]()
This page made possible by Starship Modeler - © 1999.
Last updated on 17 February 1999
