|
|
|
|
By
Marc Vezina - images and text copyright © 1998.
|
|
|
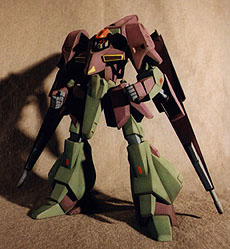
This 1/144 scale offering from the Japanese model corporation, Bandai, is typical of their mid-80s mecha models: sprues molded in single color, primitive polycap joint articulations, and low surface detail. In that time, there was none of that fancy SystemInjection® process or high tech articulations -- we had to rough it! Rather than detail the step-by-step process through which the kit was built, I'll only cover the modifications and pitfalls. Body The main body and the legs of the machine were assembled pretty much the way the instructions suggested. I painted as many parts as possible from the get-go, because I wanted to keep the articulations functional. Many parts would be hard to reach later on. I thanked the designer for putting a large apparent seam where the torso plates meet, since it allowed me to keep them off until the model was almost complete. Head The interior of the head module was detailed with small spring, assorted wires, and one railroad model red lense. From a distance, it reflects light very well, giving the impression of a malevolent red eye in the middle of a complex sensor apparatus. The forehead panel is supposed to be a hollow shield with a hole cut in it. It didn't show from the pictures, so I just painted the depression black; had I known, I would have scratchbuilt a hollow forehead shield replacement with the proper opening. Arms The arms bothered me. The articulations were designed in such a way that only a lateral elevation was possible, with forward rotation possible only at the shoulder. In short, it looked darn stiff. I decided to install another rotation collar between the shoulder and the elbow so that the arm could approximate a more humanoid rest position. I simply cut the upper arm piece in half just below the shoulder, glued two plastic sheets to cover the hole and installed a rivet between them. Simple, effective, and looked darn good. It would have been better had I realized that the crude moldings on the side of the part were supposed to represent separate power cables, but still... The arm shields were assembled with no modification, but I ended up cutting off the poorly molded beam cannons and replacing them with new parts made from telescoping aluminium tubing. Painting A friend showed me an interesting painting technique that I was just dying to try on a model. The Gaplant was painted in subassemblies, with internal parts being painted up first, masked, then glued in their proper positions. All the parts were first undercoated with Floquil flat black using an airbrush. This lacquer bonds with the plastic and gives a tough base that was absolutely matte. |
|
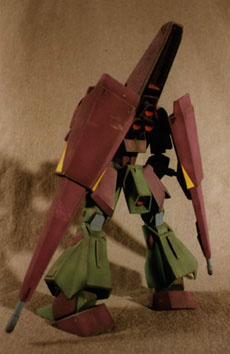
Over this, I painted Humbrol green, grey, and purple with an airbrush, putting more color in the center of the flat panels and almost none at the edge, leaving the black underneath for color. This gave a very dark, very matte feel to the model. The yellow trim was added last. One of the beam swords was painted flat white, then airbrushed with fluorescent blue to simulate the plasma discharge of the blade. I hand-painted the interior of the thrusters using a bright red, then added dry transfer ID letters to the shoulder pads. All that remained to do was to find a nice, menacing posture, and my model was complete. |
![]()
This page made possible by Starship Modeler - © 1998.
Last updated on 24 March 1999