 |
|
|
|
By Jay Adan - Copyright © 1999
In the SF3D universe (or the "MAK ZbV 3000 universe", as it's now known) the Nutrocker is an unmanned hover tank that mounts a rather inconspicuous laser cannon. It was apparently a very successful design until the appearance of the Super Armored Fighting Suit. I fell in love with the design of the Nutrocker because I love clunky designs. They just feel much more plausible to me than the sleek SF designs that have become so commonplace. The entire SF3D..er.. MA.K. ZbV 3000 line is full of these types of vehicles. 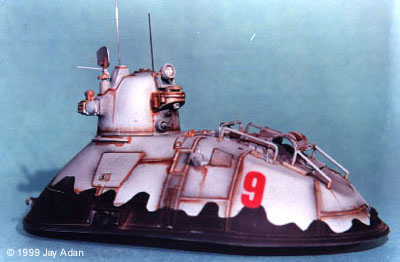
Building The kit is very straight forward. There are not many pieces (upper hull, underside, turret, laser, searchlight, antennae, and other various detail parts). There is one brass piece (antenna) and one piece of wire to use with the other antenna. A nice little included extra (though not pictured) is a S.A.F.S. in scale with the Nutrocker. I also added an extra bit of wire to simulate a couple of whip antennae that are shown in one of the drawings but not included in the kit. The kit looks as if it was even meant to include these antennae since the bases for them are molded into the turret. The kit assembles with ease. Assembly took most of an afternoon and part of an evening (probably 4-6 hours, including putty drying time). The turret is easily left free to turn and position as you see fit without looking like a toy. You will have to do a bit of puttying, but not much if you are careful with your gluing. The area where the underside meets the outer hull is the worst fit... it's also the least likely area to ever be seen if you mount your models on a base. Although the instructions are all in Japanese I found them pretty easy to follow. There are some areas where the picture on the box and the instructions seem to contradict each other. I would say that in these situations just pick what you think looks best. There probably aren't many "purists" who are likely to complain if you're wrong. Finishing Finishing the kit is where I really had a lot of fun. The Nutrocker, like all kits in this series, comes with a little card of suggested camo patterns and markings. Because of the really ugly, clunky look of the tank I decided to go with a neat pattern that reminded me a lot of a WWI Battleship design. The majority of the tank gets a standard grey color with the bottom in a wavy black pattern. I used Testors Model Master paints for the grey. I started out with Lark Dark Grey as my base coat. Once that dried I added some shadows with Gunship Grey. I finished off the hull with highlights using Lark Light Grey. At this point is was time to move on to the black camo. I used a blue plastic 3M tape to mask the approximate area for the wavy line. Using a pen, I drew in the wavy line by hand trying to match, as well as I could, the pattern shown on the card. After I had the line drawn I carefully cut the pattern into the tape with a sharp Xacto knife. The plastic tape works very well for doing this kind of work. It isn't necessary to force your way through the tape to get it to cut properly meaning that, as long as you relatively careful, you can keep from damaging the surface of your model. Once the tape was cut away, I painted in the black area. I started with a light coat and built up the color with a few more light coats to keep the paint from seeping under the tape. At the same time I painted the underside of the tank a dark grey. Once this was all dry I removed the tape and had my pattern! Markings The kit comes with a few different marking sets. The ones that go with this color scheme are pretty simple. Just a big red number '9' on the rear of the hull and a few generic detail markings are all that are used. Rather than gloss the surface of the model for the decals to lay down, I polished the paint in those areas using a old piece of 600 grit sandpaper. Once decals were placed I was only left with weathering. In my mind I had pictured a tank that was on garrison duty, slowly moving from place to place on patrol for enemy units but never seeing any combat. Since it's a hover tank I figured that more than anything else it would be plagued by rust and dust rather than dirt or mud. With this in mind I attacked the model with various strategically placed oil washes of Raw Sienna, and black to simulate rust and dirt buildup. After that I added a lot of pastels to add a dusty look. I also used my old 600 grit sandpaper to sand through the black paint to the grey underneath to look like wear from rubbing past shrubs, trees and other ground cover. At this point the model itself is complete but I have not "based it". When I do I am considering trying to simulate the action of the hoverjets using field grass bent over to look as though the jet wash is blowing it over. This kit was a really fun weekend project. The scale means that your finished piece is a bit on the small side but it doesn't make it any less fun to do. It's also one of the less expensive kits in the line - and might be a good kit to start with if you think you might like to give one a try. |
^ It looks a bit like a mollusk with a turret, doesn't it? You can see the dust built up on the lower hull in this shot. The rust and dust were done to give it that "I haven't been in a fight and nobody takes care of me" look. 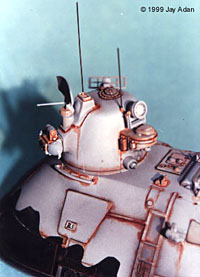
^ That turret is just bristling with sensor arrays. I'm not sure what the searchlight is for since the tank is unmanned. 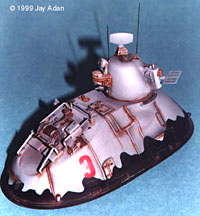
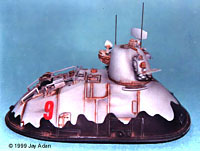
^ The thing that I was most pleased with was my camo job. It had been a while since I'd done that much masking on a kit and I can't remember ever doing a pattern quite like this. I really didn't know what to expect. Luckily, I got exactly what I wanted. 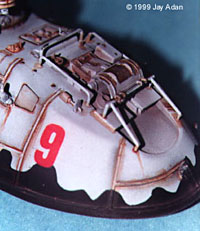
^ I'm not sure what all of these bits are but they sure make it look cool. 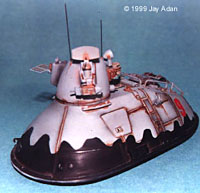
^ Ugly and not that well hung. That odd shape near the bottom of the turret under the radar dish is the laser cannon. This is one of the many things that I like about this design. It doesn't have the "it's sci-fi so the gun has to be huge" syndrome. It's very understated. 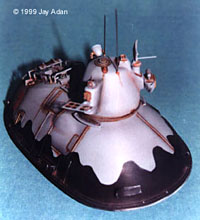
^ The rusting was based on seeing many rusting trucks since I moved east. Sometimes the rust occurs in the strangest places - but mostly it happens anywhere water is likely to collect. |
![]()
This page copyright © 1999 Starship Modeler™. Last updated on 24 March 1999.