
By E. James Small - images & text © 2001
|
![[Click to enlarge]](js_licy_Lightcycle1.JPG) |
|
|
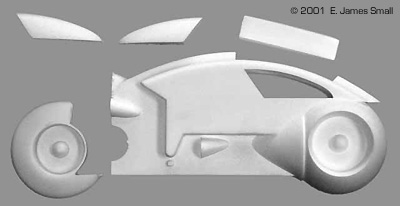
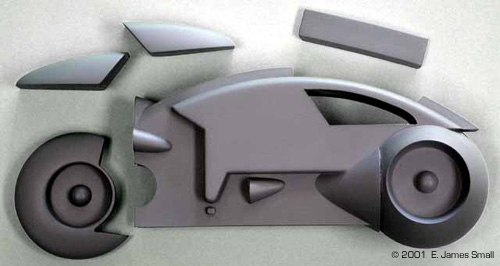
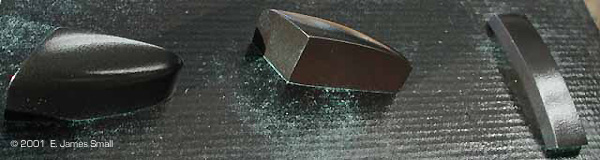
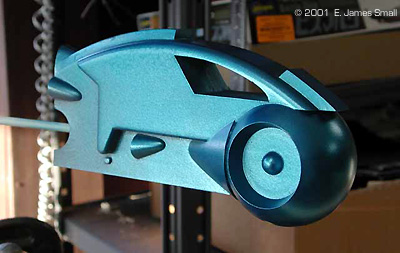
Tron was a movie released in 1982 by the Walt Disney Company. It was the first film to utilize computer generated imagery as a part of the main action and the character's surroundings to create an otherworldly atmosphere, and VERY successfully done for the time too I might add! Although the script was considered by many to be lame, the film showed us an environment never seen before then, but copied repeatedly since. The Lightcycle was the main vehicle used in what is probably the most exciting sequence in the film. Mark Dickson and Cliff Erasmus have successfully captured the overall aura of this interesting CGI model in a physical kit made of solid urethane resin. The KitThe kit consists of five parts, shipped with rubber bands holding it all together, and packed with a single sheet which acts as the kit's description and instruction sheet. Considering the extreme simplicity of the kit, this simple page is all that is required. The sheet details the materials required, how to paint the model, and the various colour schemes you can use. Construction The first thing I did was clean up the mold parting lines that run the circumference of the main body and the rear wheel. This took about ten minutes with a piece of sandpaper. Since many of the seams lie on a curve, I deliberately avoided a sanding block, as a freehand approach allowed me to follow the curves easier. A few minor mold blowholes and pins needed to be sanded off, and some small air bubbles in the rear fender needed to be filled, which is the norm for a resin kit. I used Cyanoacrylate hit with accelerator to fill these tiny voids. With cleanup complete, it was time to paint the model. After washing with soap and water and allowed to dry, the model's parts were completely sprayed with gray primer. This is one model where it's best to completely finish and paint all parts before assembly. Simulating CGI with Real Life (There's a switch!) The Computer Generated Imagery on Tron was in it's infancy in 1982. It was all they could do to create three dimensional images without the sophisticated texture mapping they use today in the more realistic CGI (although that's still debatable) scenes we're used to in modern films. In Tron, the lack of technology to produce photorealistic results was used to an advantage to simulate a fantasy look within the electronic world of the computer. Therefore, the images looked intentionally VERY artificial. To simulate this look with a physical model would be literally impossible, but I still wanted to try to represent the aura of the synthetic CGI world. Simply painting the model with basic colours would look too "normal" and not portray the model as seen in the film. I decided to use metallic colours to paint the model, because I thought that a solid paint would look too bland, and I wanted to try to present an "electric" feel to the physical construct. I decided also to paint the bike with the base colour of blue, the colour of Sark's "Warrior Elite", and, most importantly, because blue is my favourite colour. I went to Canadian Tire, a huge Wal-Mart style hardware store chain in Canada which has a wide selection of automotive laquer touch-up paints in spray cans, and looked for a colour that I thought would be suitable. I chose as the blue colour, a "Neon Blue, GM. '91, code 21 WA9614". I also wanted some silver and black paint. For the silver, I chose the brightest I could find, which was "Bright Silver, GM. 85-91 13,9021". For the black windows, I wanted something metallic as well, so I chose "Black Emerald M CC, GM. 48,8747" The metallic black, however, was not as successful as I had hoped, as more of a metallic look was desired. I sprayed the blue directly from the can for the first coat on the main body and rear wheel, then followed up with the same colour from the airbrush to be sure all crevasses were covered. The silver was applied from the airbrush after masking off the blue areas. |
|
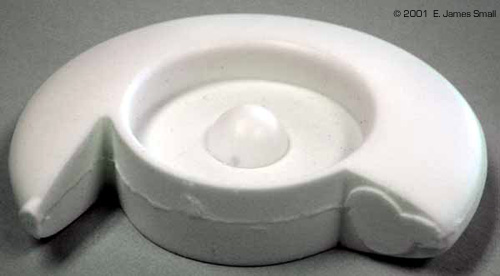
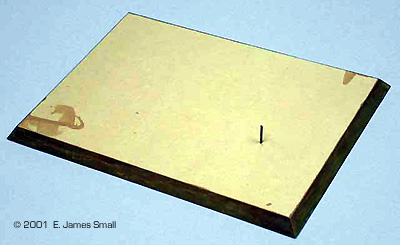
The little hubs in the wheels were sprayed with the same silver used on the underbody, and the black wheel rims were brush painted with Tamiya flat black acrylic. I used a knife to scrape paint off the edges of the windows to suggest a "wireframe" look as seen in the film. With the parts painted with these colours though, it still looked too "there". I wanted it to look more "ghostly" as if it was not a physical thing. I found that the best way to do this was to spray the metallic coloured model with Testor's "Dullcote" after all painting and detailing had been accomplished. This helped to diffuse most unwanted flaws and reflections, and make the whole thing appear softer. A high gloss shine is definitely NOT wanted on this model if you are trying to simulate the look of the CGI model! Displaying the finished model After painting, the model was glued together with medium grade CA, a task which took about five minutes! However, before I had even started the kit, I had discovered that there is no way to display this thing without some kind of supportive base. No chance that it'll stand up on it's own! I grabbed a piece of 3/4 inch MDF (Medium Density Fiberboard) and cut out a platform for the model to sit on. I drilled a hole plus a corresponding hole in the front wheel of the model to accommodate a piece of coat hanger wire to hold the model in place on the stand. This works well, as the model appears to stand up on it's own with no visible means of support to keep it from falling over. The beveled edges of the MDF foundation were sealed with CA, sanded to a smooth finish and the whole base painted flat black. "Game Grid" lines, intentionally out-of-scale to provide perspective, were added with white automotive pin stripe tape. The finished model (and the assembly steps shown here) was photographed using a Nikon digital camera under my workshop's fluorescent lighting. With more controlled lighting conditions, I think I could simulate the look as seen on the film more closely, but I was in a hurry to get it done... customers waiting and all..... Oh! I'll bet you're wondering about the 256,000,000,000:1 (two hundred fifty six billion to one) scale I showed at the top of this page! Well, the thing was supposed to exist within an electronic city contained inside a microchip inside a computer... right? Think about it! Enjoy building your own Lightcycle from this kit! I recommend it for any fan of "Tron"! |
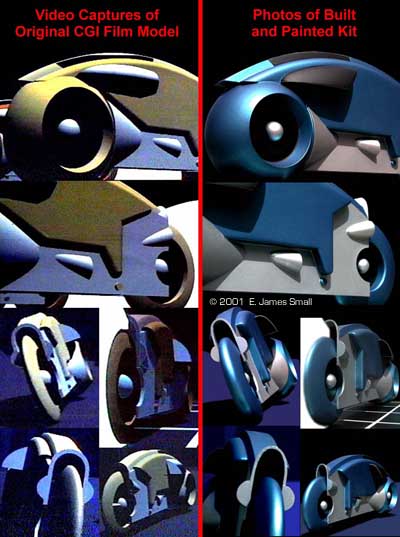
Editor's Note: Jim raises some concerns about the kit's accuracy, as outlined below. I contacted Mark Dickson, who prepared the CGI files for stereo- lithographic processing, for his response. His thoughts are included after Jim's. Accuracy of the Kit in Question Although the claim made in the advertisement shown on the news release of the kit on this web site indicates that the model was made "from the actual CG files", (presumably from the film model) this seems highly unlikely, since there are many inaccuracies when offered up to scenes from the actual film. Compare the pictures of the kit with the posted video captures of some shots taken from the film (click here for examples). You will notice that the rear tire's wall (distance from the tread to the rim) is far thicker on the kit than on the actual film model. The rear fender is also way too high and the wrong shape, and the area of the coloured body under the side window that intersects the silver cone behind the front wheel is not accurate. There are numerous other inaccuracies as well. Judge for yourself. The kit master was grown using the real files. The animators of TRON now working at Rhythm and Hues received some light cycles and said they are dead on! Jim points to screen captures from the film (formatted for TVs) as proof that these show it to be a different looking bike. However, the DVD letterboxed TRON was an anamorphic wide screen, not a true wide screen as seen in the theater; this "stretches" the prints and in some instances distorts the actual proportions. |
![]()
This page copyright © 2002 Starship Modeler™. Last updated on 1 February 2002.
![[Click to enlarge]](js_licy_BoxContents.JPG)
![[Click to enlarge]](js_licy_Lightcycle2.JPG)
![[Click to enlarge]](js_licy_LightCycle3.JPG)
![[Wheel after spraying]](js_licy_WheelPaint.JPG)
![[Scraping the edges of the window]](js_licy_WindowScrape.JPG)
![[Click to enlarge]](js_licy_BaseSupport.JPG)