
By Jack Wendt - images & text © 2003
|
![[Click to enlarge]](jw_gevfinal.jpg) Ogre is a sci-fi armor combat game. The pieces that are used to play this game vary in length, but in the case of the 'original' GEV, are about 1/285 scale (an inch or so long). |
|
Image: Hull, front and rear Image: Hull, side view showing how well-cast the piece is. Image: Assembled, another view |
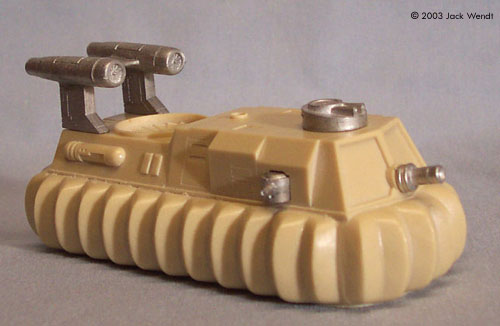
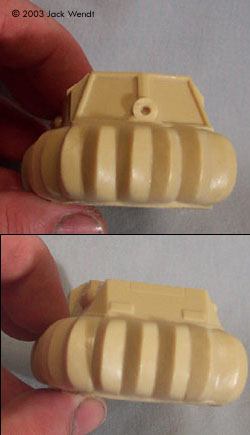
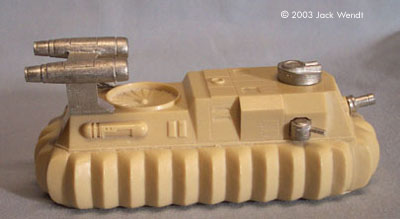
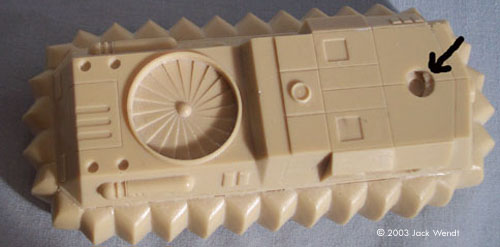
A new line of Ogre game products known as Macrotures is being released by Steve Jackson Games, and the Paneuropean Galahad GEV is the first of the line. These pieces are in 1/60 scale. What You Get The kit arrived well packed in a plain box. SJG's intention is to keep cost down as true players of this game will more than likely buy more than one of each tank. Inside, you get the parts to make 1 tank. The tank consist of 7 white metal pieces and 1 resin piece. The tank measures 4.5 inches long, 2.25 inches wide, and about 2 inches tall. The directions for assembly are online and are well detailed. They include several photos showing the positioning and attaching the individual pieces, and a possible color to paint the tank. Problems? The kit is designed for easy assembly, easier than the average multimedia kit available currently. This is a well cast kit. The only defect I found on mine is in the opening where the main turret sits. It would appear the mold rubber was torn due to the "undercut" of the hole. This led to a slight bulge in the opening. A sharp X-acto knife will fix this in a jiffy. Do not be concerned if you knick the opening as the turret will cover this up easily. On the underside of the tank you will see many bubbles, but as you can see this is a hollow cast kit. I do not call this a defect, because this is intended as a game piece. That is why I gave this a 10 on casting quality. |
|
These bubbles were easily cleaned up with sanding stick that ladies use to file their nails. If you are unfamiliar with these, you can find them in the cosmetic section, even at Wal Mart. They come in various grits, but I would suggest you get the coarse variety. You could also use plain sandpaper to file this down. Just remember as a game piece, the bubbles in the resin on the bottom is not important. The metal pieces only required a sanding stick or knife to remove small burrs. The only tools needed for clean up and assembly are an x-acto knife, sanding sticks, and/or sand paper. Many of you reading this article might only be familiar with the metal miniatures. In any resin kit there is a mold release which is just like what is used on the metal pieces. You should wash with warm soap and water the resin and metal pieces. You can use a small brush, such as a old tooth brush, to insure that you get this mold release off the resin. If you do not remove this release residue your paint will not adhere to the model. Building It Assembly was straightforward and took about 30 minutes. I used superglue to glue all components. Alignment stubs are found on the back top of the tank to properly attach the two struts that support the twin engines. The barrel of the front gun fits easily into a hole in front, just above the armored pressure containment skirt. The two small turrets fit easily inside the recessed holes on either side of the chassis. Enough friction remained in the hole on top to keep the main turret in place without falling off. I assembled the engines to the struts, but did not attach them to the tank body until I had painted the main tank body. I also left the top turret off until I had finished painting. The only additional step I took was applying clear acetate to the windows of the tank. A quick little tip on using superglue. Do not try to apply the glue to the part. If you do, you take the chance of the glue running in areas you do not want it to go. Place a small amount of glue on a discardable object, and with a tooth pick apply some glue to the parts to be glued. Finishing Painting can be done to match the color illustrations online. According to the game rules for Ogre, visual spotting of the opponent is obsolete. Only computers and electronics are needed to detect the enemy. This is the reason the online pictures are illustrated in parade colors. As you can see, I have taken a more traditional approach. I used Testor's enamels for a jungle camouflage for the tank, and flat black for the skirt. I spent about 2 hours airbrushing my GEV. Conclusions I had had a lot of fun with this kit. I would recommend this kit to anyone that has an interest in Ogre. This is also an excellent kit for the beginner to try their hand working with resin. For the advanced modeler who might want to do a little scratch building, this is after all a hollow resin tank. It is conceivable to make a cockpit and internal engine parts - with a lot of work. |
![]()
This page copyright © 2003 Starship Modeler™. Last updated on 5 June 2003.
![[What you get - click to enlarge]](jw_gev.jpg)