
|
By Kit Rees - images & text © 2003
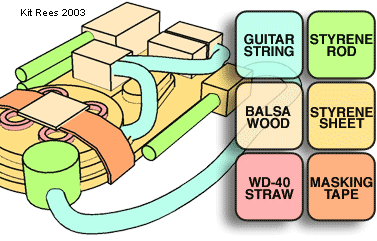
This is my solution to building proton packs and a rack for my Ertl Ecto-1A (1/25 scale). It is no less compatible with the Polar Lights Ecto-1. Is it accurate? Depends on where you get your references, and your own personal level of detail-mindedness. My intention is to share with you what did, and how, so that you may do the same if that is your wish. Many will likely find discrepancies, or think it is over simplified. If by looking at this you are motivated to make a better/more detailed version, more power to you. You may notice that the plans differ sometimes from the product. Just part of the scratch building process as unforeseen issues are addressed. 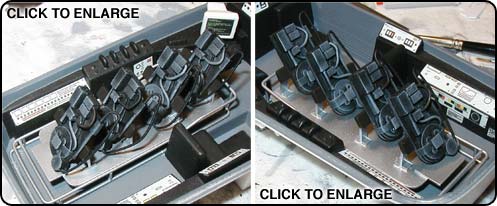 I have designed this so that the pictures do the most of the talking. The majority of my references come from http://www.gbprops.com, a site dedicated to Ghost Busters fans' projects, projects to replicate everything in the movie. The Packs These are made of .75mm thick polystyrene sheet from a local hobby shop for their base. Transferring the parts patterns from my computer drawn diagram to the styrene was difficult. I ended up gluing the paper pattern to the plastic sheet with white glue, and from there attacking it with a blade to cut the parts out. The white glue separates from the plastic more easily than desired sometimes. The method was far from perfect, but with trimming and sanding the parts reached satisfactory shape. Have something entertaining to listen to through all of this. It's hours of work. The rest of the shapes were added using whatever worked and was sitting around. Details are in the diagram. The polystyrene rod is 1mm Ø. The cylinder at the base of the pack is a 4.8mm Ø hollow polystyrene rod, filled with putty. The base of the pack was dremeled out for it and the filled cylinder was then simply cemented in place. A set of X-acto fine drill bits drilled out the places where parts like guitar strings inserted. The final packs were painted black and given a gray dry brush to accent edges and shapes. Regardless of accuracy issues I am not making opening doors on my car so I will never remove the packs from the finished model. The only look anyone will ever have will be through the windows.
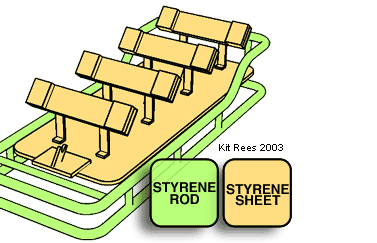
The Holding Rack By merely glancing you can see that is is a simpler shape to understand, but it was harder to build. It is flimsy, and bending plastic rod at right angles is easy but once a rectangle is formed the sides will want to bow out. I cemented in cross rods to the bottom rectangle to hold its sides together. I also omitted the hook shapes on the platform which would cradle the proton packs because the payoff wasn't worth the effort, it's fine without. The plastic rod is the same 1mm Ø used on the pack. In the end it was airbrushed silver, and the pads were hand painted a dark brown. I avoided black pads because the packs were black. Whether the distinction will be seen once the car is complete is a secret held by the future. At this point I give it a "Who cares?" factor of 9.
|
![]()
This page copyright © 2003 Starship Modeler™. Last updated on 2003.