|
By Marc Vezina - images and text copyright © 1998.
|
|
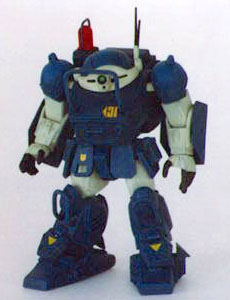
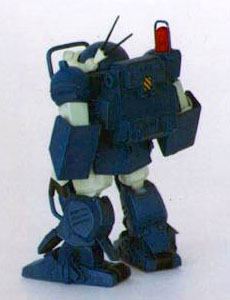
Meet the Watchdog. Watchdog turns away. |
Small military mecha were the staple of the animated television series Armored Troopers VOTOMS™, which was shown in the early 1980s in Japan. The VOTOMS™ of the title were mass-produced war machines that carried soldiers in battle and could readily be thrown away. The most-often seen machine was the ubiquitous Scopedog, a soldier-type mecha fielded by the Gilgameth/Merukian armies. Scopedogs were everywhere and readily available whenever a character had to blow something up. Most of the Merukian mecha designs were variations of the Scopedog. VOTOMS™ did not last very long, but it did inspire a series of Japanese novels and tons of kits. (Indirectly, it later also influenced several games such as Heavy Gear®.) Scopedog kits were made in many different scales ranging from 1/24 to 1/60, with the largest production runs being at 1/35 and 1/48 scales. Takara manufactured plastic injection kits while many garage kit companies flooded the market with vinyl and resin offerings. A few years ago, I picked up a Scopedog at the local hobby store to see what I could do with it. This 1/48 scale offering from the Japanese model manufacturer Takara was typical of the mid-80s mecha models: sprues molded in single color (green), no polycap joint articulations and low surface detail. Still, the Scopedog is a very blocky and angular machine, so modifications and detailing were fairly easy to do. I decided to put together a VOTOM that could be used by the Merukians as a police trooper. The Conversion The conversion involves reshaping the feet and lower legs, modifying the backpack and adding some armor and crashbars to the limbs and torso. In addition to the usual tools, I used sheet styrene and rods for the new parts. Much of the construction proceeded exactly as described in the instructions. Rather than detail the step-by-step process through which the kit was built, I'll only cover the modifications and pitfalls. Arm Units To improve the posture of the arms, I cut each just below the shoulder and rotated them out a bit before regluing them. This would make the final model appear less "stiff." I built the forearm armor plates out of flat sheet styrene which were scored and folded, then glued together. A bit of putty ensured that the joints were neat. The rivets were cut from a thin styrene rod, then glued in place. Dryfitting showed that the usual wrist armor plates wouldn't fit anymore, so they were left out. The forearm plates were left off until after painting. Feet and Lower Legs Since the feet of the machine are molded with the lower legs, they prevent the machine from having a natural stance. I separated the feet and built new ankle joints out of laminated sheet styrene so that I could glue the model in a better pose. Ambitious modelers might want to use ball joints instead to add mobility, but I prefer more solidity and usually glue my mecha in a suitably heroic posture. While the ankle blocks were drying, I extended each foot by adding strips of styrene to the front of each. Once they were dry, I used a file to blend them in with the regular slope of the feet. The important thing is to get nice, straight edges. |
|
I used a similar method to add another roller to the rear of the feet (VOTOMS™ have rollers under their feet to move faster on pavement). Two laminated styrene blocks were sanded down to the proper shape and glued to the back of the feet, with a bit of rod in between to make the roller (I was careful not to get any glue on it. It's easier to paint the roller if it's not stuck between other parts). The last thing I had to do was to make new armor plates for the back of the legs, the molded ones having been destroyed when I removed the feet. They were made like the forearm plates, with sheet styrene and rivets made out of plastic rod. Backpack The backpack is shortened and slightly rearranged. Since the Watchdog is a police machine, I decided to put a red strobe light on it. I glued the backpack parts together, then used a razor saw to remove the ammo storage rack. The gaping hole was covered with a styrene plate. I took an unused part (D2) to make the strobe light mount and glued it to the right side of the backpack, near the top. The strobe itself was an old red LED, carefully filed to fit (I left it off until after painting, though). A piece of bent wire, inserted into holes carefully drilled on either side of the LED, made a convincing crash bar. Final Details The torso and leg-mounted crash bars are simply pieces of heavy copper wire bent to the right shape. They were glued in holes drilled on the parts beforehand. I found that I had to shorten the main sensor camera to clear the torso bar, and ended up removing about 1/16 of an inch with a file. Painting All the sub-assemblies were painted with a flat dark blue-gray using an airbrush (except the arms and thighs, which were painted a very light gray). I applied a diluted dark blue wash to deepen the shadows, followed by a light drybrushing to highlight the details and rivets. The sensors were handpainted with acrylics and blended to create an illusion of internal light. I applied a few decals from the kit, then sealed the whole with a flat spray. |

Go back up | Mecha | Starship Modeler Home | Site Map | Feedback
This page copyright © 1998-2016 Starship Modeler™.