
|
The shuttle challenge (which took place on the Discussion Forums) originated with an idea I had shortly after the events of February 1, 2003 with the loss of shuttle Columbia and its crew. Its purpose: to provide modelers with an excuse to dust off their space shuttle kits and build them as either a real space subject or a science fiction subject. The models entered didn't even have to be a complete space shuttle kit, as long as they used components from the various shuttle kits issued over the years. This was an unofficial challenge, so no prizes are awarded for the best models. But I would like to thank John Lester of Starship Modeler for providing us with the bandwidth to display our completed models. Enjoy what you see and hopefully seeing the works displayed will give you the inspiration to build a space shuttle kit or two.
--- Jay Chladek |
| ENTRIES |
|
|
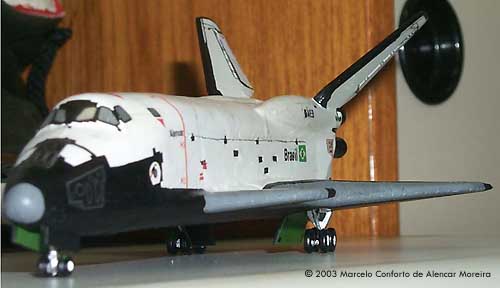
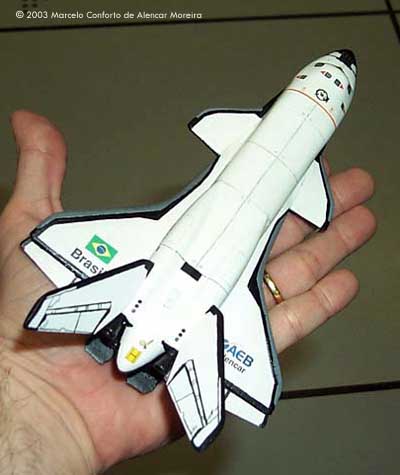
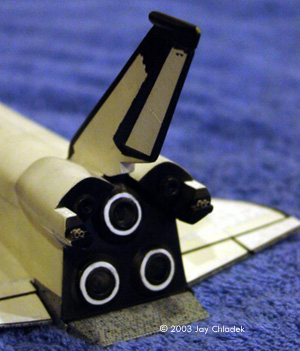
Image: Front/left Image: Top view |
Brazilian Shuttle by Marcelo Conforto My name is Marcelo Conforto de Alencar Moreira, Starship Modeler addict and this is my entry to the Space Shuttle Challenge, a fictional Brazilian Space Shuttle. If you want to now the "tale" of this ship, go to my webpage and find out.This ship was inspired by the Churchill (Lifeforce) and the Boeing X-37. I always liked the canard airplanes and also the twin rudder configuration, so I decided that my shuttle would incorporate these features. The model was created kitbashing two Hasegawa 1/200 Space Shuttles. The first was built and completely cut into the pieces I needed. My design called for an extended cockpit, so I sawed the fuselage right after the place where the payload bay doors start to bend to the nose. The wing tips gave me the canards. I also used the rudder and, since my shuttle would be bigger than the american sibling, the main landing gear would be comprised by 4 wheel bogeys, so the first kit delivered half of the landing gear. I had to wait one and a half month to the other 1/200 shuttle arrive, so I could really build something instead of destructing. Meanwhile we were in the countdown to the arrival of our first baby boy, so I was in some kind of a hurry to finish it. |
|
The second kit arrived and was promptly built. Then I started to convert the American Shuttle to my Brazilian one. First, I tore apart the cockpit and glued the "extended" one from the first kit. Then I cemented the canards in the proper position. Lots of filling and sanding in order to make the surfaces smooth. I also built the 4 wheels bogies for the landing gear and set them aside. The extended OMS Pods were created from the belly tank of a Hasegawa 1/72 A-10, from my spares box. Filling and sanding again. Initially, my shuttle would have a body flap similar to the american, but later I decided to make it in two parts, like the Venture Star. So i did. I designed a special set of markings that were kindly produced for me by Jim Botaitis, from JBot Decals. When the markings arrived, my orbiter was well into the prime coat of white paint and I started to make the black areas. I can say that most of my model looks I owe to JBot markings. After all done, a good coat of dull varnish to seal it all and, voilà, the Brazilian Shuttle was ready to launch... |
|
| |
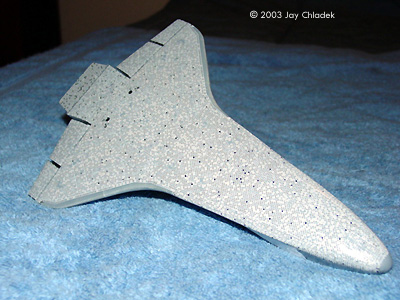
Space Shuttle Stack by Karl D. Dodenhoff This is the only pic I have of a very old Monogram 1/72 scale shuttle I built while I was stationed at Edwards Air Force Base. It's the only pic I have of a built shuttle model I've done. It's nothing spectacular, built out of the box, before the days of decal wraps and resin after market sets!There are a few other photos of models I've built on my site My Little Space Museum |
|
Image: Front view Image: Top view, with plaque Image: Beauty shot |
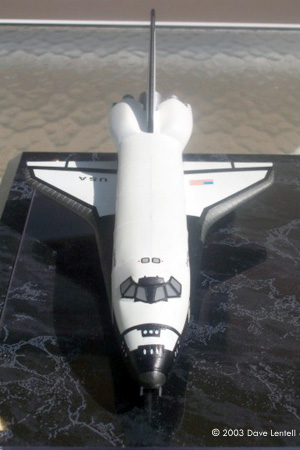
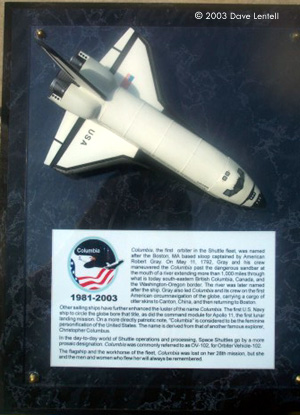
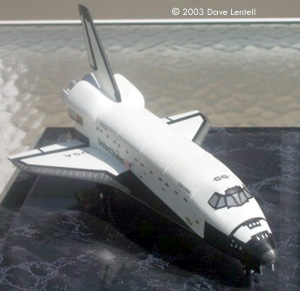
Space Shuttle Columbia - Early STS Configuration by Dave Lentell This is Hasegawa's 1/200 shuttle right out of the box. Other than having to deal with Columbia being spelled "Colombia" on the fuselage decals, it's a nice little kit. I decided to experiment trying to replicate tile patterns by using Slixx Brand Carbon Fiber decals. The look is subtle (can't even see it in these photos) but up close it gave me something different that flat black that I thought turned out pretty well. The underside got rough in spots because I was trying to get it finished in time for a local contest. Next time, I'll actually make templates, but I think 1/200 the carbon fiber looks great. Also had some help on the front RCS decals, but I'm not sure I'm at liberty to divulge the source. I'll let them do it when they're ready, suffice to say, much nicer than trying to get a uniform dollop of paint at that scale. Now that it's made the summer contest circuit (and did okay here and there), my "little experiment" as I like to call it, is ready to be packed up for a friend of mine who took the loss of Columbia pretty hard (for personal reasons). |
|
Image: Display Image: Closeup, cabin area Image: Port side Image: Back side |
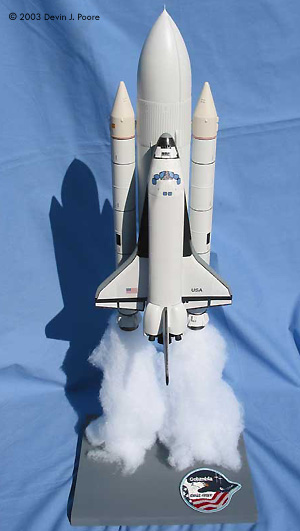
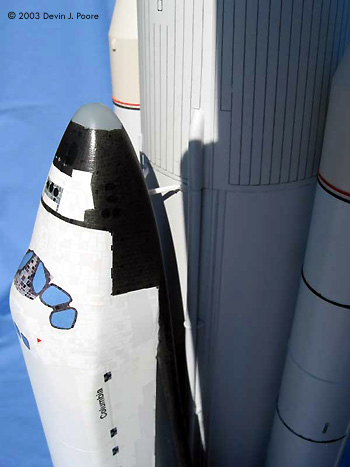
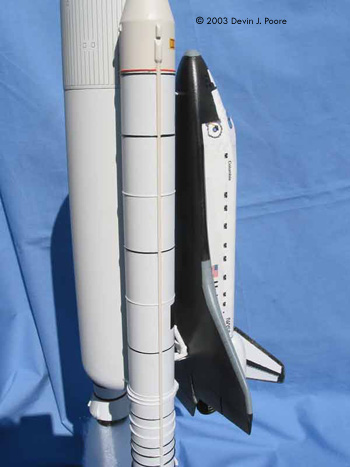
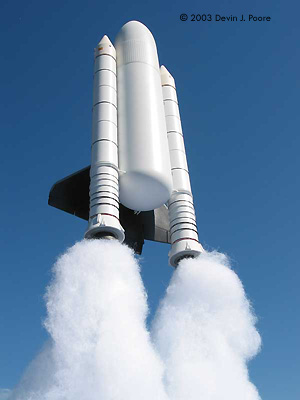
Shuttle Columbia by Devin J. Poore Back in high school, when I built tons of models and finished one a week, I had built the 1/144th scale Revell shuttle stack. Most of my models from those days no longer exist, and I wanted to replace that shuttle build. I had the Airfix kit on order from Model Expo when the Columbia broke up on re-entry earlier this year; that pretty much decided which orbiter I would be building. I decided to go with a STS-2 version, as I like the white external tank, and the historical significance of that flight. The kit is the Airfix 1/144th scale full shuttle stack. I had lots of fit problems with the kit, both because it's a 25 year old molding, and because this is the first styrene kit I've built in years - all of my recent models being of the resin variety. Suffice it to say there is a lot of Bondo, primer, and elbow grease in this project. I also used basically all of the goodies that Cutting Edge has released in recent months (tile decals, marking decals, resin engine cones), and a sheet of Real Space marking decals. I also made a few extra tile decals from blank decal paper and PhotoShop scans as needed. The Cutting Edge decals were way too light for my taste after application, so I masked around most of them and airbrushed some Tamiya Smoke to darken them down. The display base is an idea that I had been tossing around for a while, and was actually very simple and easy to make: two 1/2" dowels stuck into holes drilled in the base. The exhaust plumes are polyester fiber filler that you can buy for either stuffing pillows or filling aquarium filters. The patch is a STS-2 mission patch, purchased on eBay. I have a Plexiglas case on order to house the entire display. Photos were taken on our roof top deck during a beautifully clear day, using a Canon Powershot G2 digital camera (that camera is one of the best purchases I've ever made). More photos, and some of the steps along the way of this build, are posted on my website. |
|
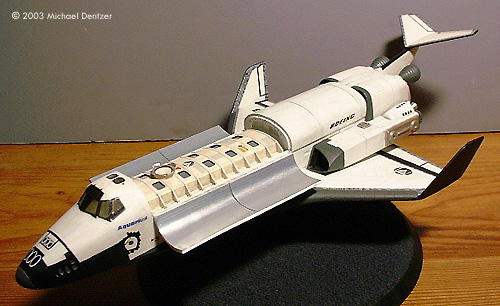
Image: Top view Image: Starboard side Image: Port side Image: Top/left Image: Right/rear |
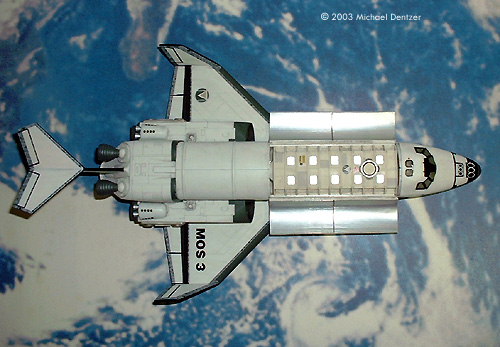
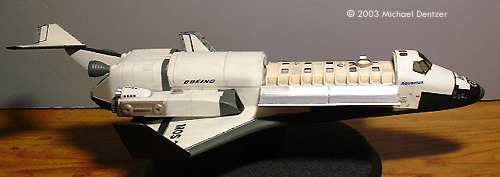
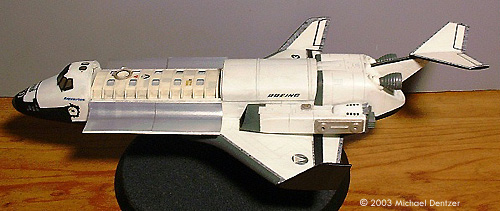
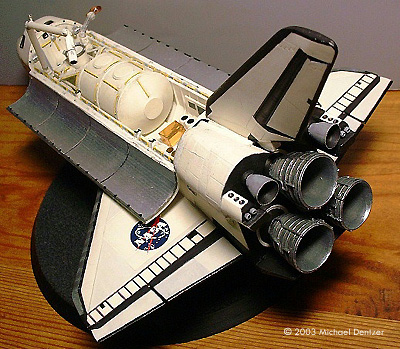
Metacorp Orbital Systems Aquarius Shuttle by Michael J. Dentzer In the not-too-distant future, multi-national conglomerate Metacorp contracts Beoing to construct an orbital transport system capable of carrying up to 20 passengers to their planned hotel module on the ISS, taking advantage of the surge of space tourism pioneered by the Russian Space Agency in the early 21st century. Using the basic airframe design of the earlier - and now retired - Shuttle STS Orbiter, Boeing designed a new orbiter with features capable of doing away with the old external tank and solid boosters which caused two STS orbiters to be destroyed. Metacorp wanted a safer and more reliable way of getting a large number of people into orbit and back safely and reliably, as well as reducing the cost of orbital transport.To acomplish this, Beoing designed and perfected a revolutionary new engine - the Turbine Based Combined Cycle (TBCC) engine. This engine combines three different engines in one - a turbine engine and a ramjet-scramjet which allows the same engine to operate at all speeds from high subsonic through Mach 18 using the atmosphere as oxidizer for much of the journey to orbit. For the final punch to orbital velocity, 2 ducted rockets are employed. The ducted rocket is a hybrid, air-breathing device that is intermediate in design and function between a solid propellant rocket motor and an athodyd, or ramjet, motor. Using airbreathing/liquid oxygen hybrid engines reduces the amount of oxydizer (the bulk of standard rocket propellents) needed for flight. Most of the fuel is liquid hydrogen & hydrocarbons. |
|
Sitting atop a modified Boeing 747, the shuttle is carried aloft to an altitude of 45,000 ft. and released. The ducted rocket engines and turbofan engines are fired using liquid hydrogen/hydrocarbon and air to boost speed to Mach 2.5 where the ramjet engines are started. At Mach 2.5 the turbofans and ducted rockets are shutdown and the vehicle continues to accelerate using only the ramjets-scramjets. Somewhere between Mach 8 and Mach 10 the rocket motors are ignited with liquid oxygen and liquid hydrogen. The vehicle then continues to accelerate using both the scramjets and the rockets to somewhere between Mach 14 and Mach 18 when both are shutdown. The vehicle will then coast up to its staging altitude of 150 km where the rockets are again fired to boost the orbiter into orbit and rondevous with the ISS. A powered, controled landing is done using the turbine engines. This enables the vehicle to land at any standard airport anywhere in the world. The model is a highly modified 1/144 Revell kit, the rear section with side engines is from the Hasagawa Young Astronauts Lunar Patrol Hopper kit. The bay passenger section is from an old MPC Pilgrim Observer kit. I used the Cutting Edge Tile Decals to mark the nose for painting as I didn't like the light gray tile pattern for this area, and the Revell kit has no guide lines - raised or scribed - of any kind to indicate the pattern. More tile decals were used to accent and outline different areas. |
|
|
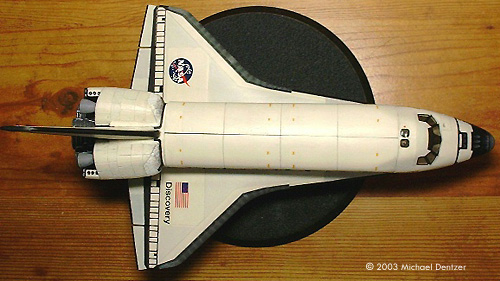
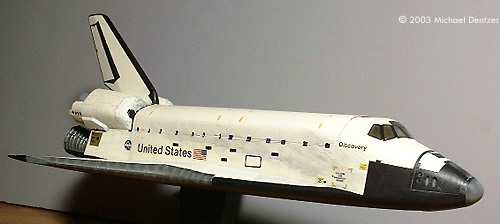
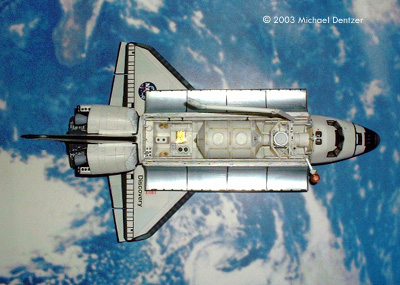
Image: Top view, payload doors shut Image: Starboard side Image: Top view, payload doors open Image: Left/rear Image: Payload bay Image: Payload bay, arm extended |
STS Orbiter Discovery OV-103 by Michael J. Dentzer The Discovery was the third Orbiter to enter service in Nasa's shuttle fleet. This 1/144 scale model is a modified bash between the kit from Hasagawa's Young Astronauts Lunar Patrol Hopper which transforms into two other craft, one being a NASA shuttle. I liked this kit over the Revell kit I had for several reasons:
There are many others, but these were the main reasons. Although I had to do a lot of modifications to the wings and rear engine section, the acurate placement of panel lines overall made this much easier to finish than would the Revell kit that I used for the conjectural entry Aquarius. The rear section of the Hasagawa kit was unusable as it had too many areas modified for the tranformable purposes so I grafted on the rear section of the Revell kit. I also had to use the Revell bay doors - cut in half - to make usable doors. The bay door radiators are scribed sections of an aluminum beer can. The doors themselves are hinged with paper hinges to allow them to open fully and close relatively cleanly. Much of the bay interior is scratchbuilt/kitbashed from the Revell kit. The engine bells and NASA meatball decals are those from Real Space, adding the final touch. |
|
|
Untitled by Kevin Stone This is a fictional shuttle of course. Not much went into building it except to convert an old AMT Leif Erickson kit by removing the engines and the bridge tower. Then I gave it a nice new paint job.Image: Top view Image: From the side |
|
Image: Engine bell plugs removed |
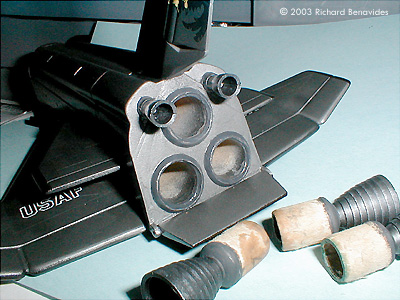
Armageddon Shuttle Independence by Richard Benavides Attached are two shots of my "Armageddon" Shuttle 'Independence'. In the NAR competition field the event called PMC (Plastic Model Conversion) I took the shuttle and made it to fly on three 13 mm Black Powder 'A' sized engines. Engine bells are plugs left in for static display. The entire cargo bay doors and boosters (not finished) will eject, allowing a parachute to come out and enabling the shuttle to fly and land in horizontal flight. At least that is theory. The paint is Model Masters Buffable Titanium where I buffed up some of the panels to give it a seperated panel effect and all was sealed with Polly S acrylic semi gloss. Later I will use a Minicraft 1/144th scale stack to complete the static display. |
| |
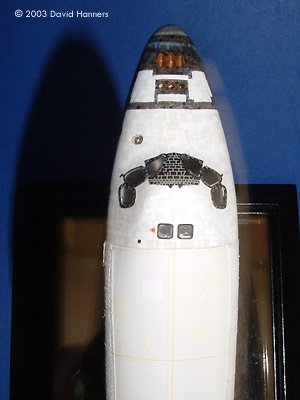
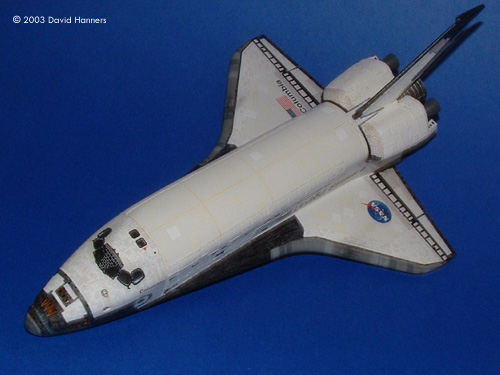
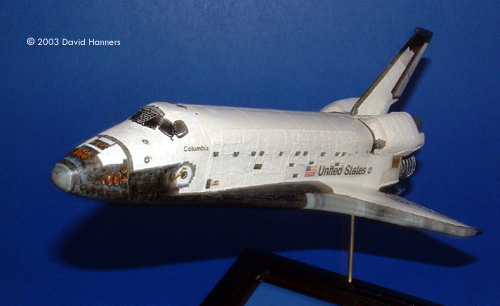
Columbia by David Hanners Image: Cockpit area Image: Top view Image: Port side |
|
|
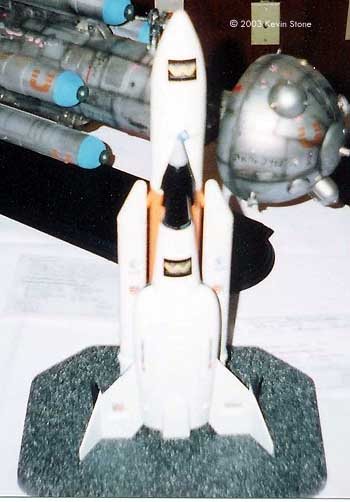
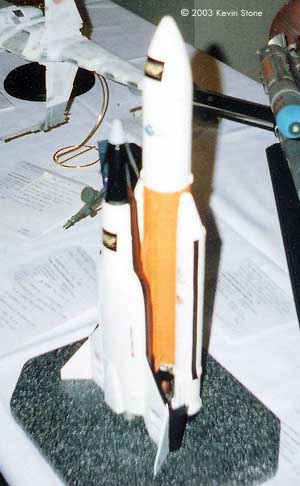
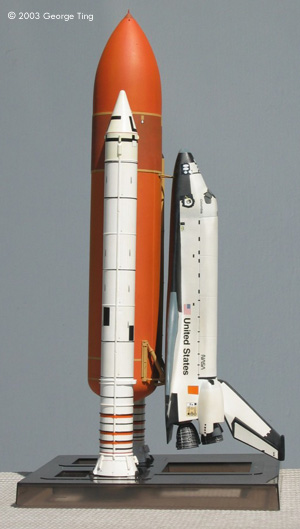
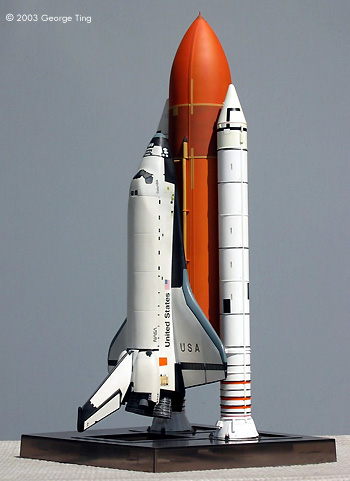
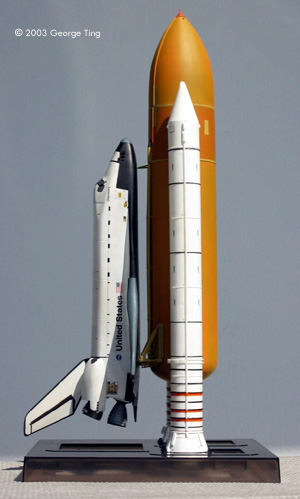
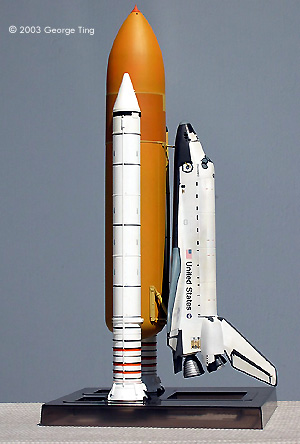
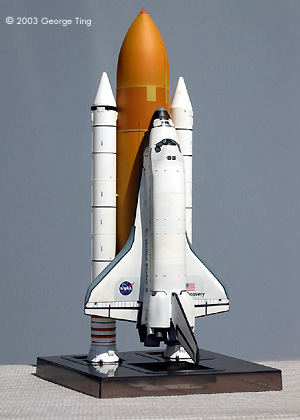
Columbia and Discovery by George Ting These shuttles are from Airfix 1/144 scale kit with aftermarket decal set for detailing and resin SSMEs by Realspace models. The shuttle full stack models are Columbia and Discovery. Image: Columbia stack, left side Image: Right side Image: Discovery stack, right side Image: Left side Image: Beauty shot |
|
Image: Close-up on the nose of the Orbiter Image: Tail Image: Underneath |
Columbia by Jay Chladek My own model didn't get finished in time. When completed, this 1/144 Airfix kit will be a replica of Columbia from STS-107 as seen just before launch. Lots of accurizing work was done to the External Tank, the Solid Rocket Boosters and the Orbiter. The orbiter itself also utilizes the brand new Space Shuttle Tile Decals from Cutting Edge model works. These decals are designed to represent the color variations seen on the thermal protection tiles after many orbital flights. They produce a very nice effect even if the coloring might not be representative of what was on every shuttle. So the next step will be to darken the tiles down in some areas to more closely match my research photos. Extensive work was also done to the cockpit windows to get the appearance that you see in these pictures. |
![]()
This page copyright © 2003 Starship Modeler™. Last updated on 13 August 2003.
![[Click to enlarge]](challenge/01_beauty_shot.jpg)
![[Click to enlarge]](challenge/01_business_end.jpg)
![[Click to enbiggen]](challenge/02_shuttle.jpg)
![[Click to make less small]](challenge/04_DLColumbia1_lil.jpg)
![[Click to supersize]](challenge/03_shuttle.jpg)
![[Click to swell]](challenge/05_F0003.JPG)
![[Click to see something remarkably like this, but larger]](challenge/05_F0005.JPG)
![[You know the drill]](challenge/06_disc4.jpg)
![[Clickety, clickity, click!]](challenge/06_disc2.jpg)
![[As big as it gets]](challenge/07_2155.jpg)
![[Clickety-boo]](challenge/08_PMC.JPG)
![[Click it or ticket]](challenge/09_columbia1.jpg)
![[As enbiggened as it gets]](challenge/10_ColumbiaStacklaunch.jpg)
![[No bigger either]](challenge/11_Gallerypic.JPG)