
|
By Alfred Wong - images & text © 2001 ![[XJ-class]](aw_xj1.jpg) Those who are familiar with the vast and richly detailed Star Wars universe outside the movies will know that the X-Wing starfighter, the ship most identified with the saga, is not exactly a state-of-art starfighter. It was already approaching obsolesence at the Battle of Endor, and most other fighters in the Star Wars universe can out-perform it with ease. Despite this, the X-Wing remains popular with its pilot and remains the dominant fighter of the New Republic. Those who are familiar with the vast and richly detailed Star Wars universe outside the movies will know that the X-Wing starfighter, the ship most identified with the saga, is not exactly a state-of-art starfighter. It was already approaching obsolesence at the Battle of Endor, and most other fighters in the Star Wars universe can out-perform it with ease. Despite this, the X-Wing remains popular with its pilot and remains the dominant fighter of the New Republic.
|
|
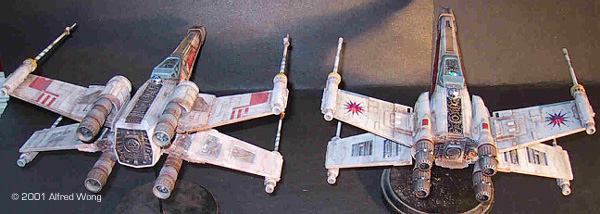
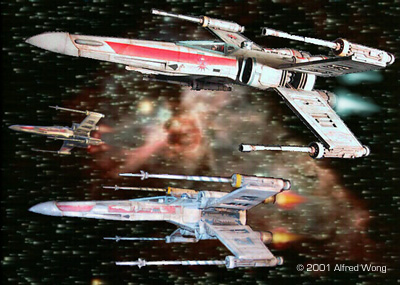
Image: Under construction (2) Image: Under construction (3) Image: Rear view, with standard X-Wing Image: In flight Image: Top view Image: Bottom view |
X-Wing pilots love the fighter's ruggedness, reliability, power, range, versatility and ease of handling. The Jedi-Knights have also steadfastly held on to the X-Wing as their ship of choice. To use a real-world analogy the X-Wing is very much like the McDonnell-Douglas F-4 Phantom; a widely-used, popular, dependable workhorse serving long past its prime, even though its flight performance is no longer quite up to par anymore. New Republic engineers have worked to improve the X-Wing to at least keep pace with newer and better starfighters, the ultimate version is perhaps the XJ-class as described in the New Jedi Order series of books. The XJ is designed purposely for use by the Jedi-Knights. All Jedis will eventually get the XJ, and presumedly regular squadrons after that. There has been no image published of the XJ, but what is known is:
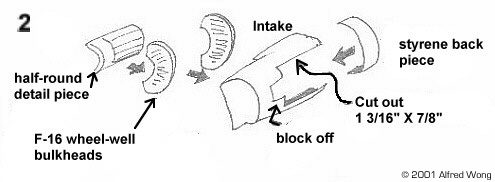
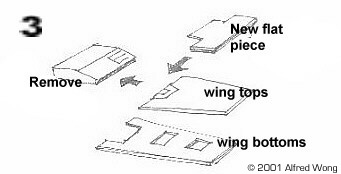
In deciding what the XJ should look like, I wanted to keep as much of the X-Wing as possible, while making it look more lean and up-to-date. It was also an opportunity to trim down that big back-end. The X-Wing studio models had that big, boxy rear end in order to house the S-Foil operating gear. I will outline 6 major steps for building the XJ. I used the large scale AMT/ERTL X-Wing kit, and used parts from 2 old Monogram F-16 kits and F-18 kits I have kept just for parts. Engine nozzles from a Starfury was also used. A small illustration is included for each of these steps. Step 1: Fuselage: Cut back the rear fuselage box by about 1 inch, and remove a good 1/4 inch from the bottom. Cover the bottom with a piece of .60 thou styrene, fill the edges and sand smooth. Add some panelling detail and landing gear doors to the new bottom. Blank off the back with styrene and add detailing. It's a good idea to modify the existing X-Wing details as much as possible for the sake of continuity. Step 2: Intakes: Assemble 2 sets of F-16 intakes (front & 2 sides). From the back edge, make a cut-out 1-3/16 inch long X 7/8 inch high for the wings, (you'll need to block out the remainder of the nose-wheel bay opening). Add a 3/8 inch strip of styrene to the back ends. You can use the detailed wheel-well bulkheads from the F-16 kits to box in the wing-insert opening. You will also need to make some kind of half-round detail piece for the inside, attach this to the bulkheads. Step 3: The S-foils: Remove the engine-mounting boxes from the 4 wing tops and replace them with flat, detailed styrene pieces cut to fit. These pieces should have an extended insert that will fit into the intake cut-outs. |
|
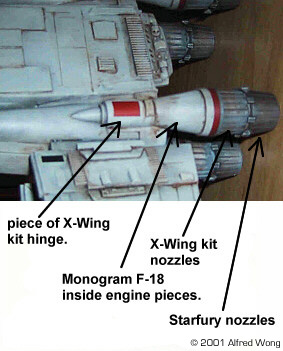
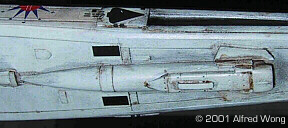
Step 4: S-Foil Assemblies: Make some 30-degree angle pieces and assemble sets of S-Foils for each side. Test-fit in the cut-outs as you go. Step 5: Engine Nozzles: Stack up the parts as outlined in the illustration. The cylindrical bits are just cut-off ends of the hinge halves from the X-Wing kit. The cones are the engine insides from the 2 F-18s, then add the X-Wing nozzle pieces, the Starfury nozzles finish the assemblies nicely. Step 6: Torpedo Launcher: I wanted to find something interesting to use for the new launcher, and settled on half of a spare chaff dispenser-pod left over from a built 1/48 Italeri Tornado IDS kit. I just added a new front piece and did some minor modifications. Obviously, you may use something different, just try to keep it interesting yet simple, not just any old plain missile-half. Finally, I made other minor improvements, such as a less-cluttered, more advanced-looking cockpit; as well as new sensor blisters on sides of the the nose. I finished it in the markings of Rogue-11, Jaina Solo's starfighter. I used substantially less weathering than on my old X-Wing. I even made a little Jaina for the cockpit. |
|
![]()
This page copyright © 2001 Starship Modeler™. Last updated on 28 November 2001.
![[Click to enlarge]](aw_xj3.jpg)
![[Click to enlarge]](aw_xj5.jpg)
![[Click to enlarge]](aw_xj6.jpg)
![[Under construction]](aw_Xwjconstruct1.jpg)
![[Click to enlarge]](aw_xjxw2.jpg)