
By Christopher Langwade - images & text © 2006
|
![[Please click to enlarge]](cl_boba_models004.jpg) |
| Editor's Note: It has been brought to my attention that the particular kit in this review is almost certainly a recast of Kaiodo's 1/6 Boba Fett, now out of production. This is something I'm sure Christopher did not know when the model was presented as a gift. Recasting, the practice where someone pirates another company/person's work and sells it as their own, is the scourge of the garage kit industry. It's driven many legitimate companies out of business. Lesson learned: always check the background of the kit you're looking to buy so that you don't inadvertantly support recasters. Starship Modeler does not, and will not, support recasting. Folks looking to buy this model should not either, which is one reason I will leave this review online. Plus the bulk of the article deals with painting a convincing Boba Fett replica, so it is still of use for the folks who have bought the original, licensed kit (or any of the various other scale kits, such as the 120mm Kotobukiya version). ----- John Lester, Starship Modeler Publisher |
|
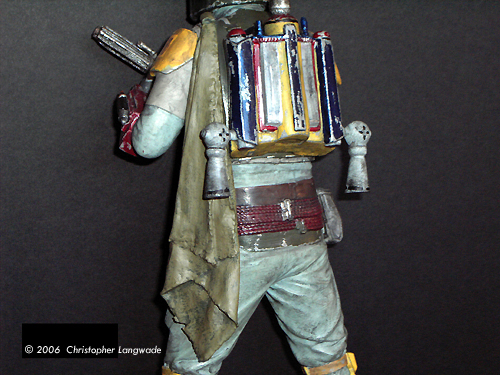
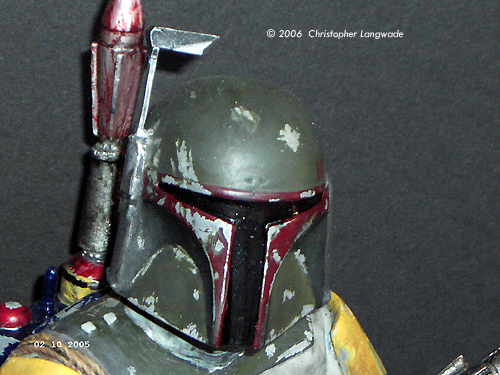
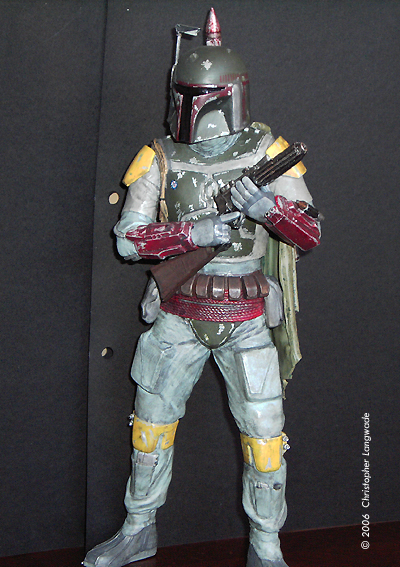
Image: Left side Image: Rocket pack and back Image: Front Image: Here's looking at you, kid Image: Full front |
Being a lifelong star wars fan I was wanting to get my hands on this kit the minute I saw it on the Frontier Models website. After a few gentle hints to the family I was presented this kit as a birthday present from my kids, god bless them. Building Upon unwrapping and opening the cardboard box it was supplied in I was pleasantly suprised by the crispness of the moulding (no flashing). I laid out the parts and started the assembly. The first thing to deal with was trimming the parts. For this I used hot water and a sharp scalpel. The cutting is pretty straight forward; however if the part you are trimming starts to harden up as you cut it, then pop it back in the hot water to soften it. This will prevent you having fingertips covered in old scars where you've slipped with the scalpel. Then deal with washing and cleaning the parts to hinder any chance of a paint reaction. A good soak in washing up liquid and warm water, then a gentle scrub with a toothbrush to remove any mould relaese agents from the parts, should be enough to eliminate this problem. If you have any bubbles or sink marks in the vinyl then use a small amount of putty to fill them and sand then smooth when it's dry. I had next to no imperfections in the vinyl and only ended up using a fingertip of putty to smooth out any slips I had whilst trimming the kit. I then gave the the model a base/primer coat of paint with a couple of thin coats of undercoat I used some automotive plastic primer, (normally used for undercoating car bumpers). This gave a very smooth base to work onto. Once dry I went on to putting some weight into the legs to prevent the finished model from falling over. If you are planning to mount the finished model on a base then now is the time to do it. I drilled to bottom of the boots out and fitted a small nut and bolt into it, and then used epoxy resin to set the nut and bolt where needed. I used a material I use at work for making repairs to concrete (a concrete resin) but I'm sure that normal concrete would work just fine. A tip though: when you have poured your concrete in to the legs it might help to stand the model in a bucket of water to cool down the chemical reaction that takes place as concrete dries. This should stop any warping of the vinyl as it hardens. (Or you could use plaster of paris - ed.) |
|
After this had set (give it at least 24 hours), I continued with the basic construction, but left of any parts like the arms, head ,rocket pack that were easier to paint separately then attach later as the model nears completion. Painting I began with a coat of Tamiya light blue on the flight suit (after days of research on the Internet I found this colour to be very similar to the original lucasfilm costume). Whilst waiting for this to dry I started work on the helmet and gauntlets. I painting these parts with an enamel-based chrome silver, ( you could also paint the rocket pack as well at this stage, you will need to leave these parts for a day or so for the paint to dry properly). Going back to the flight suit, I painted the 'jerkin' that is worn underneath the armour with Tamiya XF-19 Light Grey. This when dry may look as though it is too light, however by the time you've finished with the weathering later it will look spot on. Now it was time to paint the rest of the armour with the chrome silver. When this was dry I painted over the chest armour and helmet with a dark green (Tamiya XF-61); the knee armour and the shoulder epaulets were painted with Matt Yellow 24. The gauntlets were then painted with REVELL Matt 38 (Wine Red). Once dry the details were picked out using dark washes of Tamiya XF-1 Matt black. The 'T' piece on the helmet was painted REVELL Matt 38 and the visor section was painted with HUMBROL Gloss Black. When painting the cheek recesses on the helmet I used consecutive washes of black to darken up the area but not change the colour completely , just give it a subtle hint of a darker area. Going back to the body, I painted the leather belt around his waist and the honour sash that he wears. The sash was painted with Tamiya XF-7 Red. The leather belt was painted with Tamiya XF-10 Flat brown. When these were dry I gave then a black wash to darken them up and a bit of drybrushing of the original colours to pick out the details. I chose this point to put the main kit aside to dry for a couple of days and started painting the rocketpack. Starting with the lightest colours, I painted the 'pack' with the following colours: Tamiya X-3 Royal Blue, XF-7 Red, XF-19 Sky Grey, and HUMBROL Matt Yellow 24. A word of advice take the painting of the rocket pack very slowly, leave each colour to dry before starting with the next colour. When I was happy with the overall colour of it I gave the 'pack' copious amounts of black washes to darken up the clean paint, giving it a very dirty and used look. When painting the 'metal' rocket to attach to the 'pack' I used a black wash to change the colour of the metal but not completely. I painted the uppermost part of the 'rocket with HUMBROL Clear Red, then wiped most of the paint of leaving just a hint of the Red colour behind. This gives the appearance of the 'rocket' being very worn and battered. Back to the flight suit, I gave the completed flight suit and jerkin a few dark washes to dirty them up. The idea here was to make them look 'real and lived in'. I completed nearlly all of the rest of the construction steps, such as attaching the belt pouches (but left off the two large 'hip' pouches) and fitting the helmet. I left the arms off until the model was completed -- at this stage believe me it's easier to paint the model without the arms on. When the 'washes' have dried I gave the suit some drybrushing of the original colour added to a very little amount of white paint. This highlighted the folds and creases on the material. INext I painted the blaster rifle with Tamiya XF-1, then drybrushed it with XF-10 Flat brown to replicate the grime and rust on it. The cloak that is fitted to the left shoulder was painted with Tamiya XF-62 Olive Drab, and when dried given a heavy wash of Tamiya XF-59 Desert yellow. I found I needed to give it extra washes to get the colour to lighten up considerably. I used a mixture of about 70 percent paint and 30 percent thinners for this wash. Whilst this was drying I started chipping the armour on the chest, helmet, gauntlets, knee pads, and rocket pack. To get the desired effect I took a brand new scalpel blade and very gently scraped away the Tamiya paint. If done carefully this should remove the softer paint and reveal the silver 'base' underneath. Believe me the scratches on the armour look more realistic when done this way. I used the same process on the rocket pack. It's a slow process, but have fun whilst your doing it: it's not very often you get to paint something to a pristine condition then scratch the hell out of it for fun. I painted the 'wookie braids' on the right shoulder with Tamiya XF59 Desert yellow, then gave them a dark wash followed by a drybrush with a lighter base colour. The 'kill' marking on the helmet was painted with REVELL Matt 38. The 'bantha' skull marking on the left shoulder was hand painted with REVELL Semi Matt 381 (Sandy Brown). The hoses on the right arm were painted with HUMBROL Chrome Silver, and given a heavy dark wash. The boots were painted with Tamiya XF-24 Dark grey and the 'points' on the tip of the boots picked out with HUMBROL chrome silver. For the knee 'pad' straps I used REVELL Semi matt 381. The belt buckles on the rear of the model were carefully picked out with HUMBROL chrome silver then given a black wash to darken them up slightly. The gloves were first painted with Tamiya XF-19 Sky Grey. Then the fingers and thumb were painted Tamiya XF-24 Dark Grey (if you look at the gloves you will see the markings on them to assist you whilst painting). The various switches on the gauntlets were picked out with Tamiya XF-1 Flat Black. The two large hip pouches were left the original undercoat (grey) colour and darkened up with a very black wash (it took three or four washes to accomplish this). The idea here was that these pouches were never part of the original suit that boba's father 'Jango Fett' wore, they were added to the suit at a later date by Boba. Finishing Touches With these items completed all that remained was to finsh any last bits of construction and make touch ups to the paint. I also found at this stage that I could give the model a couple more washes just to blend everything in. Then I mounted it on a base and stepped back to admire my work.Thanks must go to Dale Radcliffe who proved to be an invaluble source of information, and to Steve Jarvis at FrontierModels.com for supplying the kit - 'thanks guys'. Paints and Materials Used TAMIYA (acrylics):
ENAMELS REVELL:
HUMBROL:
Glue: quick drying epoxy resin References:
|
![]()
This page copyright © 2006 Starship Modeler™. First posted on 10 April 2006.
![[Please click to enlarge]](cl_boba_croppedhead1.jpg)
![[Please click to enlarge]](cl_boba_models008_lil.jpg)