
By David Windham - images & text © 1999
|
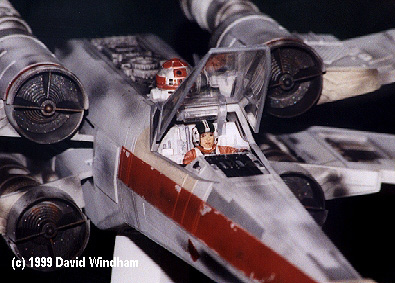
Probably the most recognizable starfighter today, the X-wing fighter once again blasts its way into the modeling world. This time, though, it's packing an extra punch. First off, it's BIG, with a 13" wingspan and 15" from nose to tail it 25% bigger than the older version. If that's not enough, you get a bundle of electronics that include motorized wings and canopy, lights and audio clips. With the touch of a button, Luke calls out "I am Luke Skywalker" and "Red 5 standing by" while Darth Vader coldly says, "I have you now!" and "Don't make me destroy you." Another rebel pilot begs you to "Stay on target" and lastly, a the sound of a blaster pierces the air. |
![[Paint it black]](dw_xwing6.jpg) ^First off, paint the interior to help keep the light only where you want it.
^Scoring the wing.
Fixing the wing detail, before and after.
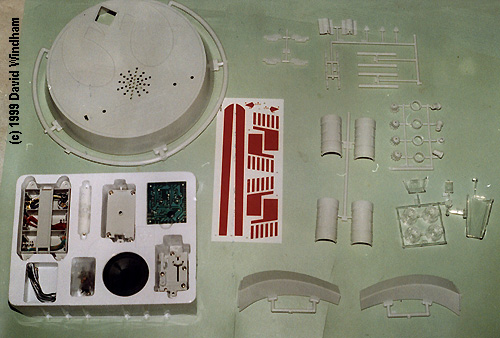
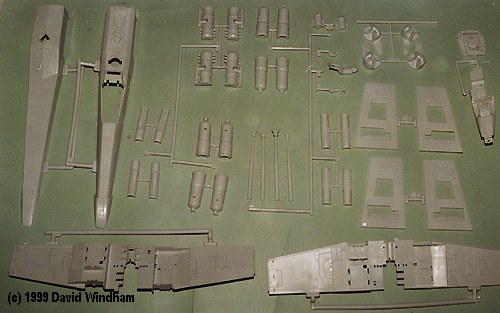
^Sub assemblies, prior to weathering. |
With all of the reference out there for X-wings, I'd say this is pretty good as far as accuracy is concerned. Some of the detail was lacking on the exposed hardware area behind the trusty R2 unit and on the engine guts inside the wings. One thing in particular was grossly inaccurate. They finally decided to put some detailing in the open areas inside the wings, but went just little crazy, filling up the entire area with all sorts of garbage. They made up for it with the cockpit and pilot, though, adding all the stuff on the 'dashboard' and making a pilot that looks like an X-wing pilot and not some vague representation of one. This kit is pretty hard to come by, at least where I'm from. I found one at one of our less popular hobby stores, dropped some hints and got it for Valentine's Day. Normally it sells for around $60, which may seem like a lot, but becomes worth it in the end. It's a typical injection molded kit with 88 parts for the actual ship and base, and a whole tray full of the electronics, over 100 parts in all. The parts were all very nice with hardly any flash at all. I did find some forming problems with a couple of the clear engine parts, though. Probably just a fluke, but watch out for it. Some of the sprues have very large connections that can give you some trouble when removing them and adding to the little clean up required. O.K. Let's put it together. The parts all had extra little ridges, grooves, notches and slots which made everything fit almost perfectly. I was very impressed considering some of the previous kits from AMT/ERTL that I've dealt with. The instructions were pretty straight forward, although the wiring diagrams seemed a little messy. I kept confusing the paint colors listed with the wire colors and got a little lost. Before I got really started, I painted the insides of the parts where the lights were going to be so the whole ship didn't glow from the inside. After that, it starts off with the cockpit. While there wasn't much to the assembly, a big long painting break is required. At this point, it also helps to know which X-wing you plan to build. The instructions included and list of pilots from Red Leader to 'Porkins' and how many stripes they had on the wings of their fighters. I say this now, because it's time to get the videos out and check out the markings for the pilot's helmet. I chose to do Red 2 piloted by Wedge Antilles who had big dark green stripes on his helmet. Also, you can look for pictures of the 'dash board' and get all the gory details for it. The wing assemblies were next. I got rid of all the garbage that filled up the hole in the inner wings with a dremel and smoothed it off with sanding films. After that I used some 1mm rods and tried to make it look a little more accurate. I also replaced the gun barrels with 1/16" copper tubes. After the wings were assembled, I ran into the only big fitting problem I could find. Once you get the wings done and stick them together using the geared tube insert, in the closed position they were still about 25% open out by the gun placements. I don't know if they had gotten warped or were just formed that way, but it simply wouldn't do. My solution, while probably not the best, was to score the wings along the inner edge and carefully bend them in a little so they matched up when closed. I then ran a bead of super glue along the scored line to 'un-score' it and provide some support. Like I said, this probably wasn't the best solution, but it worked for me. |
|
|
|
With everything mostly painted, I proceeded to finish the assembly. The motors for the wings and canopy are attached with screws and all the wires are fed out the bottom. This is where it gets trickier. All the wires that have to be soldered to the circuit board are not in the most convenient lengths and spots. With a little patience, and only and couple of burns, I managed to get everything working. After everything checked out, I glued the ship to the base and called it finished. I thought this was a great kit. It was a little tough in some spots, but probably because I'm no electrician. With the lights, sound, moving parts and overall finished look, I feel it was worth any headache I had to put up with. Definitely a fine addition to anyone's collection. Many thanks to my wife for having to deal with the hobby dealers that tend to look at her like she has no business being in their store.
|
^Engines, lit.
Four views of the completed kit |
![]()
This page copyright © 1997-9 Starship Modeler™.
Last updated on 21 July 1999.
![[He shoots, he Scores!]](dw_xwing3.jpg)
![[Get rid of these]](dw_xwing4.jpg)
![[Wing detail mods, after]](dw_xwing5.jpg)
![[Pre-weathering]](dw_xwing7.jpg)
 After the wings were finished I painted all of the major parts with light grey. I decided to not use the decals since they were easy to replace with a quick masking job. To get the chipping effect, while it the areas were masked off, I took some rubber cement and splotched it on in some spots. After the red was dry I used a rubber-cement pickup and rubbed off the cement, creating a nice chipped paint effect. You have to use water-based paints with this technique, though, or else the cement dissolves your base coat. I then used sand and dark ghost Grey for some panel work and in the exposed wing areas. For the weathering I first used a light black wash to make it overall dirtier and to bring out some of the panel lines. Then some black airbrushing for streaks and blaster marks followed by a little jet exhaust and some dry brushed rust.
![[Complete!]](dw_xwing14.jpg)
![[Lights! Action!]](dw_xwing10.jpg)
![[Comin' atcha]](dw_xwing11.jpg)
![[Side view]](dw_xwing12.jpg)
![[Closed]](dw_xwing13.jpg)