
By John Boswell - images and text © 2005
|
![[Please click to enlarge]](jb_rebuild_TOP_OBLIQUE_lil.jpg) Yeah I know, all sounds a bit gloomy at the moment doesn't it? |
|||||||||
|
This Snap Kit idea, if you've made models for a day or all your life chances are you hate the concept, please eMail me if you know one that actually snaps and stays snapped! Anyway enough moaning, ERTL's Rebel Base kit will give you the Falcon, Rebel transport, 3 X - wings and 4 Snowspeeders, all to scale.The kit's usually pretty cheap on E-bay so its a nice way of getting a few ships out of one kit. MILLENIUM FALCON |
||||||||||

|
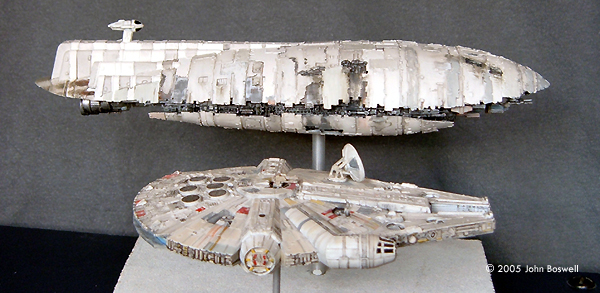
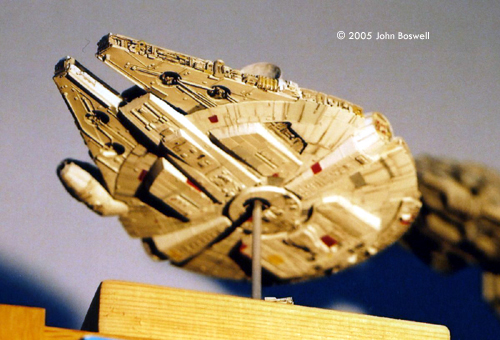
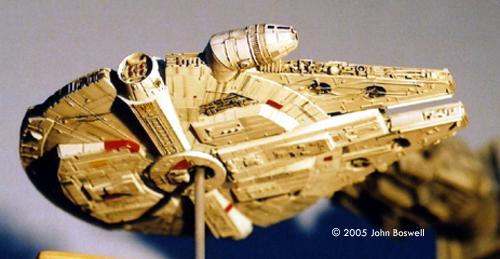
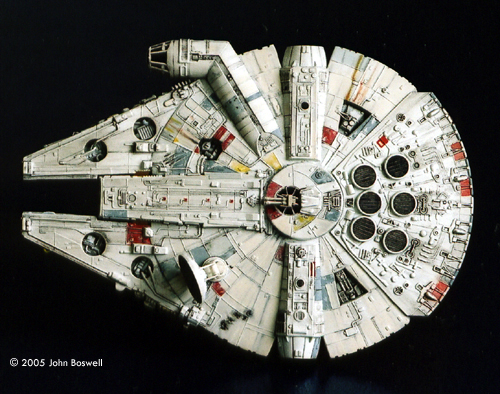
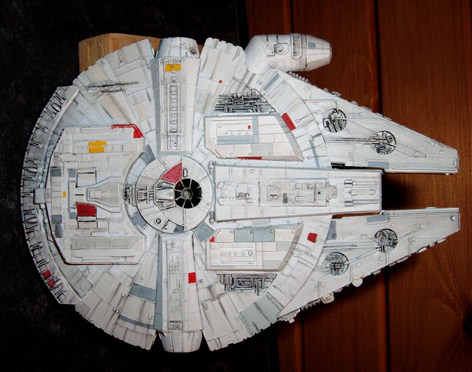
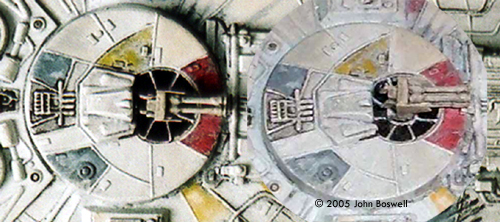
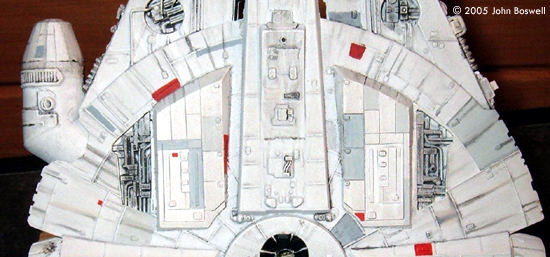
Image: Underneath the port side Image: Starboard side, upper Image: Starboard side, below Image: Top view Image: Underneath |
I started work on the Falcon and my 1st step was to list all the problems I wanted to fix:
Side Walls I used a sanding drum in my Dremel to remove the thick side wall on each half of the falcon, filing out the more hard-to-reach areas. |
|
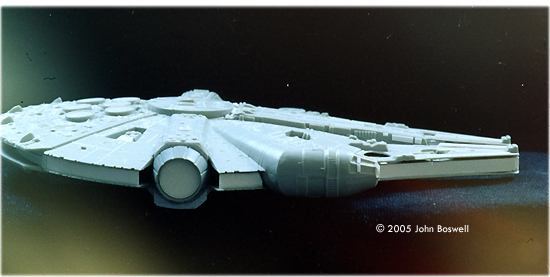
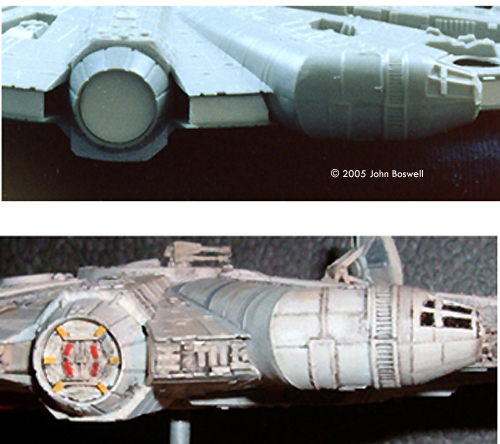
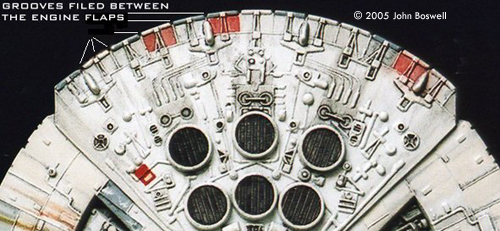
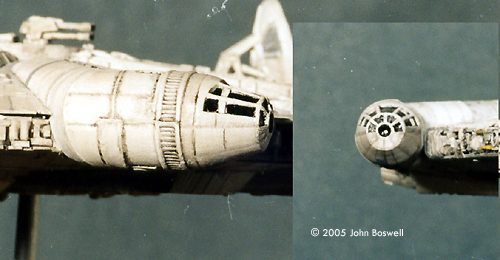
I then thinned out the plastic all the way round, being careful not to melt the plastic as I went along. I cut some long strips of plastic-card approx 3mm wide to make the new side walls. Once in place the Falcon looked so much better, much more like the studio model. The Falcon has 4 recessed holes above and below each of the two loading mandibles at the front. Mine disappeared while I was sanding so I had to scratchbuild them. I used 7mm diameter plastic tubing, cut into 4 rings the same height as the side walls. A thin circle of plastic card was glued half way inside each ring, after which I detailed each side with greeblies. This is the hassle you get for daydreaming while Dremelling! The side wall detailing is just mainly greeblie bits of plastic strip, cut into various sizes just to vary it a bit. I did try to follow the studio models detail along the loading mandibles; the trick here is to resemble it, don't worry if it's not spot on. I used stretched sprue to replace as well as add to some of the pipework on the mandibles; you can see where I put what in the pictures. Escape Capsules The new escape capsules are made from 1/48 Revell F-18 engine nozzles, with about 3mm cut off to fit. I detailed the inside using thin sheet styrene and stretched sprue. Engine The engine is a strip of grooved Evergreen styrene with a thin strip glued half way along it's length. Grooves were filed between each engine flap to better resemble the studio model. Unfortunatley I made my mistake by gluing together each kit half BEFORE painting the engine !! After a few choice Anglo-Saxon expletives I dug out a very thin brush and carefully painted my engine piece gloss sky-blue. Ah well, you live and learn ! Cockpit The cockpit doesn't have the side-frames or any detail at the front. I added thin Evergreen strips at the side and then carefully filed them down to blend them in. For the front I drilled a hole to take a 3mm diameter styrene tube; it protrudes by about a millimeter so the front frames can taper up. The bottom half is Milliput shaped to match the taper of the frames. |
|
|
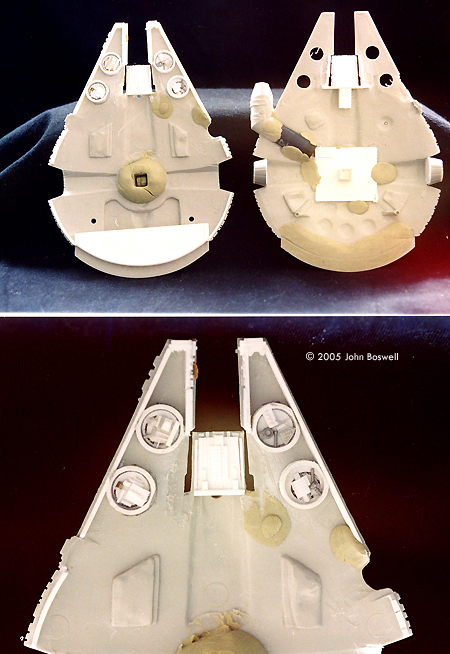
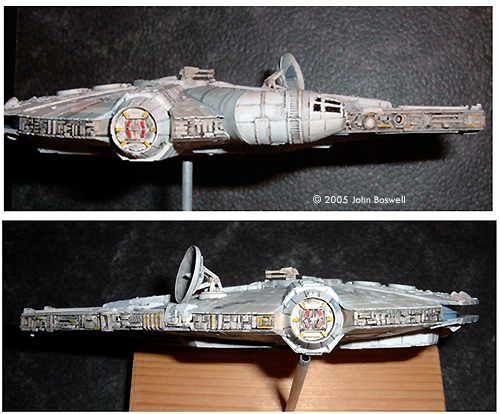
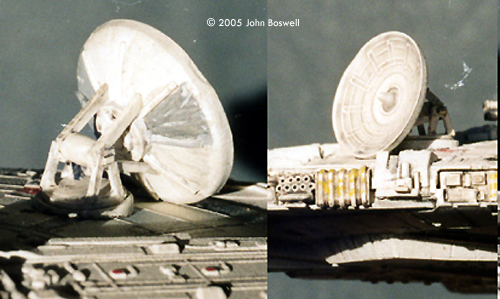
Sensor Dish I added a small spike to the centre of the radar dish and filed all the detail off the back. Looking at the back, the centre disc is from the spares box, and the 8 ridges are Evergreen strip. The framework is mainly steet styrene with a thin tube to connect it all together. I only noticed after I finished the kit that the dish is WAY too big! It needs about 3.5mm taking off the outside edge. Ah well, maybe Lando replaced it with a bigger one after ROTJ hoping Han wouldn't spot it! Quad Lasers and Top Turret The only way to get these was to scratch them. I made mine from a Tamiya 1/35th scale German Infantry accessory kit. I used the handles from 8 grenades to form the barrels, the rest is all sheet styrene. The bottom guns are detachable so I can display the Falcon using a stand slotted through this area. Somehow ERTL managed to mold the top turret bit on backwards, but if you carefully cut round the turret you can remove it with minimal clean-up. Once glued in the correct position I filled any gaps that where left. Sadly I don't have a "before" pic, so I used the computer to un-do my efforts. Extra Landing Gear Bays I noticed something while doing my research that if I used the existing recessed detail panels as a reference and sized my bays to fit to them, they'd be too narrow. I cut 2 paper templates in the shape of my bays and positioned them until they looked right. From there I could draw the outline of the new detail panels. These were cut open and detailed. The gear bay templates were stuck to sheet styrene and, using Milliput to get the right positioning, then attached to the Falcon. Painting Now for the fun part. The base coat was Halfords plastic car primer (white). After it had cured I painted all the coloured panels (grey, red, darker grey, odd bit of yellow) using my references to get it as accurate as possible. Onto the weathering, this was just washes of thinned Tamiya black of various strengths until I thought it looked just right. I guess the trick is to stop yourself just before your happy with it, because undoing overdone weathering is a lot of hard work. REBEL TRANSPORT |
|
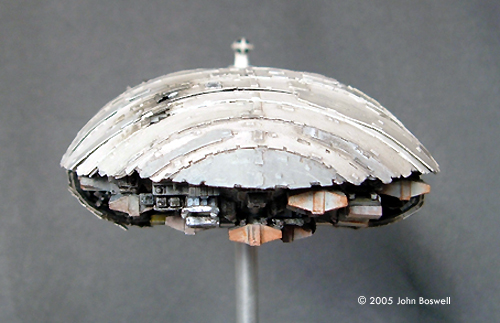
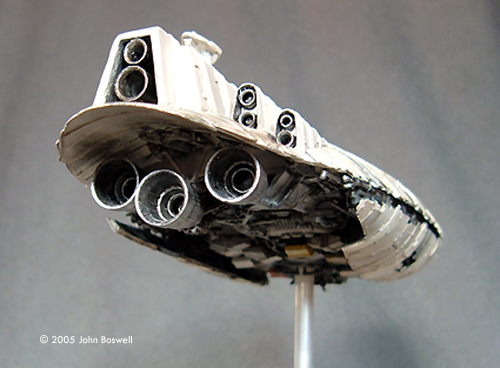
Image: Head on view Image: Right/rear Image: Left/rear Image: Port side Image: Starboard side Image: Top view Image: Underneath Image: Right/front |
As with the Falcon this will need loads of work, here's a list of what I wanted to improve -
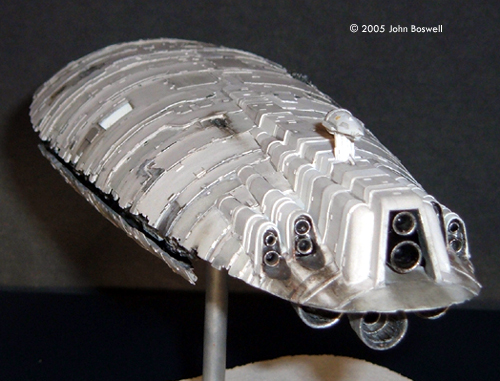
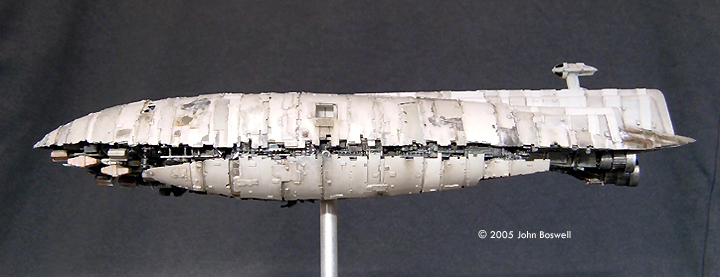
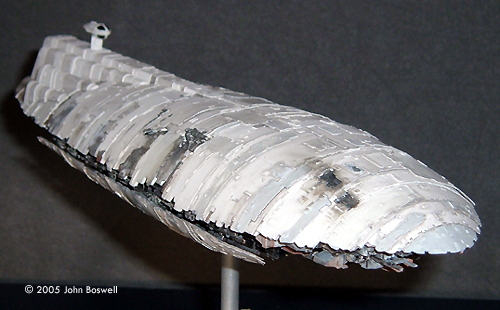
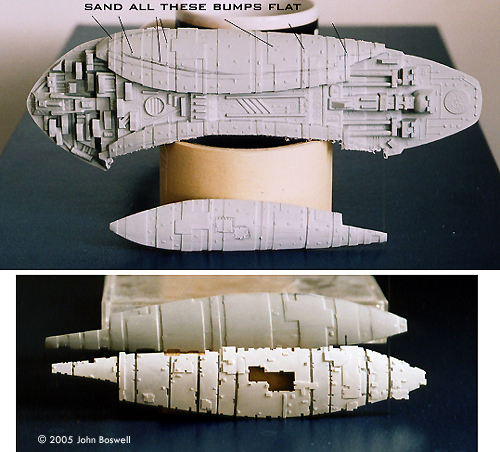
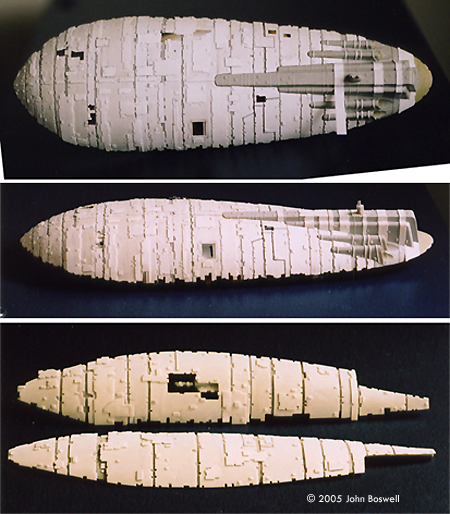
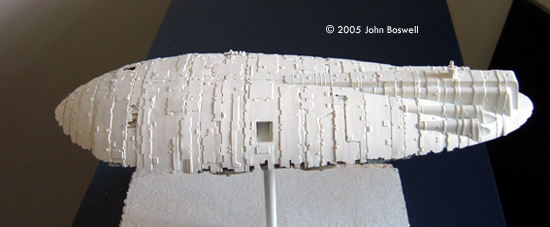
Hull Plating My first step was to cut away the two large lower side panels from the bottom part of the kit. Then I sanded off all the raised details from them and the upper hull. It's crucial not to sand them flat as the kits panel lines will help me keep the new hull plating from veering off track. Here's the tricky thing with the plating: if you cut a straight strip of styrene it won't line up properly on the model. This is because the hull curves sideways and from front to back. So, I stuck Scotch Magic Tape to the model and using the kits panel lines as a guide, drew them onto the tape. I transferred the tape to thin styrene sheet and cut these strips out. These strips look like arcs as opposed to straight strips. I then affixed these to the kit and where they lined up nice and straight. Once the hull was covered in styrene I cut small notches out of the plates, as seen on the studio model. Small bits and strips of styrene were selectively stuck all over the kit, giving it detail and a sense of scale, not to mention giving me eye-strain in the process. |
|
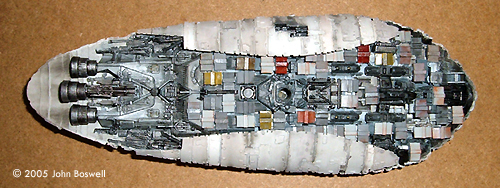
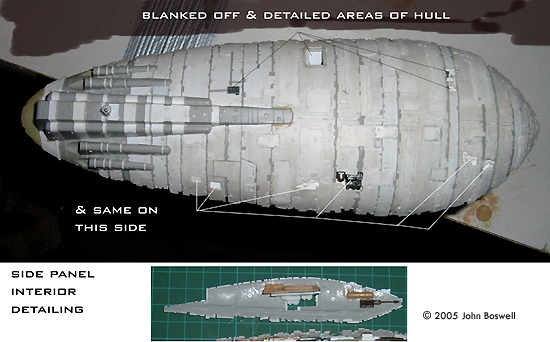
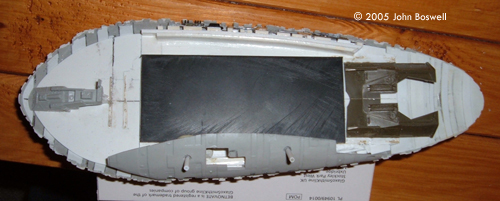
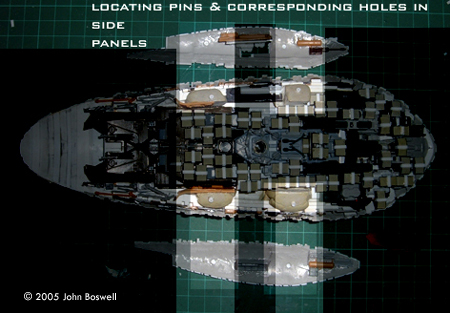
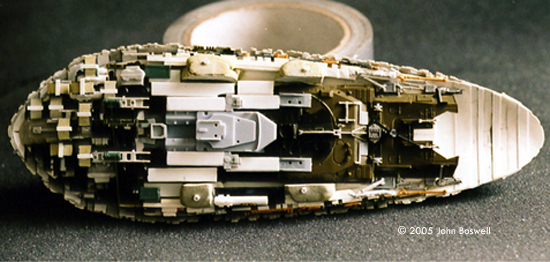
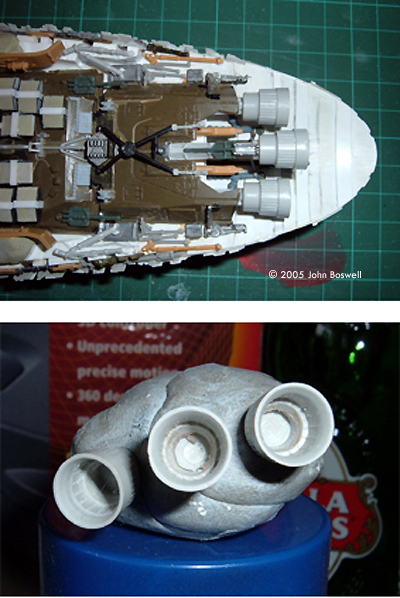
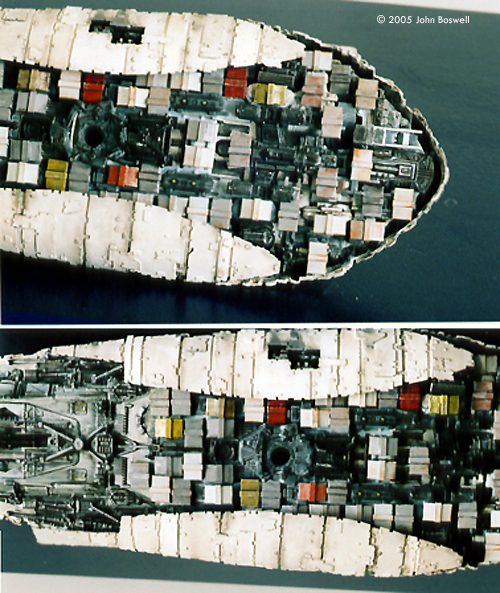
Pilot Pod and Tower Pretty basic this one, the tower was a small diameter styrene rod layered in stretched sprue. The pod itself is scratchbuilt from styrene and Milliput. Engine Recesses These are at the back of the top hull. I drilled them open then filed them out. I couldn't find any engine bells in my spares box so I just used styrene tubing to make the engines. I painted them in such a way as to hide the fact they were cylindrical and not bell - shaped. Bottom Detail This is easily the hardest part of this project, so I'll try to explain what I did in stages. I took a long look at my reference pictures, the underside of the Rebel Transport is fantastically detailed, a real credit to the ILM model builders. My main problem was the small scale of the kit and how to represent it all. STEP 1 - First task was to detail and blank off all the open sections of both the main hull and side panels. Then the underneath of the main hull needed blanking off with thick sheet styrene, which would also act as a base for all the new detail to be glued onto. The back of the hull is too short, so I curved some thin styrene and glued it to the rear underside of the hull. Once dry this was filed and filled to the correct shape. STEP 2 - I needed to know how the side panels would fit so I could build the detail in to the right depth. I built some locating pins from styrene rod embedded in milliput so I could work around the panels but detach them whenever I needed to. STEP 3 - The depth of the hull's underside was built up using more layers of thick sheet styrene, I also glued thick strips along the edges to act as a base for the detailing along the sides. STEP 4 - That's the basics done, now it's time for the superdetailing. The bottom is made up of dirt-cheap kits from eBay, cut, filed, sawed and generally abused in some way to get them to fit in how I wanted them to. Among them are HMS Fearless, bits off 1/72 Apache helicopter, and body parts from 1/72 tank kits. This gave a good detailed base for all the smaller details to be glued onto. These came from the spares box, but I tried to give each piece a sense of purpose. I wanted the bottom and sides to be as detailed as possible without looking random and messy, so I duplicated some parts to give an impression of symmetry. STEP 5 - The cargo pods. If you want to try these DON'T do what I did, which is scratch each individual one, you'll go nuts! Make a few and then cast them in resin, much, much easier. Mine were just made from scrap styrene and Milliput, with thin styrene strips glued over them. These were glued on somewhat randomly, but again I wanted to resemble a working ship so some thought went into it. STEP 6 - I used the engines from the kit but they're molded very thick. I used a Dremel to thin the insides out. All three are glued onto the same part from ERTL's Slave 1; the middle engine is just angled differently so it hangs lower the the other two. |
|
|
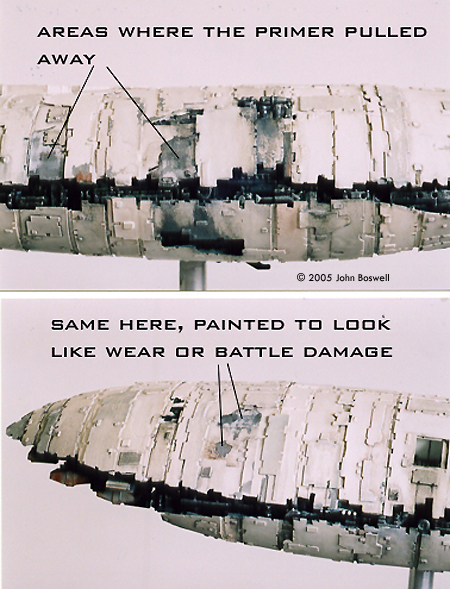
Painting I gave everything a grey primer coat, then started painting the color coats. Sadly this is where things went VERY wrong, initially anyway. I wasn't happy with my first colour scheme so I used Model-Strip to get it back to the primer coat. This is a paste that dissolves the paint but it also attacked the hull plating causing it to buckle and curve away from the kit body. It also attacked some of the primer causing that to peel away too. My options were -
I cleaned off all the Model strip and repaired the hull plating as best I could. Next up was another coat of primer and this made things look a lot better. Where the primer had initially peeled away I decided this could pass for battle damage or wear. I painted those areas either aluminium or chrome to give a bare-metal look. I then painted various panels shades of grey to give an overall panelled effect, once this was done I was really pleased with how the Transport was looking. The weathering was done by dipping a cotton bud in Tamiya thinners and rubbing on the model. This removed paint in a controlled and gradual way, giving a really worn, battered Rebel look to it. The underside was a breeze in comparison. Mainly stages of dark washes, the same cotton-bud tecnique was used near the engines. The cargo pods were all painted individually, some I dry-brushed a rust colour, others with aluminium. Areas around the engines were drybrushed with greys and burnt umber. The bases are only temporary, as I plan to display the two ships together. Afterword Without all the problems I had at the start of painting the model could've looked a lot better, but I'm still really happy with the end result. I'd like to see more of the Rebel Base ships posted so if you have that kit give it a go, and post it when you do, I'd like to see 'em ! |
![]()
This page copyright © 2005 Starship Modeler™. First posted on 26 October 2005.
![[Please click to enlarge]](jb_rebuild_falcon_back.jpg)
![[Please click to enlarge]](jb_rebuild_TRANSPORT_HEAD_ON_Under.jpg)