|
|
|
|
By Paul Bornn Copyright © 1999. |

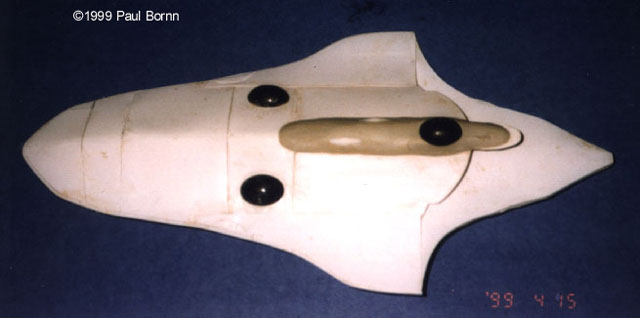
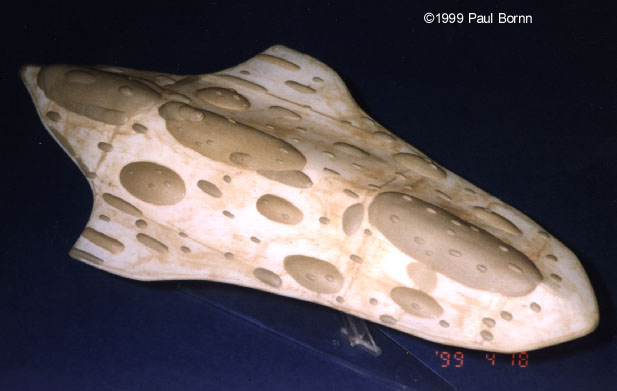
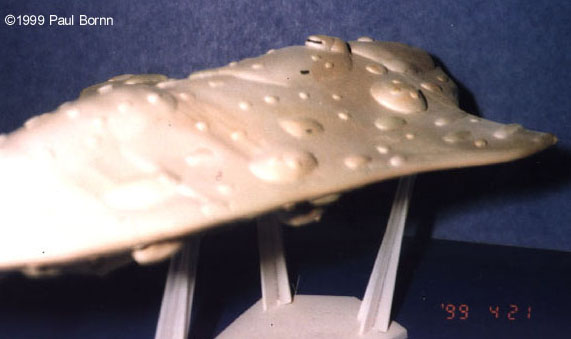
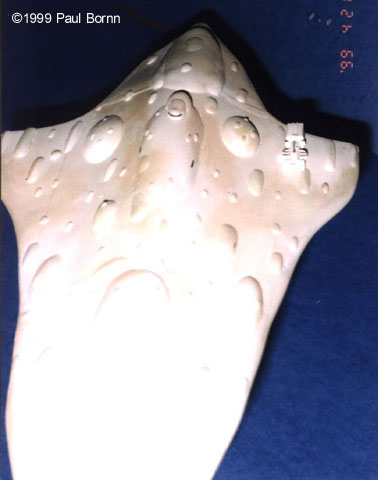
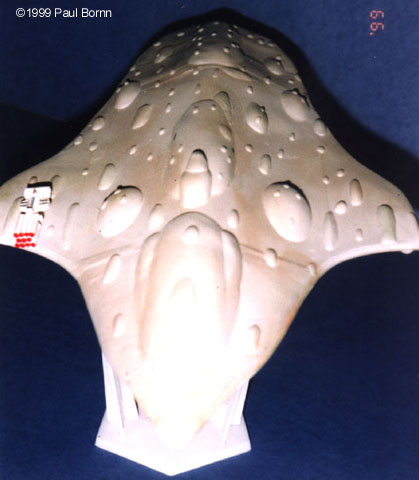
After the death of the Emperor the Alliance found the need for heavier cruisers thus came the newer series of Mon Calamari cruisers. The Republic was built roughly to scale with my AMT Imperial Star Destroyer. As per the Star Wars The Essential Guide to Vehicles and Vessels manual the Star Destroyer is 1600 meters long and the Mon Calamari M80 series cruisers are about 1200-1400 meters in length. This gave me and idea of the scale and actual size of the ship. Layouts of the actual shape drawn to 1:1 scale and used to lay down the keel and outline of the ship. The ship is actually 33cm long (13 and a half inches) by 18cm wide (7 inches) by 8cm high (3 inches) and has a crew of 15000, carries 4 squadrons of fighters for a total of 48 fighters. The cruiser measures in slightly smaller that the I.S.D. as the book say it is smaller so there you have my scale. First I laid the keel with support ribs. Styrene plastic was used and molecular bonding glue was used to put the parts together. Each rib was hand cut and outlined on the blueprint. This allowed me to see ahead what the shape would be before actually cutting and gluing the parts together. Once the ribs and supports were in place thin sheets of styrene were glued over the ribs and trimmed to fit properly. Several parts of the skin were done in small sections for ease of fitting and to ensure a smooth form. After the first thin layer of skin was placed on a second layer was placed over to further form the shape. It must be remembered this ship is to look organic and not mechanical or built but rather grown. Once all the skin was in place the edges of the ship were the top and bottom had to be addressed. As I used 3.2mm flat piece to outline the edges I wanted to make the side look round and not square. I therefore used a 3.2mm half round strip over the edge. This gave the impression that the top and bottom blended into one round piece. You see the strip along the bow of the ship, as I had not yet finished the stern. The engines were built separately and the last to be placed inside the nook on the bottom of the ship. The cracks and uneven areas were the pasted with Testors putty and sanded to a not so perfect finish (partly on purpose). Now the real challenge began…the bulges. As some may remember from the movies the Mon Calamari cruisers are known for there rounded shape covered with blisters and bulges contain various equipment. I needed to come up with a way to build these blisters in a simple yet pleasing manner. This is when I discovered Milliput epoxy putty. Probably the easiest stuff I have ever worked with. Just like plasticine and all I needed was some water and my I let my fingers do the work. The putty works like clay when wet and sticks to the styrene without the need for glue. I let the putty set overnight the box says three hours but that is a little understated as if the putty is not hard it gets very easy to leave an impression when one has started a new blister. Once dry the putty was lightly sanded to smooth out any mistakes etc. In pic 2 the black bulges and the white ones were buttons I found at a craft store. I had to do the larger bulges then let dry before I could build on them with the smaller ones. I actually used the putty to fill in some of the cracks as seen on the stern along the edge trim and the actual stern tip. When the putty began to harden I made the impressions for the bridge and shuttle bays throughout the ship. The bridge is the top raised part on the rear part of the central blister. The hardest part was using my not so tiny fingers to mold the really small blisters! After all was set and done the painting…..I used Tamyia AS-16 light US Air Force Spray paint. Which meant I had the house ALL to myself…make sure you vent !! I applied a thin base coat then the fun part next. Using make-up sponges I dabbed and mixed Tamyia XF-21 Sky, XF-25 Light Sea Grey, Hobby Color H321 light brown in various soft patterns over the entire ship. As seen on your website of the studio model the hull is made of various color patters. I tried to create my own cammo type pattern. Then a second coat of the AS-16. I then used Hobby Color H12 flat black to accentuate the bridge, shuttle bays and the sensor area on the bottom seen on pic 5. After all the painting was done the engines were assembled using styrene tubes of various sizes and glued to a backing. Each individual engine was places and balanced to look like they are symmetrical. I painted with the flat black and Tamyia clear blue was painted on the inside to simulate the fire which burns inside. I then used the AS-16 light grey from a very far distance and with minimal spray left a light spotting over the engines to help blend but not too much. The engines were then glued in place and a beer was opened to celebrate! All in all I really had a lot of fun building this cruiser from scratch. This was my second scratch built starship but not my last. The Mon Republic looks pretty good beside its opponent the dreaded Imperial Star Destroyer, however I think it looks best on my desk at home reminding me of how much fun model making really can be. |
to see a (much) larger view.
|
![]()
This page copyright © 1999 Starship Modeler™. Last updated on 23 May 1999.