
By Paul Heaberlin - images & text © 2002
|
![[Click to enlarge]](ph_fmx_001F.JPG) What can I say about Finemolds' X-wing that hasn't already been said? Nothing. |
|
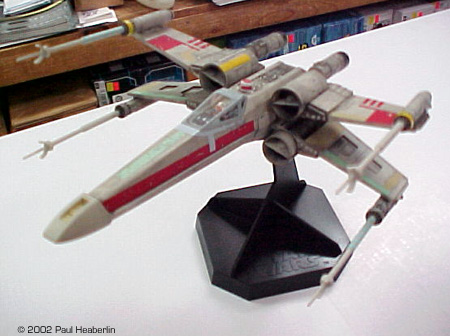
Image: Red 3, top/left view
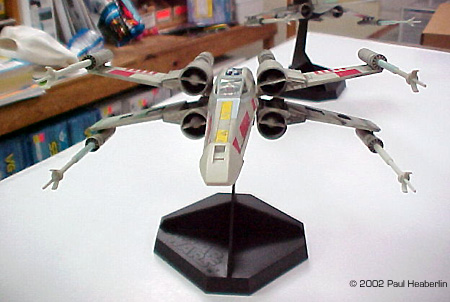
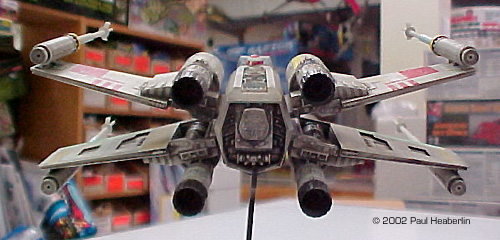
Image: Red 5, front view Image: Red 3, rear view Image: Red 5, upper fuselage Image: Close-up of Biggs' R2 Image: Engines, dirtied-up Image: Close-up of R2D2 Image: The ink wash really brought out the details Image: Luke looks good under the crystal-clear canopy |
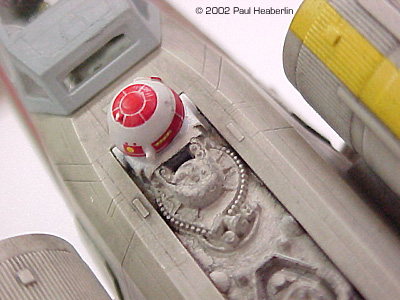
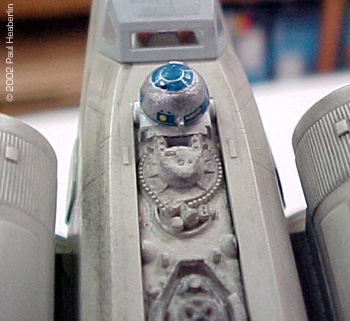
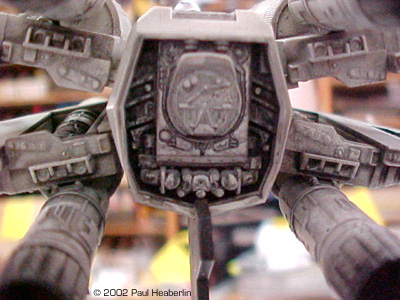
This is THE "must have" Star Wars" kit of all time (except maybe the new TIE Fighter). These are pictures of my two - Red 5 and Red 3. I started them months ago, but because the inspiration hadn't been there, and I wasn't sure of this color or that color, I started slow. Thanks to the guys on the Starship Modeler message boards, though, I got inspired. First off, I looked at the cockpit. The instruction sheet says to paint it the same color as the rest of the ship. To me, the X-wing cockpit has always had a light blue look to it. I came across Model Master Flat Interior gray #2739. Looks perfect to me. Ioated the interior pieces, gave them a wash with a bit of diluted black acrylic, and dry brushed. I painted the seats flat black. I assembled the wings, engines and fuselage separately. There were no problems. Then it was time to paint. The concensus is that X-wings are supposed to be camouflage gray. I didn't see it. Didn't seem right, but base coated them anyway. That's when it dawned on me that Camouflage gray looked just right! I looked it over, and just HAD to bring out those panel lines scribed throughout the ship. That's when things slowed down. Dirty, Dirty Wash I've been building figures for a lot of years and haven't really done a good spaceship since my Starfuries, but they have raised panel lines. Back in 1992, I used a black wash to bring out the panel lines on my Narcissus, so I figured I'd use the same technique of a gloss black wash. Alas, no go. Don't know if I was rusty, if I wasn't thinning it right, or if I had put too thick a coat of paint on it, all I got was what I call wash stains. No matter what I did, my results sucked. The rectangle on the back, the one with the R2 units, the wash worked on it fine, but everywhere else, no luck. I toyed with another idea recommended by the best modeler at my club. He recommended using black oil paint (something he is Michelangelo with). The problem with that was: I used enamels and the oil paint would ruin that. So, I got the idea to use India ink. I picked up a bottle of black, some Q-tips, and a bottle of 91% alcohol (don't know if the 91% had anything to do with it butģ), and sat down to try something new. I dipped the brush into the ink, drained it off then dipped it in the alcohol a bit. Then, starting on the bottom near the engines I traced the panel lines with the brush. It overflowed a bit, but I remedied that by dipping into the alcohol and went over it. I let it dry a bit, then dipped a Q-tip into the alcohol, rubbed it over the 'overwash' and BINGO! I was shocked! So I used a bigger brush and began slapping the diluted ink over every part of the model. Sometimes I added more alcohol. Then I rubbed over it with the alcohol soaked q-tip and got some fantastic results (that I hope you can see in the pictures). The alcohol-soaked q-tip was alot like dry brushing, in that it rubbed the ink off all the raised areas and then some. This technique made the engines look nice and dirty. This is the thing I love about modeling, when I 'try' something and it works better than expected. Off and on over the weekend, I got the ship all dirtied up. Mind you, sometimes the q-tip does not get all the overwash off. Sometimes you can still make out the edge where the ink ended, but the alcohol will dull it almost completely. When all was said and done, I had 2 X-wings that looked like gaming miniatures with a great wash on them. The ink I feel gave them a metallic look. I then started the FUN task of putting on the decals. ("I gotta bad felling about this." -Han Solo). Decals On thing that is awesome (among all the other things) about this kit is the decal sheet. It gives nearly EVERY marking you would find on the studio models of Red 1, 2(Wedge), 3(Biggs) and 5(Luke). Even small ones you would never see. |
|
Luke's are all there, but the ones on the lower starboard wing interior look like a light green instead of a gray in the pictures I've seen. And the nose decals for Biggs', decal #103 looks light green and the don't include the dark tan/brownish markings that go on the nose near the radome cover (look in the Art Of Star Wars, you'll know what I mean.). Despite the color concerns, or the fact that some of them didn't look faded enough, I used them anyway. I used most of the decals to cover both ships, but reached a point where I figured "They're done."
Surprisingly enough, I got the helmet decals and R2 unit decals on! I did debate on painting Biggs' R2 how it looks in the live action scenes, but was happy with how it looked with the supplied decals. I do, however, hope to paint Red Leader's R5 as it looked in the live action scenes. The only decal that didn't like me was the one for the framework on the canopy. I ended up painting it with light ghost gray, but I think the flat interior gray I used on the cockpit would probably match the decals better. Conclusions These are great kits, well worth the money. A bit small, but look awesome in the end. I'm very proud of mine! I have FINALLY built an X-wing I am happy with! Soon, I hope to have one on landing gear, then do both Red 1 and 2. Or maybe I'll do Luke's sitting on Dagobah after Yoda fishes it out. Hmmmģ For reference material see the books The art Of Star Wars, The Star Wars Chronicles, and From Star Wars to Indiana Jones. |
![]()
This page copyright © 2002 Starship Modeler™. Last updated on 24 July 2002.
![[Click to enlarge]](ph_fmx_002F.JPG)
![[Click to enlarge]](ph_fmx_007F.JPG)
![[Click to enlarge]](ph_fmx_009F.JPG)
![[Click to enlarge]](ph_fmx_003F.JPG)
![[Click to enlarge]](ph_fmx_011F.JPG)