By Philip "FLASH MASTER FLEXX" Schembri - images & text © 1999
|
|
|
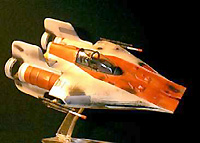
The A-Wing is the most nimble ship in the rebel fleet, and a favorite of mine. This kit is no longer sold in the U.S. I got mine from a guy in the U.S. who deals in rare Star Wars stuff as a hobby. I painted the model as I was assembling it, instead of waiting until after everything was built. For the majority of this model I used an airbrush, but used a fine brush for some of the weathering effects. I used acrylic paints throughout. First I painted the model camouflage gray for the off-white color. Then I spotted it with a flat gull gray to give it a "wearing away" appearance. I carved and sanded out the concussion missile launcher holes and the two small inlets in the front of the ship. I also drilled out the laser cannons with a sharp hobby knife. I then painted the middle the model and the engine tubes with a brick red color I mixed from "Insignia Red" and "Leather". I made the paint lighter in some areas than others to give it a more beat-up appearance. I completely finished the engine / vertical stabilizer sections before cementing the top half and bottom half together. I weathered the engines before attaching them because they were easier to get to unattached. I airbrushed a dirty black / brown color to replicate engine exhaust stains. After finishing the engines I started on the rear area / exhaust ports. I used a dark gray primer color, then thinned out and brushed on some of the color I used for the engines to give it a leaky oil / dirty appearance. I then cemented the pieces of the model, sanding off all "snap tight" prongs for a better fit. I applied a small amount of putty to the rough edges next the concussion missile launchers and sanded them smooth. I then re-airbrushed the area with flat gull gray. Next, I added some detail to the cockpit by adding some electronic pieces of an broken Walkman and painted it all a dirty black - gray color. I used a gloss orange to paint some the cockpit instruments. For the pilot, which is terribly detailed, I added some putty the helmet to give it an A-Wing pilot look and a black and white chest plate with very thin strips of black tape for harnesses. I painted his flight suit dark green and his helmet gray. And finally, weathering the ship! I used a dark gray primer for some of the replaced panels on the ship. I airbrushed "laser scorches" on the hull and vertical stabilizers. I then took the same dark dirty color I used for the engines and misted the model in certain spots, including the areas around the launchers. ![[Grrrrrrrrrrrrr!]](ps_awing2.jpg) Overall, it was a simple kit to build and I had a lot of fun painting it. Get one if you can! |
|
![]()
This page copyright © 1997-2001 Starship Modeler™. Last updated on 7 November 2001.