
By Rafael Mateo - images & text © 2001
|
![[Click to enlarge]](rm_awing/24_FINISH.jpg) OVERALL At first sight, it seems to be a easy model and any modeler can finish it in only a weekend, if they just want a simple out-of-the box build. The shape and details matching the IL&M model fairly well but, it's a Sanp-Fast kit so, if we want to have a good replica and avoid a "plastic toy" look, we must do some serious work. I chose this model thinking it would be a fast project but, it ended up taking me a lot of time. |
|
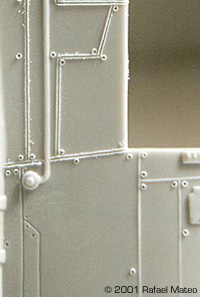
|
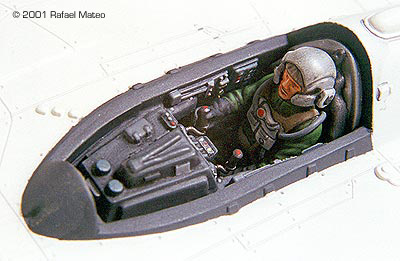
These are the parts I modified or scratchbuilt:
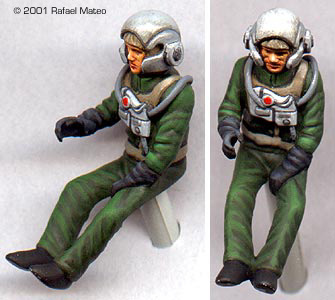
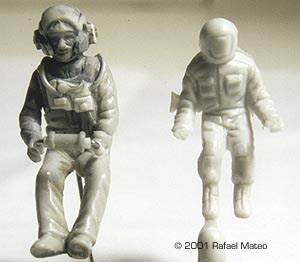
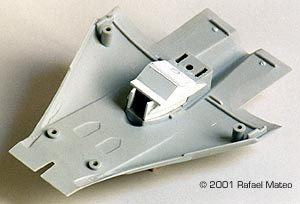
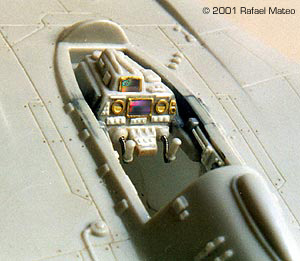
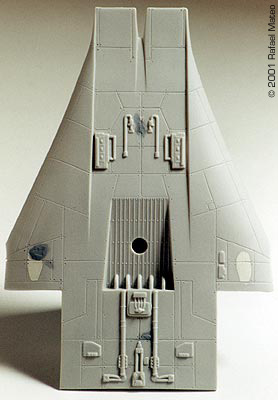
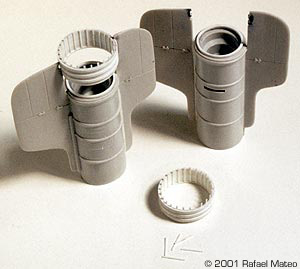
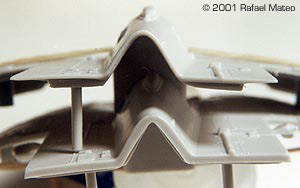
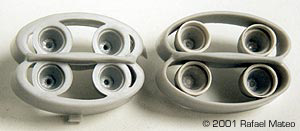
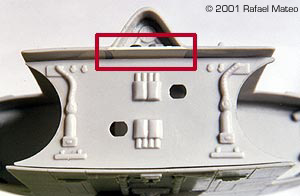
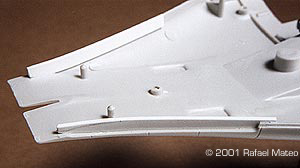
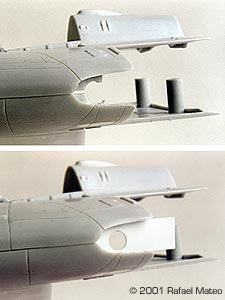
1.- PILOT The pilot supplied on the kit is too much small and the flight uniform and equipment isn't right. I got a new pilot from a 1/48 helicopter kit and it was transformed to get a good A-Wing pilot. I modified the helmet using modeling putty and small plastic parts to get the right shape. The flight suit was carved on the plastic figure and the chest pack was made from different thickness plastic. The ear globes were made with modeling putty.2.- THE COCKPIT First, I filled the holes for the canopy pins with plastic bits and putty and built the inside walls and floor with 1 mm. sheet styrene, taking care to keep free space for the pilot. The upper side on the main console looks right and only some plastic bits were added. The front side, however, is really poor so I detailed that part using photo etched details, electric guitar strings and some scratchbuilt plastic parts. Finally, I put two bits of hologram on two screens to simulate electronic images. The side consoles was scratchbuilt matching a IL&M model photo.3.- THE CANOPY This clear part is very irregular and it cause major transparency distortions. I cut the snap-fast pins and the front wall off. I then sanded the part entire part with medium and fine sandpapers. After this I used Tamiya's polishing compound to remove scratches and restore the original transparency. 4.- THE PANEL LINES I removed all the raised panel lines and rivets, and rescribed them carving with a scriber on the main hull parts and the stabilizer wings. I added the lost lines around the side cannons axies. 5.- ENGINE PARTS The main problem with these parts was that they were poorly molded with a irregular, not just a circle, shape. I worked on them with sandpapers and files where the shape was too much high, and modeling putty where it was short. I removed the last ring on the rear end of the main engine cylinders, replacing them with two new and perfectly circular-shaped rings from styrene sheet. The new rings hide any distortion in the rest of the engine. (A). The thrust rings are poorly shaped as well and are hard to repair parts. I removed them and built two new rings from scratch. I used a 19 mm cylinder to vacuum form sheet styrene, from which I cut the two basic rings. The details were added with 0.4 mm sheet styrene outside and 0.25 mm inside. (B). The rebuilt engines look much better than the kit parts.6.- PARTS THICKNESS The excesive thickness on some parts that are visible on the finished model are clearly out of scale and a serious fault for any model. I thinned the rear zones of the main hull parts from 1.5 to 0.5 mm. and the stabilizer wings to half of the original thickness. The end cap was really bold. I removed the four thruster jets to thin the inside of the cover chassis. The four exhausts was cleaned and completed with plastic tube before pasting them in their places again. The new exhaust are about 1mm. shorter than the original because they must not be at the same level than the cover chassis. This part looks now more accurate and closer to the studio model. Another part that has to be modified is on the back side of the fuselage. I added a little plastic strip under the rounded triangular shape to complete it. 7.- MISSILE LAUNCHERS These zones have a irregular and were not deep enough. I cut them and pasted two plastic strips inside the fuselage to get a uniform 1.2mm. depth on both sides. |
|
Finally, I covered with sheet styrene the areas to receive the side cannons because it was poorly molded and a huge gap would have been visible when the model was finished. After that, I pprepared to paint. PAINTINGI did not attach the completed engines and the laser cannons to the main body to make the painting work easier. These parts can be affixed after painting without any problem. First I painted the pilot and cockpit. I slid him into position and then and I glued on the clear canopy, filling and sealing with Milliput putty all the flaws. This putty is easy to use, water soluable and won't damage or mark up the clear plastic parts. Then, I masked with Tamiya masking tape all the clear areas (except the canopy frame) to allow painting of the rest of the model. The main painting starts by applying several thin layers of coating primer. Next I applied the basic colors using these Tamiya acrilyc paints:
I don't even use the bad kit decals. Instead I substituted others from a 1/72 Hasegawa«s "Tornado" fighter. I did the weathering and ageing effects using several techniques and the next steps:
REFERENCE DOCUMENTATION
|
|
![]()
This page copyright © 2001 Starship Modeler™. Last updated on 7 November 2001.
![[Click to enlarge]](rm_awing/14_COCKPIT.jpg)
![[]](rm_awing/16_FRICTION.jpg)
![[]](rm_awing/20_PAINT.jpg)
![[]](rm_awing/19_PAINT.jpg)
![[]](rm_awing/21_FINISH.jpg)
![[]](rm_awing/23_FINISH.jpg)