
By Ward Shrake - images & text © 2001
|
![[Click to enlarge]](ws_darthtie2.jpg) I liked building this kit. It was a pain in the (bleep) to build, but the end result was worth it to me. If you are used to the usual poorly-fitting sci-fi kits, and are willing to spend some time with the kit, the end result can look very nice. I put a lot of extra effort into this kit, partly because it was the first kit I had actually built in many years. That, and I was interested in seeing how it would do in competiton at local (Southern California) model contests. |
|
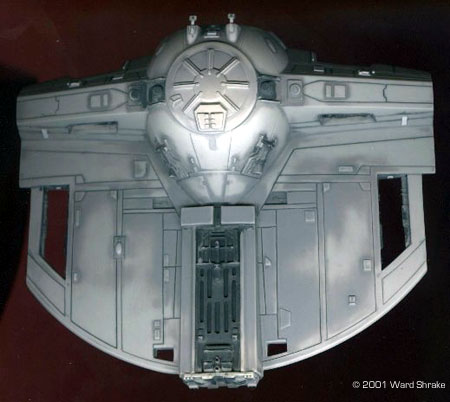
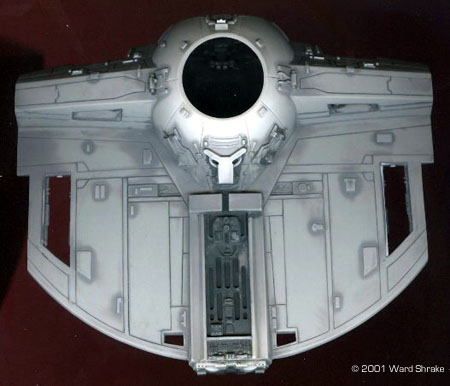
Image: More details and rescribing, on opposite "wing" Image: Top of the hull, showing pre-shading (described in the additional text) Image: Bottom of the hull, showing pre-shading ![[Detail on wings]](ws_darthtiea.jpg) |
I nabbed a few contest trophies with it before "retiring" it to my shelf space, so the extra work was well worth it to me.
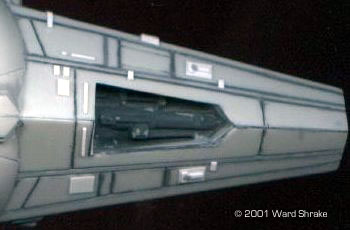
In-box Overview This kit builds up into a fairly large model. Final size is 4.6 inches tall, 6.7 inches long (front-to-back) and 7.7 inches wide. There are 55 parts total. This breaks down into these major groups: 7 cockpit parts, 2 figure halves, 4 main fuselage parts, 6 wing parts, 23 fuselage details, 5 hatch parts (2 are molded in clear), 2 base parts (also in clear) and 6 landing gear parts. The instructions were easy enough to follow. Nice, big pictures apparently meant for younger modelers. No decals were included but none were really necessary, either. (There is only one spot on the original studio model that had anything like a decal on it; one small red rectangle on the upper hatch.) The figure included with the kit just looks awful. It is supposed to be Darth Vader, sitting down and flying the ship. In reality, it looks much more like some kind of a troll, apparently sitting on a portable toilet. I just ignored the figure when I built the model. The cockpit details supplied with the kit are completely made up. There is nothing like that seen in the actual movies. However, the details they did include are really nicely done. Very fine details for a Sci-Fi kit in general, let alone one that was designed in the late 1970's. (This is the same exact cockpit as the 1/48th scale #8438 "Imperial TIE fighters" kit... except larger, of course, because of the scale differences.) My suggestion is to just do a nice paint job on what they supplied and leave it at that, in most cases. I got quite a few compliments on my painted-but-stock interior at model shows. And this was from military modelers, who generally just give Sci-Fi kits a glance in passing. Most of the exterior parts also have a fair amount of detail on them. There is neither more nor less in a given area of the kit than on the studio model, as a general rule. Most of the "problem" areas I noted were places the injection molding process itself had limits in, such as the need to avoid any undercuts; the usual, expected over-simplification. Although my initial impression was that the details were perhaps a bit fuzzy and indistinct in places, I later realized that this is pretty much the norm for kits of this age, type and scale. Besides, I have to admit I am spoiled by the modern add-on detail sets that the major resin and photo-etched parts manufacturers make for many military model kits. Most sci-fi kits are just not in that league at all, let alone 1970's kits! When I took the half-completed model to my model club, even my military modeling friends had some nice things to say about the overall amount of detail that is included in this kit. It pleasantly surprised them, so I decided to adjust my attitude accordingly. Overall impressions I must admit that during my build-up of this kit, I was generally having fits because (pun intended) none of the parts DID fit! |
|
I did not start to truly enjoy this build-up until halfway through the process, when I decided that my initial expectations were partially to blame. In other words, when I quit thinking that this kit should have been (for example) up to Tamiya's exacting modern-day standards, it quit frustrating me. I then began thinking of it as an imperfect garage kit. I enjoyed building it from then on.
The kit does have a lot of raw potential, but anyone considering buying one should be aware that this is a kit originally designed and tooled in the late 1970's. In terms of overall parts fit, this is not a good thing at all. Stock up on putty and super glue. You will need them to build this kit nicely, without obvious gaps or seams. (3M's automotive "Acryl Blue" putty rocks, in my opinion!) Detailing is generally very accurate when compared to the studio model. (Which I have actually seen close-up and in person, during the traveling Lucasfilm Archives museum exhibits.) There are a few areas that are not perfect, but most people would not be able to tell the difference. You'd never know just from watching the movie, since the few times the ship is seen at all, there is considerable motion blur. Even with good reference sources handy, it takes some study to find any major areas that are glaringly "wrong". It is interesting to note that some sources say that the original studio models of the "TIE Bomber" variant seen in the "Empire Strikes Back" episode of the Star Wars series were supposedly built using wings from the MPC kit, albeit with some modifications. You can't really beat that for an endorsement. Assembly Tips Pay particular attention to parts fit and/or warpage during assembly, as almost everything fits poorly. Follow the instructions just to see what parts go where. Test fit parts often. Be ready to cut off a number of alignment pins, and to carefully mate parts by eye, as many pins are "off" and they will actually misalign some parts. Be ready to use a fingernail-sanding stick to file various mating edges flat. This will minimize gaps needing to be puttied. Use super glue to assemble the fuselage halves, at least. Be ready to use it on other areas, if regular glues don't look like they'll be very useful. Assemble the cockpit interior, but don't glue it into the fuselage right away. Leave it loose until you get the two fuselage halves all glued together, as it may interfere with getting them aligned well. Pay particular attention to the wing alignment. It seems that one or both wings have an unintended angle to them, at the attachment points. (When you set the finished model onto a flat surface, this becomes very obvious.) Slow-setting epoxy glue isn't a bad idea in this area, so you can move things around until they are aligned. Do your best to align the inner wing details when adding them to the outer wings, as these too can cause some amount of misalignment. You may want to attach one finished wing at a time, letting it dry in place first, and then align the other wing to match it. Stock up on putty; you will need it often if you want no evidence of gaps or seams to show. You may need sheet plastic as well, to pre-stuff some of the larger gaps; that can cut your puttying chores to a minimum, later on. Or you may want to try the super-glue-and-baking-soda methods to fill gaps. Definitely be sure to read this web site's Reader's Tips section, to find out about the super glue "stitching" construction technique. It can be very helpful both during basic assembly and seam-filling chores, and it should minimize the awful frustration of having a seam pop open later, after the model is finished and painted. Super-detailing On my own build-up, I took some pains beyond normal assembly. I re-scribed all of the existing panel lines, mostly to sharpen their edges up. I added new panel lines as needed, to match those shown in good reference photos of the studio model. (Mostly the new lines are in the area of the rounded cockpit-ball area of the fuselage.) I had no references that showed the panel line details on the back side of the cockpit. I saw the studio model after doing this kit, and of course, some of my guesses were wrong. Sue me. I was pleased, however, to see that MPC's original sculptors got most of the other panel line locations right. The ones they left out would have been hard to mold. Fitting the fuselage's six recessed boxes properly were an awful lot of tedium and drudgery. I took pains to make them fit well, and to keep the edges sharp where they meet the fuselage. (If I ever built another one of these kits, I'd throw the kit parts away, and scratchbuild new ones. Live and learn?) My reference photos also showed some raised fuselage details that MPC could not mold very well on some surfaces. Generally, I cut those soft-looking, non-square-edged attempts at surface detail off flush. I replaced them with better looking parts made out of sheet plastic. The edges of these new additions are much more sharply defined, and they are also more accurate in general shape and placement. Painting Notes You don't have to paint your kit the way I did mine. I used a bunch of special techniques I'd picked up from being around "Master Modeler" type people at various model shows and contests. That was just my personal choice. Most of the other articles I've seen about this type of a kit suggest a pristine build-up. They figure that this vehicle was similar to a one-of-kind "show car". They suggest a flat light grey color on most surface areas, a flat darker grey on some detail areas and gloss black on the solar panels. They advise very little shading or tone changes, and no weathering at all. If that method sounds good enough to you, take their advice. Nothing really wrong with it. (Although the original studio model did have a blue-ish tint to it, remember that cameras and lighting make things look different than you'd percieve them in person, so the intended effect was likely always shades of gray colors.) I did not necessarily agree with those "ultra-clean" choices myself, for various reasons. And I freely admit that one of them was that I wanted to try some new-to-me modeling techniques I'd heard about. As a result, I built my kit quite a bit differently than most others I have seen on the Internet, or even in the best reference sources that I had then. Simply put, I painted my kit with an airbrush using the "pre-shading" paint technique. I also used a modification or variant of pre-shading on my kit's simulated solar panels. This gave various relatively large, flat and uninteresting areas some visual interest, even if it is arguably "incorrect". Done with control and subtlety, it can look fabulous. I also used "washes" of artist's oils to get deep into the most shadowed areas, such as panel lines. I then used some "dry-brushing" to better bring out raised textural details. I used a silver-colored artist's pencil on just a few high wear areas, to simulate worn or chipped paint. (All these techniques are in Starship Modeler's Reader's Tips section.) Scale The scale is not stated. I would say something in the range of 1/30th - 1/35th scale is close. I think 1/32nd is a very good guess. Ultimately the subject is debatable, since no "real thing" exists as a measurable, full size object. A preliminary look through various reference sources shows conflicting math to be the rule, rather than the exception. In fact, the "BTM" CD-ROM reference source says that Vader himself is 2.03 meters tall. Convert that to the English standards from Metric and you get "6.66" feet tall. (That's obviously a "666 = evil" joke, I assume?) I was interested to see from David Prowse's own personal Internet home page, that *he* said he "felt dwarfed" when he stood next to the costume that he once played the Darth Vader role in. How could that even be possible unless the empty suit was on display with added height, he implied? David Prowse claimed to be six foot seven inches when he played inside the suit during filming of "A New Hope". Even Peter Mayhew (playing Chewbacca) was "only" seven foot three. The empty suit that was on display at the Lucasfilm museum exhibit looked like it was easily eight feet tall. (But the cardboard character stand-ups you can buy are barely over six feet tall.) So much for Vader as a reference. The "Behind the Magic" CD-ROM also says that Darth Vader's TIE is 9.2 meters long (30.18 feet), while a standard TIE is 6.3 meters (20.67 feet) long. Go look at the Death Star Trench scenes again. Does Vader's TIE look half again as long as a standard TIE fighter? No, not really. Actually, it looks smaller overall. I can almost believe the figures for a standard TIE are correct. But not Darth's. Sorry, but for me personally, I can't "buy" these as being accurate. The bottom-line is, a person could argue it many ways since there is no "real" object (other than a small studio model) that you can go and measure. A scale of 1/32nd sounds close to me for this kit, based on Vader being 7 cm tall in the kit and 7 feet tall in real life. Those are round numbers in both cases, but it serves as a good approximation. One important note... this kit is in a much larger scale than the 1/48th scale kits AMT made of the straight-winged (#8438) TIE fighter variants. That means this kit will not look correct at all in a simulation of the battle scene from the end of "Star Wars Episode 4: A New Hope". To simulate that scene you would want a totally different kit of Vader's TIE fighter. Note that Estes made a model rocket kit (#2144) in 1997 that is approximately 1/48th scale. You may want to try that kit instead; it is not a bad looking kit? Estes also made an already-assembled rocket that could be reworked a bit. Either of those "kits" would work well in a diorama of Episode four's end sequence. Read a detailed description of building and painting this model here. Other articles about TIE fighter models
|
|
![]()
This page copyright © 2002 Starship Modeler™. Last updated on 2002.
![[Click to enlarge]](ws_darthtie1.jpg)
![[Click to enlarge]](ws_darthtie3.jpg)
![[details added]](ws_darthtie7.jpg)
![[Click to enlarge]](ws_darthtieb.jpg)