
|
By Clyde Jones - images & text © 2002
"How do you cut large pieces of styrene sheet?"
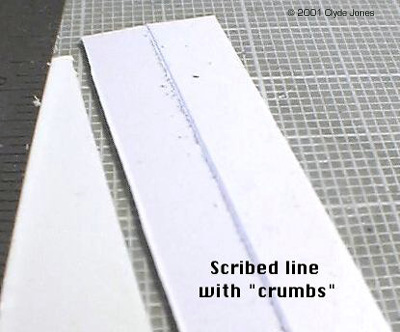
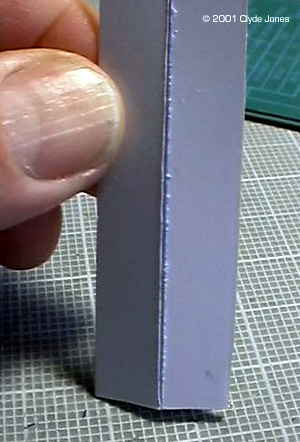
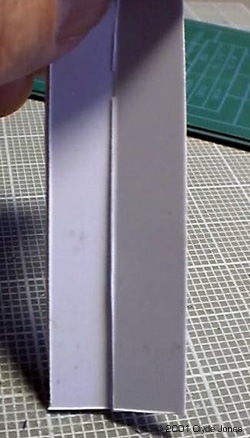
Plastics supply stores might use a special blade on a vertical cutting rig. Some people use a coping saw, jig or sabre saw, band saw, or fine tooth blade on a table saw for thick stock. I like the "Scribe and Pop" method. First lay out the line(s) you want to cut. Lightly sand the surface of the styrene with 600 grit sandpaper so a pencil will leave a good clear mark. Then use a steel straight edge and an H or HB pencil to layout your cut lines (assuming straight line cuts). When you have the lines where you want cuts (including openings in the middle of a sheet) put the steel straight edge back over the first line to be cut. Gently draw the BACK edge of an Xacto blade (#11 is good) along the straight edge to make a light groove. Repeat, carefully, with slightly greater pressure, keeping to the marked line, pressing the blade slightly toward the steel straight edge so it doesn't 'wander'. After a few cuts like this, you can turn the blade around so the sharp edge leads and deepen the groove carefully. Again, you can slightly angle the cutting blade into the steel edge to keep to the line. If you wander in your cutting, go back with the back edge and renew the line so it's much deeper then the 'oops'. Now the fun part. Place the straight groove in the plastic over a sharp table edge groove UP, and push DOWN on both sides of the groove so it flexes open. It will eventually 'Pop' or split along the groove. The thicker the plastic, the harder you need to push and the louder the 'Pop'. Keep flexing the groove open to continue separating long cuts in large pieces. I've just been doing this with .080 thick styrene making 1 inch wide strips 2 feet long. For circles and odd shapes, use a drafting compass to hold a #11 blade, and use the BACK edge of the blade again to establish the first groove. Deepen it with more passes of the blade. In this case, DO NOT use the 'sharp' edge of the blade, since it will almost always wander out of the groove. Begin flexing the plastic down, away from the groove, at some point in the circle and the line will deepen all the way through the plastic. Keep flexing the edge and 'popping' the seam open. Eventually the round piece will be free to fall out. For really odd shapes that aren't round enough for a compass, use the back of the blade and gently scribe the line many times, always cutting a LITTLE deeper each time. Eventually you will have a deep enough groove to 'pop' the part out. To open a hole in the middle of a sheet - say an airlock opening - lay out the opening with pencil, then start scribing the lines beginning at each corner, stopping slightly past the middle of the line. This way you don't 'overshoot' the end of the opening. Begin flexing the plastic and the center piece should pop out. Be careful at the corners. You may need to drill tiny holes at the corner so the 'splitting' in the plastic does not extend past the corner. The thicker the plastic, the more you will notice that the edges do not 'pop' dead square to the surface. You may get undercuts or little 'burrs' in the plastic. Sometimes it pays to leave the piece a few thousandths long, and use a sanding block to clean up the edge. Usually, liquid cement will soften 'burrs' and convert them to filler as the plastic slumps. And if you apply 'enough' pressure to compress the joints as they dry, a slight bead of styrene will 'ooze' out filling defects. Small openings in thick plastic may need to be cut with a jeweler's saw or a circle cutter in a drill, and then cleaned up with sandpaper. I've found 1 foot and longer long stainless steel straight edge rulers at 'liquidation stores' and 'discount houses' for a couple of bucks. The better ones have a layer of cork on the back so they don't slip easily. The best compass to use has an adjusting wheel between the 'legs' so once you set the opening it doesn't change because of pressure on the legs. Cutting with a moto tool, or other powered cutter like a band saw, tends to overheat the plastic causing it to melt and stick to the cutting teeth giving you a bad cut and lots of cleanup. 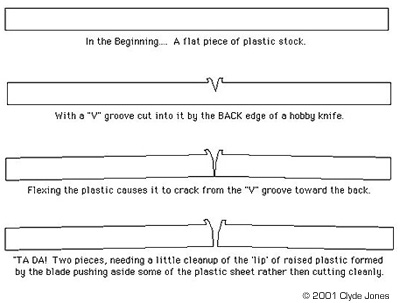 |
Image: What the scribed line looks like - complete with ridges and Ĺcrumbsĺ of plastic. Image: Bent. Image: More bent, but not yet broken. This example of styrene is very fiberous and resistant to cleanly breaking. Image: Hanging by a Ĺhingeĺ of plastic. Thicker plastic Ĺpopsĺ better.
|
![]()
This page copyright © 2002 Starship Modeler™. Last updated on 25 January 2002.
![[Basic tools]](cj_scribe_01_ruler-knife.jpg)
![[Bridge]](cj_scribe_02-bridge.jpg)
![[Draw a line]](cj_scribe_03-Drawing-line.jpg)
![[Start scribe]](cj_scribe_04-Start-scribe.jpg)
![[Done]](cj_scribe_09-Raggedy-POP.jpg)
![[Curves]](cj_scribe_10_Curves_thicker.jpg)