
|
By David H. Allen - images & text © 2003 Paper models can offer a welcome change from the glue-prime-paint-decal routine. Lest you think that paper models are too simple, lack detail, and cannot offer a challenge to the experienced modeler, check out the photo at right of the interior of a 1/24 scale Gemini IV capsule from Delta 7 Studios. Every bit of what you see in the photo, including the joystick on the center console, instrument panels, ejection seat, and open door, was printed out on paper, cut, folded, and glued. Now that I have whetted your appetite, I would like to offer some helpful advice on assembling paper models. The model used as an example in this article is another offering from Delta 7 Studios, John Glenn's Friendship 7 Mercury capsule in 1/14 scale. |
![[All paper]](dh_paper_005.jpg) |
|
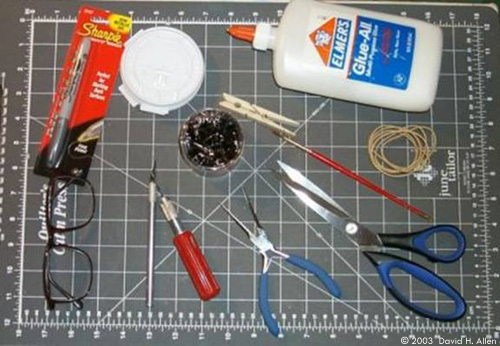
Printing Paper Models Paper models can be purchased pre-printed on cardstock. Paper models that come in electronic format (bitmap or PDF) must be printed out by the modeler. I print out my models using an Epson 870 printer, which does a great job. Your results may vary. Experiment with different settings and papers (see below) until you are happy with the result. Paper Selection The term "paper" models, while not incorrect, is a bit misleading in that most models are printed on a heavy paper sometimes called "card" stock and paper models are sometimes called card models as a result. For most paper models, a minimum weight of 65 lb. is recommended. Paper heavier than 100 lb. may not feed properly in your printer, and is too heavy for smaller parts. (The traditional method of measuring and describing the thickness of paper is to quote the weight of one ream, or 500 sheets, of the paper that has been cut to standard size. For bond paper, this size is 17 inches by 22 inches, exactly four times the area of an 8.5 inch by 11 inch sheet, so one ream of 100 lb. paper would weigh 25 lbs.) I prefer Epson Premium Glossy Photo paper, which results in a very shiny finished product and seems quite appropriate for spacecraft. Others may prefer a matte finish and should use the appropriate paper. The weight (68 pounds) is perfect for most applications. I have never had a problem with the ink smudging as a result of handling. Also, the shiny (printable) side has a coating on it that appears to be hygroscopic, so white glue (Elmer's) grips and holds it extremely quickly. White is not the only choice for paper color. A model that is primarily one color or shade (for example, gray or black) might look nice printed on a gray or light blue (pastel) paper. Silver and gold metallic papers, a logical choice for some spacecraft models, can be purchased from various sources. These papers are ink-jet printer compatible. Tools Those of you who are already scale modelers but have not assembled paper models before will be happy to know that there is considerable "cross-over" of both tools and skills. It is possible to assemble these models with only a scissors and a bottle of white glue, but I highly recommend the following tools and supplies in addition:
|
|
Image: Another look
|
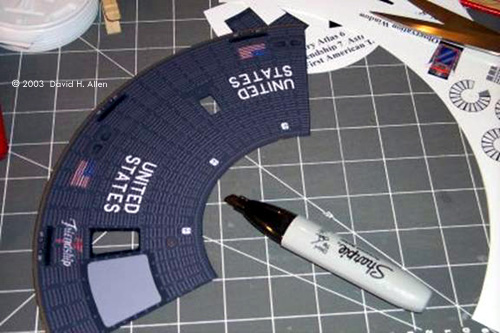
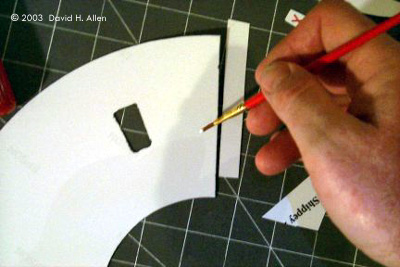
Assembly Tips Start by reading through the assembly instructions all the way through, or at least a couple of steps ahead. Before you make your first cut, carefully use the knife to score all folds. Use gentle pressure to avoid cutting through the paper all the way. ALWAYS WEAR EYE PROTECTION WHEN USING A KNIFE. Before cutting, think about which tool (knife or scissors) will work best to cut out a particular piece. A knife is required for short or inset cuts, whereas the scissors is easier for long straight or gently curved cuts. Make very small cuts and inset cuts, using the knife, before cutting out the overall piece. Cut out the first several pieces you need rather than all of them since some of the pieces are small and tend to get lost in the debris. Test fit before gluing. Masking tape can be used to temporarily hold joints, and can even be left if the joint is hidden in the final model. Before gluing any dark-colored pieces, run a felt-tip pen along the edge of any edges that will be exposed in the final model. This will prevent the white of the paper from showing against the dark background. I have never used anything but Elmer's white glue. Other glues may work equally well or better, but I doubt it. The only complaint I have about Elmer's is that it is a bit to thin. I recommend squirting a bit into a shallow, non-porous container (like a plastic condiment cup, or, better yet, the a plastic coffee-cup lid) and then using a cheap brush to apply it to joints. Do not apply it directly from the bottle since you'll end up with an uneven bead of glue rather than an even, flat coating. Apply and smooth it with the brush instead. Do not use your finger to smooth the glue, either, since you'll end up touching the model and leaving behind glue finger prints. (If this happens, you might be able to remove the glue carefully with the blade of a knife before it dries too much.) It doesn't hurt to wait a few seconds for the glue to dry a bit before you join the two surfaces. Use a binder clip or clothespin to hold the joint in place while the glue sets. For Elmer's, this takes about five minutes if not too much glue is applied. Small parts, and joints that may require a little more strength, may benefit from a liberal application of glue on the inside (unprinted) side. To make a simple overlap joint, apply glue to one side, connect the two pieces, and apply pressure until the glue sets. I highly recommend joining large flat or cylindrical pieces with butt joints. A simple overlap joint will create a noticeable seam, and the white edge of the paper will stand out against a dark printed background (this can be mitigated somewhat by running a felt-tip marker along the edge of the paper, but this doesn’t always work and still doesn’t produce a nice seam like the butt joint). Since most of the pieces are drawn with a tab, you will need to cut this off and make your own joint piece, but this is very easy. For butt joints, especially on long, straight joints, you may consider using double-sided tape instead of glue. Alternately, use a very thin application of glue and then re-enforce the hidden side of the joint with single-sided transparent or masking tape for added strength. Clothespins, binder clips, or small plastic clips can be used to hold joints while glue sets. You can accelerate the drying time of the glue by gently heating the model over a light bulb, but BE VERY CAREFUL that you do not overheat the model or burn yourself. Finishing Since good-quality paper models generally are printed with all of the necessary color, marking, insignia, etc. there is generally no additional finishing required. It is possible to paint paper models just like models made from any other material. This may be necessary to obtain colors for which paper is not readily available (for example, silver metallic). A spray of clear gloss or dull coating is possible, but usually not necessary unless you expect your model to come under extremely moist conditions, for example, in the case of a flying model which might be “splashing down” in the dewy grass. Taking Paper Models Further One of the really cool things about paper models is, by purchasing the CDROM, you get not only a collection of models, but you can print out all or part of any model as many times as you wish, provided they are for your own use. This means that if you screw up a piece, you can simply print out that sheet and try again. You may even experiment with assembling the same model using different weights of paper, matte vs. glossy paper, gray or light blue pastel paper, or silver metallic paper. SourcesThere are many paper models available free for the downloading on the Internet. These vary considerably in detail and quality. As mentioned earlier, Delta 7 Studios offers collections of models of spacecraft from the U.S. programs Mercury, Gemini, and “Blue Gemini” (advanced Gemini configurations that never flew), and a collection of spacecraft from fantasy and science fiction called Retro Rockets. Coming soon from Delta 7 Studios is a collection of spacecraft models from the Apollo program, which will include a lunar rover! Drop by their website and you can even download a couple of high-quality models for free to help you make up your mind about pursuing this aspect of spacecraft modeling. Fiddlers Green leans more toward paper models of buildings and aircraft, but their Jets and Aerospace collection offers models of the Shuttle, V-2 rocket, and other real space hardware. The center of the universe for paper modeling on the Internet is www.cardfaq.org. Here you’ll find almost anything you need to know about (and a lot you don’t) about paper modeling, including links to a number of sources of free models. |
![]()
This page copyright © 2003 Starship Modeler™. Last updated on 22 July 2003.
![[Click to enlarge]](dh_paper_008.jpg)
![[Click to enlarge]](dh_paper_012.jpg)
![[Join types]](dh_paper_016.gif)
![[Cool effects]](dh_paper_007.jpg)
![[Click to enlarge]](dh_paper_010.jpg)
![{Photoshop fun]](dh_paper_023.jpg)
![[Boilerplate]](dh_paper_021.jpg)