
| By Frank Henriquez - images & text © 2005 |
|
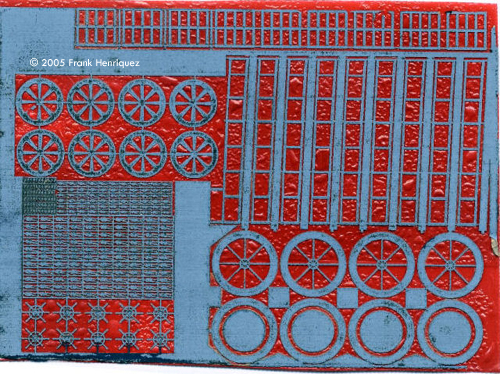
Image: The back of the brass is protected by paint and tape. Image: Ready to etch Image: Most of the sheet has been etched Image: End result - just a little cleanup needed |
Photoetched metal parts (“PE”) are a great way of adding fine details to models. Commercially made PE parts involve both a photographic process and chemical etching of the metal parts. A simpler method of making PE parts can be done at home. It doesn't involve photography, just fairly inexpensive chemicals and access to a laser printer. This is also a “dual use technology” since the same chemicals and equipment can be used to make printed circuit boards. If you're only interested in making PCBs, you can use cheap clay coated paper from Staples to transfer the pattern to a PCB. Thomas Gootee has an excellent description of the process. The Gootee method works very well for making PCBs, but I haven't had good luck (so far) in making PE parts using this method. The effort required to remove the paper from the toner once it's on the brass can also remove some of the finer details in a PE design. Requirements Before describing the chemicals and the process involved, you need all of the following before proceeding:
|
|
Chemicals This is where things get ugly and dangerous. First, a safety warning: The chemicals involved are dangerous and can cause serious burns. Common sense and safety equipment are required before proceeding with this project. The “old school” etchant of choice has always been Ferric Chloride. Unfortunately, Ferric Chloride is an expensive, opaque liquid that stains just about everything that it touches. There are better etchants out there, including Ammonium Persulfate and Sodium Persulfate. Both are clear in solution, and fairly inexpensive, but can be more difficult to obtain than Ferric Chloride. While browsing the Yahoo Homebrew PCB group () I saw an article on using Hydrogen Peroxide and Hydrochloric Acid as an etchant. The article is in the Files section and it's reproduced below:
One very important safety issue left out in the above article: When mixing acids with water always add the Acid to the Water. Muriatic Acid (another name for Hydrogen Chloride (HCL) acid) is used to adjust the pH in pools, so it's easy to find in just about any hardware store. Two gallons will set you back less than $5. Drug store 3% Hydrogen Peroxide is also very cheap; typically under $2 for a large bottle. In addition to these chemicals, you'll need some safety equipment:
Etching Equipment
The Process With all the required equipment in place, you're almost ready to start. Mix the etching solution as described above. Remember to wear safety equipment, and only mix the chemicals in a well ventilated area. The muriatic acid will release a pretty strong vapor that you don't want to breathe in. Secure the etching mix in a safe place. The rest of the process seems simple - draw the artwork, print it onto the Press N' Peel material, iron or laminate the Press N' Peel onto the brass and etch the results. I would usually suggest to “go and experiment” because I always learn from my mistakes. However, the Press N' Peel material is pretty expensive, and the process of getting the toner onto the brass a minefield of potential screwups, so I have some suggestions that'll make the process easier. The Artwork To get the best results, you have to be aware of the limitations of most laser printers. The first is that laser printers only print in black (toner is placed on the paper) and white (no toner is placed on the paper). Grayscale is simulated by halftoning - printing small dot patterns of varying diameters and densities to simulate a grayscale. Your PE parts should appear solid black in your artwork. I've experimented with halftoning using Press N' peel Blue, but the results have not been encouraging You can make the artwork in any size, but it has to be resized to fit onto the Press N' Peel sheet. Minimize the amount of brass that has to be removed. The less brass that has to be etched away, the quicker the etching, and the longer your etching solution will last. I use 0.003” to 0.005” thick brass, and I surround the parts in my artwork with black. I also run thin “sprue” lines from the black surrounds to the parts. On the two examples of artwork at left, the black areas represent the brass parts; they won't be etched. The white (or clear) areas represent the brass that'll be etched away.Group PE parts by complexity. Small and simple parts will etch faster than complex parts. A good example are the 1/1000, 1/1400 and 1/2500 figures in the good artwork figure. The ship wheels and large brass circles were completely etched long before the figures. I didn't want to over etch the larger parts so I took the brass sheet out of the etching solution. I cut out the figures and will complete etching them separately at a later date. Smaller sheets are better than large sheets. When I make a set of PE parts, I'll print out the artwork, transfer it to the brass, then trim the sheet into smaller parts. Redundancy and repeating parts more than once is good. You'll rarely get 100% yields with this process, even when using a laminator. I usually make two, three or even more copies of a part on each sheet, depending on the part's complexity. It's a lot simpler to store extra parts for a future project than to have to re-etch a sheet because the one part you needed didn't come out. Print to Press N' Peel Once the artwork is complete, print out a copy on regular paper, just to verify that everything is where it should be. Next, load a sheet of Press N' Peel blue into the printer, so that the artwork is printed on the dull side of the sheet. You don't have to cover a sheet with artwork. Don't throw away the unprinted parts of the Press N' Peel Blue! You can tape a strip of Press N' Peel Blue to a regular sheet of paper. Prepare the Brass Toner particles stick well to brass, but the environment in the etching solution is pretty brutal, even to the little toner particles. To help them hold on as everything around them is dissolving away, the brass sheet must be clean and free from dust, oils and oxide. Use the green side of a clean Scotchbrite pad to scour the side of the brass that'll receive the artwork. Rinse the brass with water, then rinse it with some denatured alcohol or acetone to remove any traces of oil from your fingers. Avoid touching the clean side of the brass, and make sure that it's fully dry before running it through a laminator or placing it under a hot iron! Transfer the Artwork With a laminator, it's simple. I place the toner side of the Press N' Peel sheet onto the clean brass surface, then tape the corners and edges so that it's in good contact against the brass. I then run the brass and sheet through the laminator. I do not use the laminator pouch, but just run the bare brass and Press N' Peel sheet through the machine. The combination sheet will come out the other side in about 20 seconds. I usually run it through a second time, to make sure that the toner has fully transferred to the brass. Transferring the artwork with an iron takes much more time and it's more of a trial and error process. The Tekniks page covers the details. Protect the Brass While it's possible to make a double sided PE sheet, most of the time you'll be making a single sided sheet, with the artwork on one side and bare brass on the other. The bare side must be protected, otherwise you'll etch the brass away completely! After ironing or transferring the Press N' Peel sheet, but before removing the mylar carrier from the brass, I paint the bare side of the brass sheet with paint. I've used Mr. Surfacer, because it was handy, but I've recently started using Testors red Acryl paint. I brush on the paint, allow it to dry, then touch up the thin spots. Once the paint has fully dried, I protect it with 2” wide clear plastic packing tape, with a slight overlap between the strips. I make sure that the tape is down securely; you don't want the acid solution to creep in under the tape. The red paint color isn't a random choice; it makes a great indicator of the etching progress, since it contrasts vividly with the unetched brass and the toner protected brass artwork. When everything looks red, the etching is done. Trim the Brass Remember, you want to minimize the amount of brass that must be etched away. Once the back side has dried and has been taped over, I remove the Press N' Peel carrier sheet and cut the brass into smaller sections of artwork. Trim any exposed or excess brass from the edges of the artwork. You're ready to etch! Etch the brassBefore placing the brass sheet into the etchant, you should be wearing your safety equipment (goggles/glasses, apron and gloves) and you should have a holder ready for the brass sheet. As described in the Homebrew_PCBs, a holder can be made from plastic coated wire. You can't allow any metal to come in contact with the etching solution. A holder made from kit sprues glued together would be better. Place the brass in the holder and then into the etching solution. I used a shallow container, and placed the brass face up in the etchant, then pushed it down with some plastic tongs. This is not ideal since bubbles will form and push the brass to the surface, where it won't get etched at all. Keep an eye on the progress of the etching. The etching solution will start to turn green as the brass is etched away. Here is where the color painted on the back side of the brass becomes important; if you pick a color that contrasts with both the brass, the color of the toner and the green shade of the etching solution, you'll have a very good indicator of the etching progress. As you can see at left, it's obvious that most of the sheet has been etched, since it has turned red. If you look carefully, you can also see where there's some brass still to be etched. Ending the Etch Etching can take anywhere from 5 - 10 minutes to several hours, depending on the amount of brass that has to be removed and on how much copper is dissolved in the etching solution. When you feel that the etching has gone far enough, remove the sheet from the etching solution and place it under running water from a faucet. This will wash away the acid and stop the etching of the brass. Some acid may be trapped under the backing tape. You can place the brass sheet in a container of water with some baking soda mixed in to neutralize the acid. You can remove the black toner (which may look blue or gray after spending some time in the etching solution) by placing the sheet in Acetone. After a few minutes, you can wipe away most of the toner with a rag. Note that you'll probably dissolve away the paint and the glue from the backing tape, so some of the parts may come loose. I just wait until I'm ready to use the part before I dissolve away the backing paint. Problems The etching solution may seep under the toner and damage or destroy some of the parts. This is often caused by dirt or oil on the brass that prevented the toner from adhering properly. Leaving the brass in the solution for too long can cause an undercut. Remember, the edges of the brass are not protected, and as the etching solution eats down through the brass, it'll also eat sideways into the brass. This is one reason to keep the brass as thin as possible. Etching Solution Storage and Disposal The used etching solution can be recharged with an aquarium pump and stone; bubbling air through the solution for a few hours can restore most of its effectiveness. If you have to dispose of the etching solution, remember that it's a strong acid, so don't dump it down the drain! You may end up with an expensive plumbing problem. In particular, the copper laden etching solution can really do harm to septic tanks. You can either take the solution to a hazardous waste disposal center, or to a garage, as mentioned in the Yahoo article. Don't store the etching solution in an open container, since the vapors that it gives off are corrosive. Remember that the etching solution is a strong acid. Label the container with the contents “Poison, HCL and Hydrogen Peroxide” and store it where it can't tip over and where pets and small children can't get to it. Conclusion Visit both the Pulsar and Thomas Gootee sites. They both have some great ideas, in particular, the Pulsar site. Once you've made a sheet or two, remember to experiment; you may find a better or easier way to make photoetched brass parts. |
![]()
This page copyright © 2005 Starship Modeler™. First posted on 4 April 2005.
![[laminator and brass]](fh_pe_Figure1.JPG)
![[Click to enlarge]](fh_pe_figure2.jpg)
![[Click to enlarge]](fh_pe_figure3.jpg)