
|
By Jack Wendt - images & text © 2002
Here we will talk about digitals. Specifically, we will address the characteristics of the camera I own, and what you should look for in a digital camera if you want to take photographs of your models. My previous camera was an Olympus Infinity Zoom 35 mm camera. This Olympus was called a "bridge" camera. A bridge camera offers the best of both worlds. It is more than a point-and-shoot, but just less than a better SLR. It took great pictures of most things except of small things such as models. When I took photos inside the house, the flash would drown out the color of the model. I eventually resorted to taking shots outside, but rather would prefer to take the shots from within a controlled environment such as my home. So what are the advantages of digital pictures?
What are some of the disadvantages of using digital cameras?
Other Concerns Digital cameras see objects differently then 35 mm camera. Digitals interpret light and colors sometimes differently. This is hard to describe so it is "show and tell." Take a look at the Seaview model that I took pictures of. Various light settings were tried. The color that I chose for Seaview is, as listed on the picture, Testors French Dark Blue Gray. ![[Scary!]](jw_digi_monsters.jpg) Rick Cantu built and entered the above in the Model Fiesta near San Antonio on February 23, 2002. The pictures on the right are with flash. The ones on the left are without. I did not adjust the white balance, and all models were shot under fluorescent light, including his. Here are pictures of Kothoga and Predator with the same examples, but different outcome. This problem reminds me of the endless discussion of what color is our favorite starships. Those that go to the Usenet or the discussion forum on this site know exactly what I mean-- think of the heated discussions of what is the actual color of Voyager, 1701, 1701A, 1701E, etc. The white balance can change the color of the model, regardless of film or digital. Also, digital photographs cannot be cropped and magnified as much as a 35 mm photo that has been scanned in and severely cropped. In a camera such as mine, you can crop the surrounding areas, but cannot take a 1" section of the photo and blow it up 100 percent as can be done with photo film scanned into a computer at a high resolution. With digital at a setting of 3.1 mega pixels, you can blow up at least 50%, after cropping. Remember something that folks cannot get their heads around sometimes and that is your monitor/camera resolution. Some people still have their monitors set for 640x480 resolution. This is the bare resolution for most modern monitors. This is equivalent to .3 mega pixels, or in that range. A higher setting will result in a better view of your pictures, more lines of resolution, and crisper detail. Folks, a good monitor is a High Definition Television, only with a small screen. With the camera I have, the resolution of each picture is 2160x1440. On a 19" monitor, at its highest resolution, a picture will fill up the entire screen. I have my monitor set at 1152x864. You notice in the 2.2 setting that this camera will take 8X10" photos. Remember people that take the 4x6" picture of a subject, scan it in to the computer, and resize to 8x10," have all these steps to go through. With a digital, you plug your camera into the computer, and in about a minute or less you can download the entire storage device onto the computer for viewing. Good photo processing software such as Ulead Photo Express, allows the user to "scale" the image down to the size requested in printing. In other words, by simply telling the computer you want to print the object on a 4x6" photograph paper, the computer will scale the image to fit the paper with little effort on the operators part. I do not feel that the images seen at the highest resolutions will print at the same level of quality, but if the image is scaled down to say 4x6" size for printing, the image are comparable to what is seen in 35 mm film. One bad thing is that when you take a picture of your model as close as a digital will allow with macro turned on, you see every little thing that is wrong. Every little seam line, spot of filler, and brush stoke is made visible. I got my camera for Christmas, and have pretty much mastered (or I think I have) it over the last couple of months. The retail price in 12/2001, was around $399. I got my camera, including shipping off the Internet for about $350. I am not a professional photographer or even in the same county as one, but these are just my observations and what I have learned recently. So what should you look for in a camera? There are different ways to download from camera, but most come equipped with an USB connector and many will save pictures straight to a ploppy disk. If yours does not have this and relies on a slower process such as a parallel port, there is a stand-alone devise (card reader) that reads different storage devises, (Compact Flash, Smart Media) without the camera being connected to the computer. For saving batteries, this stand-alone reader might be a good investment for some. Well you really don't need much higher mega pixels than about 3.1. In fact you will be probably just as happy with a 2.1 or higher cameras. Anything over 3.1 in my opinion is overkill. Maybe a professional needs it, but not the average person. Notice the spec on this 3.1 Straight from the camera, this picture will fill up my entire 19" screen, and will look sharp. The specification above can be found on the Internet, which are general for most digital cameras. I don't know if a 2.1 can take an adequate picture for an 8x10, but it will take an exceptional picture for 4x6 development. You can find a 2.1 mega pixel camera with all the below options for under $300, over the Internet. Get a camera with a macro setting. This is a little button you push or switch you slide, which allows you to take pictures from 2 inches to 2 feet away. This switch or slide is usually represented by the icons for a mountain (infinity setting) and a flower for the macro setting. This allows you to get detail that only a more expensive SLR or bridge camera with special lenses can offer. The SLR lens can cost more than the digital camera you need for photographing your model kits. In the macro setting, the small viewable screen is usually on. This can drain a battery quickly, so take your shot and turn off the camera. The Kodak cannot get up to within 2" like some of the more expensive digitals or SLR, but when the resolution is as high as this camera, you can get a lot of detail on a small object from 6" away. The camera should, and most do, allow you to turn off the flash. When taking pictures as close as you will be able with a camera such as this one, the flash can really wash out the color, making it hard for the observer to know what the actual color is. The camera in the macro setting with out a flash must be held steady or it will result in blurry pictures, so invest in a tripod (about $20 at Wal-Mart). The camera should come with what is known as a "white balance." What this means, is in its automatic setting the camera will interrupt the color based on the given light. The purpose for having a manual setting is to allow the photographer to adjust, manually, the interpretation of lighting based on the lighting. As you can see above in the description of the DX3900, the camera can manually be set to register colors based on the type of light bulb being used, (white balance: automatic, daylight, tungsten, fluorescent.) When operating the camera without a flash, a model under a tungsten/incandescent can have a yellow tint compared to most fluorescent, which will give white tint, both slightly different from natural daylight settings. Adjusting the white balance is not necessary, other than if you don't like the finished image, you can try manually adjusting the white balance to compensate for the effect you want. The camera should come with a tripod-mounting nut so that you can take timed exposure, this also allows the photographer to take a picture without jerking the camera, resulting in a blurred shot. Shutter speed: If you can manipulate the amount of time a shutter stays opened, you can gather more detail about the subject with less light. This simply means a that if you spent all that time wiring your model with light, then you want to take a picture of it. The problem of taking photos with a lighted model is that when the flash goes off, the flash does away with the light coming from the model. As stated earlier you can get better photos taken of an object with a digital camera and no flash. Sometimes flash will still not show enough of the lights in the model for the photographer. With manual shutters speeds one is able to decrease the light in the room and gather more light form the source of the model. Here is an easy example. Think about the Christmas tree you had decorated with all the lights on. When you had all the tree lights on and all the house light off, the tree was magnificent. When you took an ordinary photo, the lights were not as brilliant, due to the flash. What if you were to set your camera on a tripod, open the shutter to say around 5 seconds, and turn off every light in your house at night? This is achievable with SLRs, and digital such as this camera. The longer the shutter is open the more light it will gather. In the case of the Christmas tree, the camera can gather sufficient lighting to look almost like how you see it when the house lights are off. This brings us to the next item you really want on a camera, and that is a timer.
What you would do is set up your model. Mount your camera on the tripod. Turn off the flash. Set the shutter open for around 5 seconds or longer. Punch the "timer" button/switch. Turn the lights off in the house or down real low. Push the button to take a picture, and DON'T move. Experiment, and you will now see you can get pictures of your lighted models.
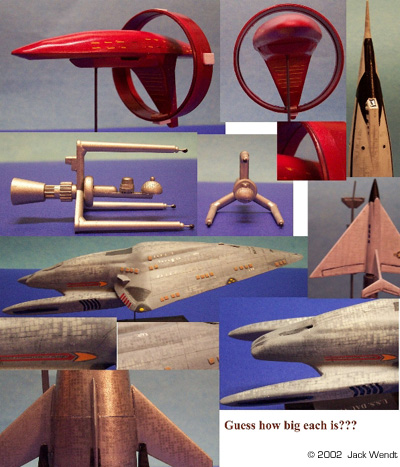
Storing Your Photos Storage devices are next. Some super cheap cameras have a non-removable proprietary member that cannot be added to. There are several types of storage devices, but I will focus on the main 2 types. One is The Compact Flash, and the other is Smart Media. Both work similarly, but are of different sizes and not interchangeable. (My Sony uses standard 1.44Mb floppy disks. Ed) The camera I have uses the Compact Flash card, and is currently IMO the best selling and the most popular. Prices vary from each vendor, but are cheap enough you can afford a name brand. If you are away from home, carry twice the number of storage units then you think you need. Professional photographers always take more pictures than the photographer might figure are needed. This is to ensure that the photographer has some high quality shots. If attending an indoor event such as a model expo or IMPS meeting, and the lighting is less then desirable, take more than one shot of each subject. What I have done is take a picture with the flash, and one without. Remember, I am not out anything other than the cost of the batteries. Zoom is a feature to look for, but not necessarily needed if our intent is to take photos of our models. With my Olympus 35mm, I used to use the zoom so that I could be the required feet away from the model, yet still get shots close in. With a macro setting this is not needed. Zoom is still a nice thing to have when shooting in the infinity mode such as in traveling. There are other things or gizmos on my camera, and there are those that are not on my camera, but are on more expensive models. The above essentials (macro, timer, no flash setting, manual shutter, and tripod mounting nut) are all you really need to get excellent pictures of you hard work/fun. The rest is gravy. Conclusions I am not ready to throw away my 35 mm camera, in fact I will still take it on trips. I plan to take pictures with both when traveling, but for model work, my digital will handle this well. Again the primary advantage, in my opinion, is you take a picture, you walk over to the computer, you see how you like it, you then make adjustments, or go on to something different. You can learn from your mistakes quickly. In closing find a camera that has 2.1 mega pixel or higher, white balance, manual shutter speed, timer, tripod mount, zoom, expandable removable memory/storage devise, and have fun. Notes: The pictures in this article have been scaled down to conserve server space. Before scaling down the pictures were around 900 KB. Oh and the size some of the different models is as follows. The Surek variant is 5.5" long. The pizza box support (the silver one) is 3" long. Dauntless is 10.5" long. This is the technical information for the Kodak DX 3900, straight from the manufacturer:
System Requirements Windows:
Macintosh: For the one person here (Clyde Jones) that uses this type of computer. ;>)
|
![]()
This page copyright © 2002 Starship Modeler™. Last updated on 7 May 2002.
![[A digital camera]](jw_digi_kodak3900.jpg) There have been a couple of well-written article on how to take photos of your models with 35 mm cameras. These are great cameras, but the better units may be beyond the price range of a lot of people. Most point-and-shoot cameras cost less than $150 and do a decent job in most instances, with the exception of taking pictures of small things. Most models are small, and a cheap point-and-shoot will not do justice to your hard work on your model. For around $200-300, you can get a camera that will do everything that a good point and shoot can do, and what most SLR (Single Lens Reflex) cameras can.
There have been a couple of well-written article on how to take photos of your models with 35 mm cameras. These are great cameras, but the better units may be beyond the price range of a lot of people. Most point-and-shoot cameras cost less than $150 and do a decent job in most instances, with the exception of taking pictures of small things. Most models are small, and a cheap point-and-shoot will not do justice to your hard work on your model. For around $200-300, you can get a camera that will do everything that a good point and shoot can do, and what most SLR (Single Lens Reflex) cameras can.![[Enterprise-D Nacelles]](jw_digi_1701d.jpg) The timer will allow you to press the shutter button without worrying about jarring the camera. Think about our Christmas tree. If you mount the camera on a tripod, turn off the flash, set the shutter for about 5 seconds, use the timer, and then push the button, you will have a fantastic shot. What I do on some of the photos I've taken is just that. Remember to be very still while the shutter is open. Someone walking upstairs can jar the camera enough to lose the shot if the camera's shutter is still open. That is the reason for a well-designed tripod. This is another reason for the timer. The timer waits about 10 seconds after the button is pushed to take the shot. This allows you to photograph your Enterprise with all the little lights in it for perhaps your first time.
The timer will allow you to press the shutter button without worrying about jarring the camera. Think about our Christmas tree. If you mount the camera on a tripod, turn off the flash, set the shutter for about 5 seconds, use the timer, and then push the button, you will have a fantastic shot. What I do on some of the photos I've taken is just that. Remember to be very still while the shutter is open. Someone walking upstairs can jar the camera enough to lose the shot if the camera's shutter is still open. That is the reason for a well-designed tripod. This is another reason for the timer. The timer waits about 10 seconds after the button is pushed to take the shot. This allows you to photograph your Enterprise with all the little lights in it for perhaps your first time.![[Lighted ships - try THIS with a point-and-shoot 35mm!]](jw_digi_niteships.jpg) In these pictures we see Voyager, 1701D, and 1701A. 1701A is a fiber optic kit I installed in a "shadow box" many years ago. Lighting from the stars are the results of various size pinholes in poster board, with fluorescent lighting behind. Fiber optics are in all the drilled out windows. The box is so old that you see the light source falling out of the hole I placed on the opposite side of the secondary hull. All 3 ships were filmed in a darken room with my shutter set for 16 seconds, using a timer and a tripod. The lights in the 1701D are grain of wheat, which were suppose to run at 1.5 volts, but are connected up to a transformer and putting out 3.0 volts, to achieve this shot. Voyager is also 1.5 volts, but in this case I cracked the bedroom door just enough to add some additional lighting.
In these pictures we see Voyager, 1701D, and 1701A. 1701A is a fiber optic kit I installed in a "shadow box" many years ago. Lighting from the stars are the results of various size pinholes in poster board, with fluorescent lighting behind. Fiber optics are in all the drilled out windows. The box is so old that you see the light source falling out of the hole I placed on the opposite side of the secondary hull. All 3 ships were filmed in a darken room with my shutter set for 16 seconds, using a timer and a tripod. The lights in the 1701D are grain of wheat, which were suppose to run at 1.5 volts, but are connected up to a transformer and putting out 3.0 volts, to achieve this shot. Voyager is also 1.5 volts, but in this case I cracked the bedroom door just enough to add some additional lighting.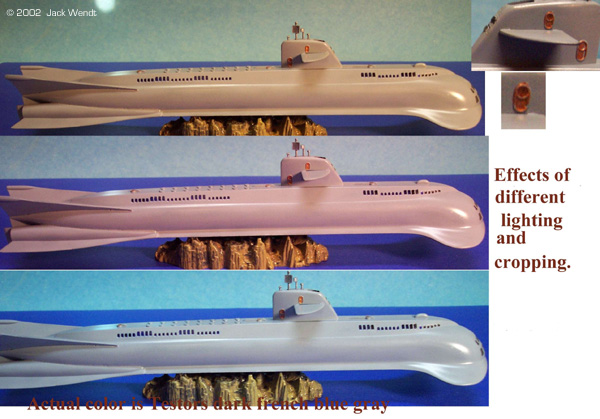