
|
By Keith Brenton - images & text © 1999 The Problems
But there's a problem. Or two. Or more. Maybe you're not an electronic genius. Or maybe you don't have time to install complex circuits and wiring; or to drill, shape and fill window holes with just the right translucent medium to transmit just the right amount of light. Perhaps you just don't have the buckage to cover the grain-of-wheats, LEDs, lightsheet, wiring, circuits, batteries and transformers. Or possibly you just don't want to deal with the inevitable once your "magnum opus" model is finished: replacing or repairing lights and even LEDs that burn or short out. You might be dissatisfied with fiber optics, which produce only round windows; or frustrated with the prospect of hiding wires and batteries so that they're not visible within your model. And what can you do if the kit is solid resin or vinyl?
Try something different. Make your windows, engine ports and navigation lights out of light reflective safety tape. You've seen it before; it's the stuff on the back of trucks and school buses that reflects your headlamps at night. Safety tape is a self-adhesive plastic tape containing glass microbeads which reflect light back in the direction of its source. It's made by 3M (Minnesota Mining and Manufacturing) as a night vision safety product; generally available in white and/or red, sometimes yellow, orange or blue. You can find it pretty consistently in the automotive sections of discounters like Wal-Mart, K-Mart; at auto parts stores; and at safety product stores and fire/police suppliers, where you'll encounter a wider selection of colors and sizes for striping squad cars and trucks. The Advantages
It looks natural; the tape has a glossy, window-like appearance. It can be pieced to fit over 3-D objects such as domes or engine intakes and exhausts. The white reflective tape looks pearlescent silver; other colors carry the same irridescent quality. In most cases, safety tape can easily be tinted other colors with clear tint spray paints in successive thin layers and still maintain flexibility. It can also be tinted with thinned fluorescent (day-glo) enamels for supplemental lighting effects with black light. Just remember: the more tint you apply, the less light is reflected back! Models "illuminated" by safety tape are perfect for photography. The brightness of the interior illumination illusion can be controlled by moving the light source closer or farther away from the viewer or camera. If the light source is very close, only a small amount of light is needed to produce the effect, enabling dramatic lighting from other angles with very little or no overwash. Halogen lamps do the trick very well.
The illusion of interior illumination is visible only when a light source is more or less directly beside/behind the viewer or camera. So if you move outside of that "cone" of reflection (with your model at the cone's point), you lose the effect at little at a time. However, safety tape is so potently reflective that you can see it dozens of feet away in the dark when you're within the "cone," which widens with distance. And it does still take time and patience to cut and apply enough "windows" for, say, a model of Deep Space Nine or the Enterprise-D. Not as much time as drilling with an AMT/ERTL-supplied battery drill and shaping by hand with a #11 X-acto, but a significant amount of time. If you're only planning to photograph from one angle, you can cheat by just applying reflectives where they'll be seen. Deciding Whether To Use Safety Tape
You may find that since this method generally takes less time, it may help you meet a deadline-such as for a modeling or photography contest. (My Enterprise-D variant, equipped with blinking LEDs and safety tape windows, had to be built with tight budget and time constraints. It was made to introduce a videotape invitation to a Human Resources convention with a "Trek" theme. So I used oversized LED running lights to make sure they'd show up on 8mm videotape.) The safety tape illumination method is perfect for video, digital or film photography, where the position of light sources can be controlled and detail/accuracy is crucial.
If you're not into photography, the effect is just as spectacular when viewing your models across a room with a reading lamp behind your head-whether other room lights are on or off. Another consideration in using safety tape illumination is your learning curve. You can use safety tape illumination to produce a satisfying model while you're still in the stages of "feeling out" the idiosyncrasies of a kit you'll buy again and spend more time and money with electric/electronic illumination. And there's nothing like it for producing an outstanding solid resin or vinyl model. Suggestions
Be brave. Experiment. See if you can find a supplier for a sample of reflective traffic paint usually available in lanestripe white or yellow, handicap blue, warning red and baby buggy green. (You can occasionally find this item at Lowe's, but generally not the glass beads which provide reflectivity. If you know someone in your city or state's street/highway department, they might be able to help you get the beads or premixed paint.) When the glass beads are applied after painting, reflectivity is high. If they're immersed in the paint mixture, it will be low. Get the tiniest beads you can. Big beads work great on the highway, not on your models. With even tiny points of reflective paint, you get the same effect as with the tape-and imagine how nifty that Next Generation Romulan cruiser (or other smaller scale model) would look with all of its windows and engines glowing! You've probably got a whole shelf- or closet-full of classics ready to be retrofitted with safety tape. 
Use your imagination. Tiny white "stars" made of reflective safety tape can be affixed to a black or navy velvet background as a drop for photography or display. Throw in a red dwarf or a blue giant once in a while. You could even construct a Bajoran wormhole from swirls of wire-reinforced safety tape, clouded with pulled cotton or spun glass "angel hair." Or reduce video capture stills from your favorite TV episodes, print them on transparent color labels for inkjet printers, and apply them to the surface of the safety tape windows on your larger-scale models. Have fun! You don't have to be totally committed to this method, so you can afford to make mistakes and go back to the way you used to do it! |
![]()
Go back up | Tech Library | Starship Modeler Home | Site Map | Feedback
This page originally appeared in Quantum's Science Fiction Modeling and is reprinted with the kind permission of QSFM.
First posted 3 June 1999; Last updated on 13 February 2015.
 You've shelled out the cash for a model you've been drooling over since you first heard it was going to be released. You've seen pictures of prototype studio models-or professional-quality replicas-and you'd like to have yours look just as good: dozens to hundreds of glowing windows; radiant engine intakes and exhausts; bright navigation lights.
 The Solution
 Using safety tape circumvents all the problems of electrical/electronic interior lighting; you simply cut the tape into the proper shape with and X-acto knife and apply it to the exterior of the model as desired. Windows don't have to be round; they can be of accurate shape.
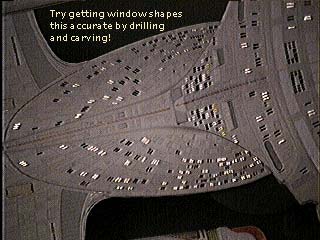 A Couple of Disadvantages
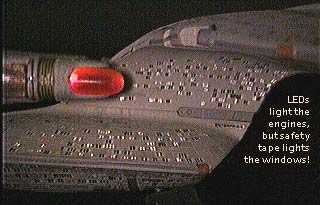 If you're a perfectionist skilled in the intricacies of electric and electronic model illumination, you may want to consider mixing the effects. The reflective tape illusion can be easily combined with other forms of self-illumination, such as blinking or chase lights/LEDs that give your static model its animated appearance. Just use reflectives for the non-animated light sources on your model.
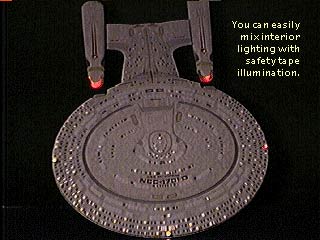 Strobes may need to be tilted slightly upward or away from the model when photographing it, so the safety tape doesn't accurately reflect a sunburst of light to your film! Placing the safety tape's light source close to the lens without creating a lens flare can be a challenge. A two-way mirror placed in front of the lens and reflecting the light source to the model can help, but it also cuts down on the amount of light for your photo-critical when you want great depth of field. Experiment with different film and shutter speeds.
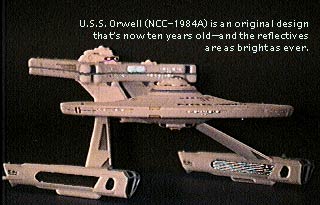 Try safety tape illumination on an inexpensive model first; see if you like the results. Or assemble the model with sparing amounts of contact cement, so you can later disassemble it if you don't like the result, and illuminate with electrics/electronics. (You can usually remove contact cement with grey kneaded artist's eraser.) Let the safety tape be the last step in your model's construction, after painting, decals, final clearcoat, maybe even weathering. If you don't like the result, you can peel it off!