
By Ken Lilly - images & text © 2000
|
|
|
^ Underside of the ship ^ Warp nacelles/pylons ^ View from the top/rear. Note the warp engine coloring ^ Bridge and upper primary hull ^ Fantail Diagram: section through the primary hull. Diagram: isometric drawing of the impulse engine area. Diagram: view of the warp engine to pylon area. Diagram: another isometric veiw, this time of the area around the center bulge of the warp pylon assembly. |
A quick note before starting, the plastic in my sample seemed a little on the brittle side, the parts had a tendency to break off instead of cutting clean, so extra care is needed in removing the parts from their large sprue attachment points to avoid cleanup work later. Also, leave off all the clear parts until final assembly.
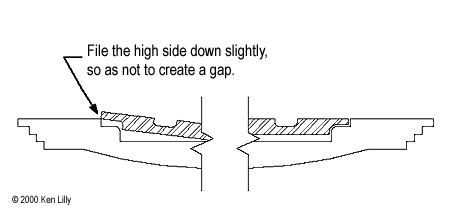
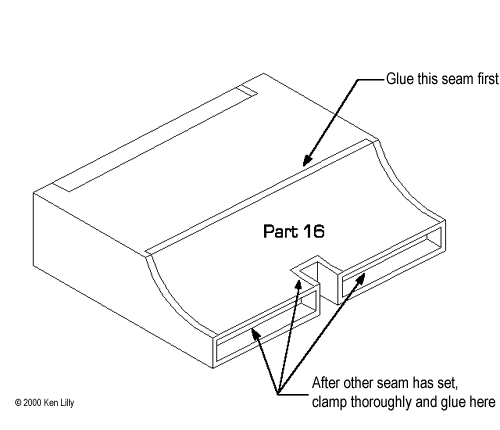
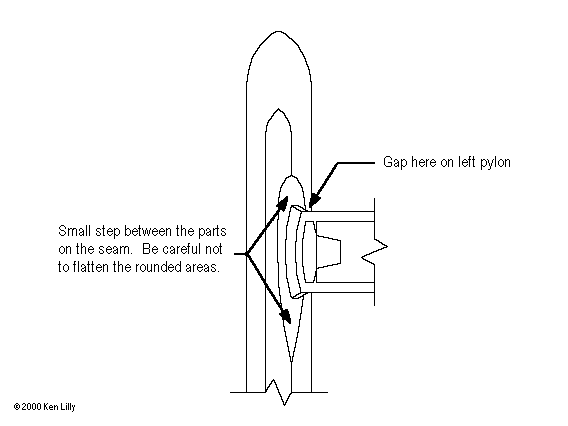
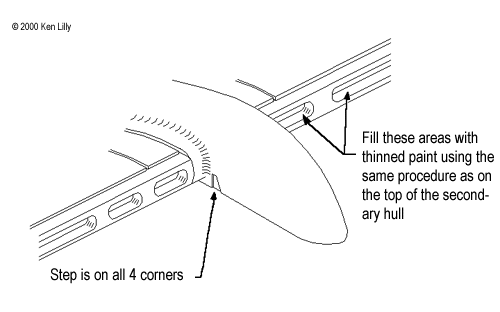
Step 1 (Primary Hull Assembly): Before you assemble parts 1 & 2, make sure to dry fit them first, on my kit, part #2 was a bit larger than the opening for it in part #1, this caused it to "rock" from side to side: if it fit in one side, it wouldn't in the other. A little filing fixed it, but don't file too much like I did, then you have a gap to fill later. After the hull has dried thoroughly, it's time to add part #16. This part is probably the trickiest assembly in the entire model. There are NO pins, lips, or tabs to keep it in place, the only thing holding it is the edge of the saucer, which is about 1/32" thick. The way I did it was to align the bottom of part #16 with the bottom of the hull and glue that joint only, and then let it dry overnight. Then clamp it down to the top hull and glue it completely, letting it dry overnight again. Most of the seam cleanup on this part is at the impulse engine area. Filler will be necessary, as well as some careful sanding and filing. The only other major joint is the seam around the saucer, which except for gaps I accidentally created, was rather easy to clean up. I sanded off the few lines around the bottom between the ring and the edge of the dish and re-scribed them. Since I had the scribing tool out, I went and scribed around the thruster pads to separate them from the dish. A scribed line makes it easier to hand paint without the paint going up the sides. Step 2 (Bow Assembly): I don't know why they call it the bow, it seems everybody else calls it the neck. Anyway, there is A LOT of play in these 3 parts, and it's nearly impossible to hold them all in the proper position to glue, so you'll have to do it in stages. First, glue parts #3 & #4 together, then let the glue dry for a few minutes until the glue has set enough but still has some play in it, then glue in part #21. A trick I used to get the parts in proper alignment is wait until the glue has set a little bit, then clamp the parts into the opening on part #6, using it as a jig. After the glue dried overnight, I reinforced the inside of the seams with super glue, since a lot of stress is on this joint. After everything had set, a fair amount of work is needed to clean up the 3 joints, especially between the back panel and the side pieces. I used a combination of a triangular file and a razor saw blade to get in between the ribs at the joints, I then gave the joints a light coat of liquid cement to smooth out any file marks and round off any sharp corners. Step 3 (Warp Engine Pylon): My sample had quite a bit of warpage in parts 11 & 12, but careful gluing and clamping fixed the problem. However, these 2 pieces had the most fit problems of any part in the kit. There is a very noticeable step at the seam between parts 11 & 12 at all 4 corners, this is due to part 11 being a bit smaller than part 12. The only fix is to carefully fill the joint and carefully sand it to the correct contour. The ribbed piece at the bottom of the pylon was glued together and cleaned up using the same technique I used for the neck assembly in step 2. Step 4: No assembly now, wait until after finish painting. However, there was an ejector pin mark in the deflector housing that had to filled and sanded. Step 5: When you glue the bottom of the warp engines to the pylon assembly, make sure they are level and plumb before the glue dries. The seam between the bottom of the engine and the pylon on the teardrop-shaped area is fairly easy to fill and sand, but on my kit there was a gap on the inside between the left (viewed from the front) pylon and the engine at least 1/32" wide, that was not on the other side. I glued a piece of sheet styrene in it and then cut and sanded it to shape. Go ahead and glue the radiators together, but the ones in my kit had a slight warp towards the center that wanted to pull the joints apart. The joint area is very small, so after the glue has tacked up, tape the joints together and let it dry overnight. Both sets of parts 14 & 15 had bad ejector pin marks and mold defects on the inside that would have showed up after painting that I had to fill and sand.Save the rest of the assembly for this step until after final painting. |
|
Step 6: Wait until after painting and decaling. PaintingI decided not to paint my kit with an Aztec pattern, since there is a lot of complex masking on this kit anyway, and I actually wanted to finish a kit for a change. The paint guide in the kit is good, but it does leave several important details off. First, the major problem is the listing of gull gray instead of dark blue. The gull gray causes problems with painting as well, since it is printed light and light blue is printed dark, it is very easy to mix these 2 colors up, especially around the top of the primary hull. Also, the triangular areas on the side of the impulse engines are not shown on the paint guide, but are shown on the box. I began by applying several light coats of Testor flat white enamel to all subassemblies (except for the clear parts of course). This was allowed to dry for a couple of days since a lot of masking was going on top of it. I used Testor flat sky blue for the light blue areas and Testor Acryl Cobalt Blue for the dark blue areas. I masked off and painted the primary hull in stages since there is so much to be masked, and I didn't want to leave the tape on longer than I had to. The ring on the bottom of the hull proved rather difficult to mask off, and I tried several techniques before finding one that worked. I tried cutting the tape using the lip as a guide, but it is too hard to get a smooth edge on the tape. Next I tried 3M Fine-Line plastic tape, but it would not conform to the curve without buckling. Finally I ended up cutting masking tape into strips about 1/16" wide, but these strips will not run more than 2-3" without buckling, so it took me nearly an hour to mask both sides of the ring. The top of the hull was masked using masking tape, a ruler, a piece of glass as a cutting surface, several new #11 blades, and a ton of patience. The light blue areas were airbrushed over a period of several evenings, and the dark blue areas were painted by brush and airbrush during one evening. There are really no tricks I used to paint all the detail: just take your time masking and painting. I also masked off and airbrushed the phaser pads, but the thruster areas were hand painted. The other details were picked out by hand using various enamel and acrylic paints. The triangular areas on the sides of the impulse engines were laid out based on the box art, about 1/16" in from the edges is about right. The neck assembly and the ribbed piece under the warp pylon were painted dark blue, and then dry-brushed a with a lightened shade of dark blue to bring out the ribs. The secondary hull was painted in 2 pieces because the blue stripe is at the joint between the top and bottom pieces, and its easier to mask in 2 pieces instead of one. The stripe was rather easy to mask, but the 2 dark blue panels on the bottom were more difficult to mask because of the compound curves. Once again, cutting masking tape into narrow strips was the most time consuming task. The top of the secondary hull was masked and painted in a similar fashion, but the engraved details required special attention. The engraved lines at the warp pylon would have been impossible to mask, so I took some of the paint I had thinned for airbrushing and ran it into the line with a brush. I wasn't concerned about a good paint job, just get enough to cover in there. Then wait about 10-15 minutes, take a cotton swab moistened in rubbing alcohol and rub it perpendicular over the lines, removing the paint without messing up the enamel paint underneath. The same procedure was used to fill in the lines on the tiled area where the spray didn't reach, and on the indentations in the warp pylon. The warp engines were fairly easy to paint except for one part, the blue stripe running around the center bulge. The stripe is supposed to follow the decal stripes, but you can't decal until you've painted. Based on the pictures on the box, I assumed the stripe was as thick as the pylons and was in the in same place. I placed the part on a flat surface, and used a pencil shimmed up to the proper height to make a light line all around, and then masked it, but later on I found out the stripe was too thick. Clear PartsI wanted to paint the clear parts on top of the warp engines and the deflector dish to represent the "glow" as seen on the studio model, so I used Testors Light Gloss Blue and Dark Gloss Blue for this step. And to give an effect of "depth", I painted these parts on the back side. When painting this step, the standard way to airbrush is light to dark, but in this case, you have to paint dark to light. I tried light to dark first, but you really can't see the overspray on clear plastic until it's too late and the overspray of the light blue obscured almost all of the dark blue. So I stripped it off and painted dark to light. I painted the parts by dividing the parts into "thirds", on the warp engines, paint a third of the way in from each edge dark blue, and on the deflector dish, paint a third of the way in all around the edge of the part dark blue. Then go over the whole back with light blue to ensure an even color. The ribbed clear parts of the warp engines were painted Gunship Gray on the outside and then gloss coated. But I should have painted them from the inside to give the same effect of depth as on the tops. I tried a similar procedure on the impulse engines, but they are so small, that it's hard to airbrush them like the warp engines, so I ended up painting them Insignia Red. DecalsI find it easier to decal starships in sub-assemblies, it's easier to handle in sections, and you don't have to worry about handling wet decals when you have to move the ship. I started by airbrushing several coats of Future until I had a nice glossy surface and I let it dry overnight. An important thing to remember when decaling starships is that there is a lot of raised detail for the decals to conform to, so decal solutions are a necessity. I used Micro Set and Micro Sol on the kit decals, these are rather mild solutions, which work great for Ertl/AMT decals. While letting the decal soak in water, brush a puddle of Micro Set on and place the decal onto it, get the decal in the proper position, and blot up the excess setting solution. Wait half an hour, and apply a liberal coat of Micro Sol, try to position the surface as horizontal as possible, and then LEAVE THE DECAL ALONE. Once the solvent kicks in, the decal is very fragile and can be smudged or damaged very easily. If it needs more solvent, wait until the first coat has dried and apply another, pricking small holes in the decal where it drapes over raised detail will help too. I found that looking at the decals under a strong light helps to make the "tents" and bubbles more visible. The only problem I had with the decals were the stripes and name decals on the primary hull. The trick is to get the decals on symmetrical, since it is very noticeable if they aren't, also if the decals have any kinks in them, they are not following the curve correctly, no kinks means they are on properly. Also, make sure to get the long stripes straight and symmetrical as well, this also shows up if not done properly. It was at this point I noticed that I had not painted the stripe on the warp pylon center bulge correctly, the decals did not follow the curve, but came down well onto the blue stripe, I decided to make them meet at a point instead. I know it's not accurate, but I didn't feel like repainting the stripe. After the decals have dried overnight, go over them with a paper towel dampened in warm water to clean off adhesive and setting solution residue that would yellow over time. Holding the parts at an angle to a strong light makes the adhesive show up easier, especially once it's dampened. I then airbrushed a coat of Future to seal the decals and make them stand out less when the flat coat is sprayed on. I used Superscale Super Flat for my flat, I don't like using lacquers over white, they tend to yellow over time. But when using an alcohol-based flat over Future, put it on in light coats, or else it will craze the Future. Final AssemblyI dry fitted the neck assembly into the primary and secondary hulls and found that it fit the best into the primary hull, but needed clamping into the secondary, which would have been impossible otherwise. So start by gluing the neck to the top of the secondary hull and reinforcing the joint with super glue on the inside, the extra insurance doesn't hurt, plus you can clamp it down to a flat surface. Also glue the ribbed piece onto the bottom of the warp pylon assembly and then glue this assembly onto the hull and clamp it thoroughly. While this glue is setting, glue the hangar, deflector dish, and cargo bay into the lower secondary hull. I then glued the top of the secondary hull onto the lower hull, clamp and let it dry thoroughly. Then glue the primary hull onto the completed secondary hull assembly, I found out the easiest way to let everything dry is if you rest everything upside down while the glue sets. Before assembling the warp engines, clamp the assembled ship onto the stand so you can work with both hands free. I used plastic cement for these parts, mainly to help hold the parts to counteract the warp. Glue the coils on first, but due to the warp in the parts, glue one side first, and let it dry, then pull it onto the other side and glue and clamp it and let it dry overnight. Then glue the top parts on, and once again, clamp thoroughly. I glued the impulse clear parts in with Kristal Kleer. After all the parts are on and the glue dries, a little touch up painting is always necessary, and I did that with a fine point brush, and then overcoated the touch up with the clear flat. It was at this point that I filled in the windows and thruster ports with India ink in a technical pen. Then after ink had dried, airbrush the clear flat in light coats over the ink to prevent it from smudging or running. It took me almost 40-50 hours to build this kit, most of it in painting and decaling. This is not a bad kit, especially compared to the Enterprise A, and with some work in painting and assembly, it builds up into a really nice model. After I finished the kit, I found out about the decal sheet from Don's Light & Magic that would have saved me a weeks worth of work in masking and painting, but I wouldn't have had the satisfaction of doing it myself. |
|
![]()
This page copyright © 2000 Starship Modeler™. Last updated on 1 November 2000.
![[Front]](kl_EXCEL1.JPG)
![[Underside]](kl_EXCEL2.JPG)
![[Pylons]](kl_EXCEL3.JPG)
![[Top/rear]](kl_EXCEL4.JPG)
![[Bridge area]](kl_EXCEL5.JPG)
![[Fantail]](kl_EXCEL6.JPG)