
By Scott Scariot - images & text © 2001
|
|
|
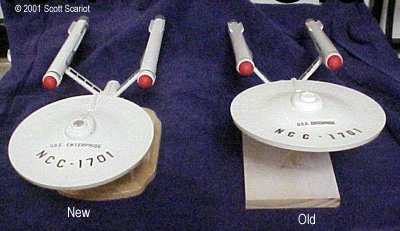
Image: New and old kits |
When I first began modeling, the Classic Enterprise was one of the first kits I built. As time progressed and my skills improved, my model of the Enterprise looked more and more sad. There was only one way to fix the problem: rebuild the model. This turned out to be no small task. ERTL discontinued production of the kit in 1996 and they have become very scarce. I scoured southwestern Pennsylvania looking for the kit to no avail. I then turned to the Internet. There are several places on the net where you can find old model kits. I was able to win an auction on eBay for a classic Enterprise for $25.00. (A word of advice: if you do enter an auction on Ebay, be sure you know what you are willing to spend because some of the auctions can get rather expensive rather quickly.) The kit was in mint condition, exactly as it had been described for the auction. Building and PaintingTo begin, I washed the parts and let them air-dry. Once the parts were dry, I sprayed them with primer. The first time I built this model, I had a nightmare with brush strokes on the smooth light Grey plastic, so primer was necessary. Once the primer was dry, I began to assemble the kit. I started assembling the kit by gluing the top and bottom of the saucer together. Then I glued the impulse engines onto the back of the saucer. This assembly was set aside to dry. Then I moved on to the Secondary Hull. It was tough to get an even seam on this assembly because there were no guide pins; there was no real way to secure the pieces together because of their shape. So I held the pieces together until the glue set. To complete the Secondary Hull, I glued the shuttlebay door into the bottom secondary hull piece. The bottom secondary hull piece was glued onto the upper secondary hull assembly. The navigational deflector was then glued into the completed Secondary Hull. With both main assemblies completed, I moved on to the Warp Engines. I glued to two halves of each engine together. I set the engines aside to dry. While the engines were drying I painted the engine end caps Grey; the circular protrusion on each end cap was painted White. With the engines drying, I began to fill the seams on the saucer and the secondary hull. I used Testors contour putty for this job. I filled each seam and let them dry overnight. The next day, I sanded down each assembly until the seams were smooth. On the warp engines, I glued the Bussard collectors onto each engine. Then using the guides on the engine nacelles and the Bussard collectors, I glued the two cover plates to each engine. Next, I filled the seams on each engine. It was a little rough to fill the seams around each of the engine cover plates, but I was eventually able to get them filled and smoothed out. Again I let the pieces dry overnight and sanded them smooth. With the seams filled and sanded, I glued the Secondary Hull into the slot on the bottom of the saucer section. I held this assembly until the glue set. I then filled the very sizeable gap at the joint where the Secondary Hull meets the saucer. Once dry, I sanded the joints smooth. I then glued the warp engines into the Secondary Hull. Keeping these pieces straight was challenging, but I was able to hold both pylons until the glue set. I filled the gap around the base of each pylon and sanded each seam smooth. This completed the major assemblies of the kit. I spray painted two more coats of White onto the top and bottom. After the paint was dry, I found that one seam on the right side of the Secondary Hull needed further attention. I filled this seam with more putty and sanded it down. For some reason, it took me several tries to get the seam filled and sanded smooth. I painted this area White. With most of the model assembled, I began the process of detailing the model. I taped off the four squares on each of the engine pylons. Once these were taped off, I painted them Black. The Navigational Deflector was taped off and painted Black. I also taped off the impulse engines and painted them Black as well. I taped around the Bussard Collectors and painted them Red. The shuttlebay doors were painted Light Grey. I then painted the four intercooler units Light Grey. Finally the Control Reactors were painted Grey. I painted the forward sensor array Gold and set it aside for attachment after the detailing was completed. The four intercooler units needed to be attached at the end of each warp engine. These pieces posed a bit of a problem. When attached to the warp engine, there is a very small gap underneath each piece, so small it would be very hard to get putty into. So I placed a thin line of putty on the bottom of each intercooler. Then I placed a little glue onto the glue pins and then attached each one to the warp engines. This pushed the putty out and sealed the gap. It took some tricky sanding but I got the gaps sanded smooth. The warp engine end caps were then glued onto each engine. I then taped off the four squares on the end of the two warp engines and painted them Grey. To complete the detail painting I painted four small rectangles on each engine pylon Gull Grey. The model comes with two opaque pieces for the bridge dome and the sensor dome. I decided not to use the bridge dome piece. When placed into the bridge white shows from underneath the dome. I did not like the way this looked so I took a picture of the Enterprise Bridge from my copy of The Starfleet Technical Manual and I scanned it into my computer. |
|
I colored it and then reduced it so that it would fit into the opening for the bridge dome. The opaque bridge dome that came with the kit did not show the detail from the bridge. So I tried to make a part that was easier to see through. I tried molding a new piece with epoxy, but it turned out with a green hue and was hard to see through. Then, while shopping at Michael's for a wooden plaque to make a stand for the Enterprise, I saw a bag of plastic Easter eggs. The eggs had a clear bottom that had the perfect curvature that I was looking for. I bought the bag of 36 for $1.99 and a plaque for $0.99. It took 6 eggs to get the shape and size correct the resulting dome and bridge look nice when placed into the model. I painted the sensor dome White around the edges and set it aside for latter attachment.
With the detail painting and construction complete I moved on to the decals. The model comes with a sheet of fleet decals. This sheet has the names of 14 different starships on it. The font used for the decals is inaccurate so I ordered a set of ST Modeler's conversion decals from Federation Models for $12.50. The add-on set came with landing lights for the shuttlebay, and the ships' name and identification code are in the correct font. There are also several small decals of numbers that were placed onto the Secondary Hull. The decals were very easy to use and added a lot of detail to the model. I was disappointed that they did not include any windows. This was not a problem because I had some window decals left from my Soyuz class conversion. I did have to trim the oval decals down so that they would be rectangular to fit the windows on the Enterprise. This took a bit of time so the windows would look good on the model, but the final effect looks good. Once the decals were all on the model, and they had dried overnight, the model was sprayed with several coats of Flat coat. Once the Flat coat dried the Forward Sensor Dish, Bridge Dome, and Sensor Dome were glued onto the model. ConclusionOverall the kit was a good project. It did get a little expensive with the cost of the kit, add on decals, stand, and of course the bag of plastic Easter eggs. All totaled I spent about $45.00 on the project. I am very happy with the results. I knew that this would be the last time that I would be able to build this kit with out spending an arm and a leg to do it, so I worked hard to get a finished model that I could be proud of. Next up: the original Klingon D-7. |
|
![]()
This page copyright © 2001 Starship Modeler™. Last updated on 17 July 2001.
![[Click to enlarge]](ss_classic_Enterprise_Top_front.JPG)
![[Click to enlarge]](ss_classic_Front_View.JPG)
![[]](ss_classic_Top_Rear.JPG)
![[Underneath]](ss_classic_Enterprise_Bottom_Rear.JPG)
![[]](ss_classic_Rear_View.JPG)
![[]](ss_classic_Bridge.JPG)
![[]](ss_classic_Bottom.JPG)
![[]](ss_classic_Side_close_up.JPG)
![[]](ss_classic_Saucer_View.JPG)