
|
By Scott Scariot - images & text © 2000
|
|
|
Image: Main hull under construction Image: Bridge module, under construction Image: Bridge, neck and hull assembled Image: Impulse engines under construction Image: All that's left are the impulse engines |
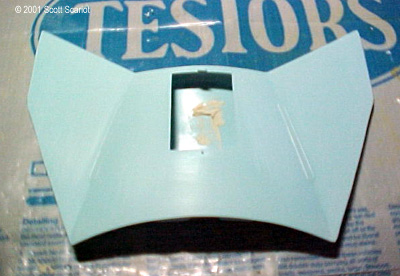
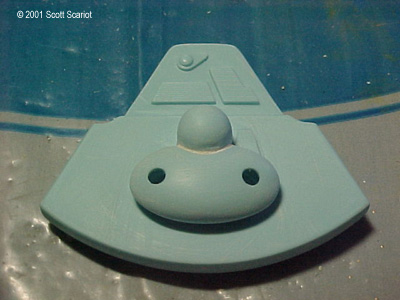
Throughout the many years that I have been modeling I never built this model. I had built the K'T'inga -class cruiser and because the two looked so similar I saw no need to build a D-7, because I thought that they would be the same model, same ship. Wow, was I wrong. This model is totally different from the K'T'inga- class, and while the two look similar the models are very different. This kit is out of production and has been since 1991. I did not even try to look in hobby shops for this kit. I turned to the Internet. I was unable to find any kits that I could afford to bid on at eBay. I then turned to John Green Models Inc. Green Models is a clearinghouse specializing in old and rare models. The website was very easy to use and within minutes I had found what I was looking for. I paid $29.00 for the model and $6.00 for UPS shipping. The model arrived one week later. My only complaint was that the kit was not sealed in the plastic wrap when it arrived, however the parts were still in the original plastic bags, and the clear green parts and decals were placed into a ziplock bag. With model in hand I took a quick inventory of the parts to make sure that all of the parts were there; they were. I then washed the parts and let them dry. I then ran into a dilemma. Do I build this kit straight out of the box? Or do I accurize it? I decided to build the kit straight out of the box. My reason for this was twofold; first there is a very good article on how to accurize the D-7 by Mark Fergel at CultTVman.com, and I did not want to appear to be plagiarizing. Second I also happened to like the way the panels that came with the model look. Construction Begins With my dilemma on construction completed, I began work on the model. First, the command deck was assembled. The two pieces that make up the bridge were glued together and the two pieces that make up the command deck were glued together. The bridge subassembly and the command deck were glued together. This assembly was set aside to dry. Once dry, I filled the seams with putty and set it aside again. I then moved onto the boom assembly. This kit was once issued with lights, so there are several windows on either side that are pre-drilled, and there are also holes for wiring in the body of the model. There are eight parts that make up the boom assembly; the two halves of the boom itself, the Photon Torpedo tube, two boom radiator tubes, two boom-side radiators, and a heat exchanger on the bottom. Assembly of the boom went fairly smoothly. The Photon Torpedo Tube is glued into the circular opening in the front of the boom. I ran into a snag while gluing the Photon Torpedo Tube into place. It was a little tough getting it flush with the front portion of the boom. But with some putty and a lot of sanding I was able to get a very flush finish. Once I got the boom glued together, I filled all of the seams and set the boom aside to dry. The Lower Heat Exchanger was left off for attachment later. After I completed the boom assembly, I began working on the Impulse Engine Assembly. There are six pieces that make up the assembly: the impulse engine top cover, impulse engine bottom cover, thrust panel, radiation shield, and a left and right side panel. Gluing the side panels onto the impulse engine bottom cover was a bit tricky; the attachment was very odd. I was able to get both side covers glued into place I then held the pieces in place until the glue set. The top cover was glued into place and the thrust panel was glued onto the back of the assembly. The Radiation Shield was not attached. It will be attached after the base coat of paint is applied to the model. I set this assembly aside and then moved on to the Impulse Engine Intercoolers. The Intercoolers are made up of three pieces each. The Heat Exchanger, Intercooler Housing and the Base Plate. These three pieces are glued together and the seams filled with putty. Both are set aside to dry. I assembled the main hull next. There were two pieces for this assembly, top and bottom. The only thing to be careful of here is to make sure that both parts are lined up straight. Again, I filled the seams and set the assembly aside. The final major subassembly is the Warp engines and pylons. There are six pieces to each warp engine. An outer and inner engine piece, two Flux Caps, a Position Light for the bottom, and a Pod Cap. Before gluing the two halves of the Warp engine together, I tested the fit. I found that the fit was a bit off, so I cut off the guide pins, and then glued the parts together. I then filled the seams on the Warp engines and let them dry. Putty, Sand, Repeat... After letting all of the sub-assemblies dry overnight, I began to sand down the seams on all of the pieces. I started by sanding down the seams on the rear of the boom. Once those seems were smooth I began sanding down the seams on the Warp Engines. This took a while because it was tough to get the putty out of the joints where the engine meets the pylon, but I was able to get all of the putty out and get a nice even seam. I then glued the Flux Caps, Position Light, and Pod Cap onto each engine. When doing this assembly, make sure that the correct Pod Caps are on the correct engine and that they are both in the correct position. Both engines were then put aside to let the glue set. I then began sanding down the seams on the Main Hull. This was much easier than sanding the Boom or the Warp Engines, because the edges are mostly flat. I then sanded the Impulse Engine Intercoolers. These were fairly easy to sand, although it took some time to get all of the putty out of the ridges on the Heat Exchangers. To finish sanding the subassemblies, I sanded the seams on the Command Deck. With all of the sub assemblies completed and sanded, I began to assemble the model. I began by attaching the Command Deck to the Boom. I found that there would be a very small gap under the Command Deck so I ran a thin layer of putty on the bottom of the command deck before I connected it to the Boom. This sealed the gap quite well. |
|
I then moved back to the warp engines. I filled the gaps around the detail pieces on each engine. These were set aside to dry. Once dry, the seams were sanded down and each engine was ready for attachment to the Hull. While the Warp engines were drying, I glued the Impulse Engine Intercoolers onto the Engine deck. I sanded down the small amount of putty from under the Command Deck. I them glued the Boom onto the front of the Hull. The Boom needed to be supported so the glue could set properly. Once the glue had set, I filled the gaps between the back of the Boom and the Hull, and glued the lower Heat Exchanger onto the Boom. After leaving the model set overnight I came back and sanded down the putty from the Warp engines and the Boom/Hull connection point. I ran into a problem here; the angles around the Boom and hull are so odd that I was never really able to get a really smooth seam here. Once these areas were sanded down and smooth the warp engines were glued onto the hull. Once the glue set the seams were again filled with putty and set aside to dry. Painting & Final Assembly While the putty was drying on the Warp Engine Pylons, I prepared to paint the model. The paint guide that comes with the model recommends Medium Flat Gray Green, Medium Flat Gray, and Light Flat Gray as the colors for the ship. I decided to use Medium Gray for the base coat of the ship. I then began the final work on the Impulse Engine Deck. The Impulse Engines were painted a Pearled Bright Green. I painted the Heat Exchangers Euro I Gray. The Radiation Shield was painted silver, then glued into the underside of the Impulse Engine Deck. This completed the Impulse Engine Deck; it was set aside for attachment after the rest of the ship was painted. After allowing the putty around the warp pylons to dry, I sanded them down. I then applied a few light coats of paint with my airbrush. After it dried, I detailed the model by painting the vents on top of the ship, the baffles on the port and starboard sides of the ship and the baffles on the Warp Pylons Euro I Gray. I also painted the clear green pieces Pearled Bright Green so that they would match the Impulse Engines. These were the glued into place on the Command Deck. The Side Radiators on the Boom were painted silver. The Lower Heat Exchanger was painted Euro I Gray. I detailed the Warp Nacelles by painting the raised rectangles Metallic Anthracite Gray. The Flux Caps and Position Lights were painted Silver. I completed assembly of the model by gluing the impulse deck to the top of the ship. I also glued the two Boom Radiator Tubes into place. After allowing the final assemblies to dry I began the process of painting the windows into the ship. This turned into a chore because most of the pre-molded windows were sanded off during construction. But with some patience and a very fine tipped brush I was able to get some good quality windows. The model was now ready for decals. There are only six decals included with the ship so these were not very labor intensive. The only adjustment I made to the decal placement is that I turned the Klingon emblem 45 degrees to the left so that it matched the studio model. The model was set aside and the decals given time to set. The model was then sprayed with a few light coats of Flat Coat. Then the four green pieces were glued into place on the Command Deck Conclusions As always, I made a stand for the Model out of a wooden plaque and some Dowel Rods. I then painted the Klingon emblem onto the stand. Overall, I am very happy with the way the kit turned out. I would have to say that this is one of AMT/Ertl's better kits. The entire project was very enjoyable and took about a month to complete. I was pleasantly surprised at how different this model was from that of the K'T'inga -class. I'm sorry that I did not build it sooner. I would highly recommend this kit to anyone. The major problem with this kit is its lack of availability, which adds to the overall cost of the project. I would say that this is a must have model for any Trekker, or anyone remotely interested in sci-fi. Paints Used (All Testors)
* Gloss Reference: Cult TV Man.com Round2 has reissued this kit with some detail improvements/accuriztion. You can read all about it by clicking here. |
Please note that the opinions expressed in this article are those of the reviewer.
Read other reader's reviews of this kit ![]() Submit your own review of this kit
Submit your own review of this kit
![]()
Go back up | Star Trek: Aliens | Starship Modeler Home | Site Map | Feedback
This page copyright © 2000 Starship Modeler™. First posted on 4 November 2000. Last updated on 22 September 2011.
![[Boxtop]](ss_d7_box.jpg)
![[Click to enlarge]](ss_d7_42F.JPG)
![[Click to enlarge]](ss_d7_44F.JPG)
![[Click to enlarge]](ss_d7_45F.JPG)
![[Click to enlarge]](ss_d7_46F.JPG)
![[Click to enlarge]](ss_d7_47F.JPG)
![[Click to enlarge]](ss_d7_50F.JPG)