![[Starship Modeler - The complete information source for modelers who build sci-fi, fantasy and real space subjects]](Yamban.jpg) |
|
|
By John Lester
|
|
|
|
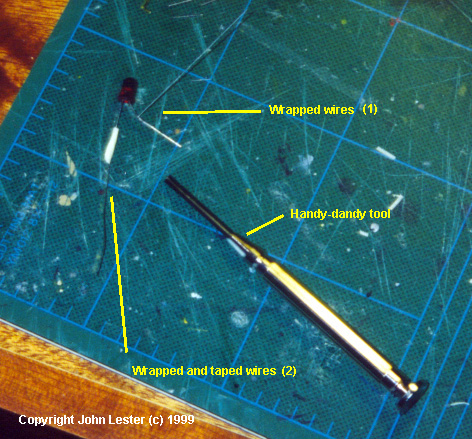
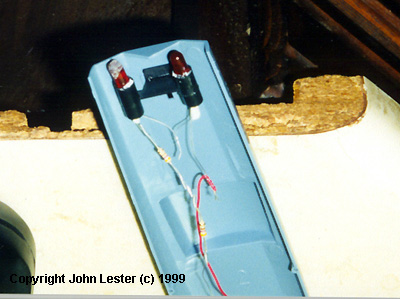
First off, I have to admit I have never seen Space Battleship Yamato in any of its incarnations. However, reading Rob's review of the EDF Patrol Cruiser, and hearing BanDai was re-issuing some of the line, I was interested enough to poke around on HLJ. The lighted 1/700 Yamato and Andromeda models looked cool, and at about $8 US (at the time) too good to pass up. The model comes in a sturdy box with a colorful painting of the ship on the cover -- which is good, because that's all the reference material I had. Carefully packed inside were seven sprue trees in three colors - black, grey and clear red, plus a bag full of miscellaneous lighting hardware. Three grey sprues contained the bulk of the parts for the ship; two black sprues held parts for the stand and lighting equipment; the remaining clear red sprues contained the engine intakes and "exhausts". All parts were flash free and well molded; the deep trenches of earlier releases had given way to nicely engraved lines in this kit. Though first released in 1980, the molding and detail on this kit are certainly equal to anything ERTL is putting out today - and the parts fit better. No decals are provided, which is OK as the ship apparently carried no markings. Instructions are in Japanese, but the drawings are clear and the parts all numbered, so this is no handicap. While there are a few toy-like aspects to the kit (the molded character figures you can wear on a necklace come to mind), BanDai didn't sacrifice detail, fit or ease of assembly in order to appeal to the younger crowd. Maybe Japanese kids are just more demanding, who knows. One of the best aspects to the kit is the engineering: every area that needs to be a different color than the base coat is a separate piece. This allows you to paint these separately ... which is what I should have done! LIGHTING Assembly starts with the base and the electrical connections for lighting . As soon as I opened the box I decided to ditch the mini bulbs provided; they would no doubt burn out in minutes and I'd be unable to replace them. Instead, I picked up three T 1 3/4 red LEDs and a 470 Ohm (1/4 W) resistor. I should probably have gotten super-bright LEDs, at least for the rear engine, but this was my first ever lighting project and I didn't know that at the time. I also decided to use one 9V battery instead of two AA's, so I ditched the battery mounting hardware and cheeseball switch. It doesn't take a rocket scientist to install LEDs, but you do need to pay attention to what you're doing. The LEDs I used only work with electricity flowing one way, and they can't accept the full strength current of a 9V battery. The resistor is used to drop the current down to a manageable level, and goes between the negative post of the battery and the LED. I determined the polarity of the LEDs by holding the resistor to one "leg" , then touching the other end of the resistor and the other LED leg to the battery posts. When the LED lit, I marked the leg the resister should go to by bending it up (usually this is the shorter leg of the LED, but you should always make sure). I assembled the neck of the stand and the contacts in the base of the model per the instructions, twisting the copper wire provided around the brass contacts. After getting the contacts in place, I touched a drop of solder to the join to strengthen it and improve conductivity. If found as I did this that brushing on a dab of resin paste flux, available in tubes for maybe a dollar at Radio Shack, helped immensely to get the solder where I wanted it without a lot of hassle. I wired two resistors in series (overkill, I know now) to the first LED with thin craft (steel) wire, using a wire-wrap tool I picked up at Radio Shack for $4. It's dead simple - you just slide the LED leg in the center hole, the wire in the outside slot, and twist. The resulting join is probably strong enough on it's own, but I soldered each connection anyway, making sure I had an alligator clip between the soldering and the LED bulb to act as a heat sink (you can burn out the LED with too much heat if you're not careful). The front two LEDs were wired together in series with craft wire, then wired to the copper stuff provided by BanDai, then wired the rear LED. |
|
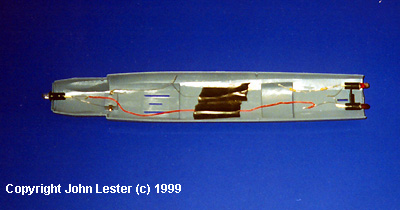
After each connection I tested the lights to make sure I hadn't burned anything out, then wrapped the connection in electricians tape so that bare wires wouldn't accidentally touch each other. I mounted the LEDs to the front of the pieces provided for the light bulbs - a big mistake as I was to find out shortly. The bulbs are supposed to go inside these pieces, and the way I attached them meant I couldn't fit the red parts in place! I ended up having to break off the two front LEDs and move them back 1/4", unfortunately mis-aligning one 0of them in the process. The rear light I couldn't do this with - so ended up having to saw off 1/4" of the red afterburner insert. Ugh. Once everything inside was complete I sealed up the model and assembled as normal. Everything fit well enough, though I found I need to putty and sand a few areas (especially around the "bow" of the ship. I had to rescribe several panel lines that got sanded off in the process. I should have left the small clear red "afterburner" parts and the main exhaust assembly off until last so I could paint them separately. I was having too much fun gluing stuff, however, and got impatient. I did leave the turret covers off, painting them separately, however. |
|
|
PAINTING & DETAILING With assembly complete, I stuffed tissue in all the openings to protect the electrical contacts and the clear parts, and primed the model with flat grey spray paint. This revealed a few areas that needed touch ups, which were fixed. I then followed Rob's suggestion to paint the base color using Polly Scale "French Blue Grey" (mostly because I had a bottle picked up from who-knows-where). Polly Scale and I aren't comfortable together - I general use enamels - and I had some trouble getting a good base coat. Once I figured out how to thin the stuff (60% paint, 40% thinner, the thinner being three parts Polish potato vodka to one part water), things got easier. I had originally intended to paint the ship in a WWI-style "dazzle scheme" - sure, it's not true to the show, but I don't care. However, after peeling up my carefully applied masking, I found that one of the colors had bled profusely under everything ... and the scheme didn't look all that hot anyway. >Sigh< I wet-sanded all the bad paint off and re-applied the base color . Then I did it all again when THAT bled profusely. Finally, on the third try, I got an acceptable finish. After that I masked off the bits that needed to stay blue and painted the 'accent color". I used Testors "Sand Beige" - a color similar to Radome Tan - sort of cream or ivory - but with a hard, glossy finish. When that dried I masked around the "afterburners" and painted them Testors Model Master Stainless Steel (which I managed to spill all over the workbench in the process. Arrggh). When all that was dry I cleaned up overspray and a few small leaks with a cotton swab and rubbing alcohol, then coated the entire ship with Polly Scale Clear Satin Finish. Fortunately, I had learned how to spray the stuff by this point so I had no further incidents. I wanted to replicate the "anime" look, without making the model look cartoonish, so I kept the detailing and weathering to a minimum. I used a fine alcohol marker to fill in the deepest panel lines, cleaning up any mistakes immediately with a damp rag. I then used a black enamel wash to fill in smaller, thinner lines. Excess was wiped off with a paper towel dampened with clean thinner when the wash had dried. The Polly Scale satin didn't react at all to the enamel or the thinner, which was a relief. Finally, I masked off the contacts and painted the stand. The black plastic looks ... well, toylike ... and I had used a ton of putty where the pieces joined, so I first sprayed it with Fleckstone to give it some texture and hide the boo-boos. I oversprayed this with a black pearl metallic because I liked the look better than the faux granite Fleckstone. After a coat of clear high gloss, I was done. Overall, this was a good model and I had fun building it - so much so that I may well get another and do it up right (more lights, less mistakes!). Highly recommended, especially to those wanting an easy kit to practice lighting with. |
![]()
This page copyright © 1997-2000 Starship Modeler™.
Last updated on 28 November 2000.
![[Oblique]](jl_and4.jpg)
![[Boxtop]](../yam_and.gif)
![[Top]](jl_and2.jpg)
![[Fore]](jl_and6.jpg)
![[Aft]](jl_and5.jpg)
![[Circuit layout]](jl_and8.jpg)
![[Insert and twist]](jl_and91.jpg)
![[Hull assembled]](jl_and7.jpg)
![[Turrets]](jl_and92.jpg)
![[Beauty, ain't she?]](jl_and3.jpg)