
| By Erin Lantz - images & text © 1999 | |
|
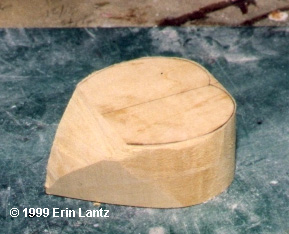
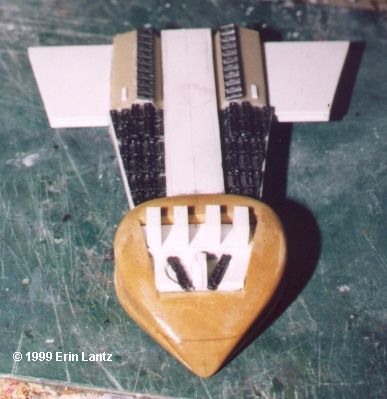
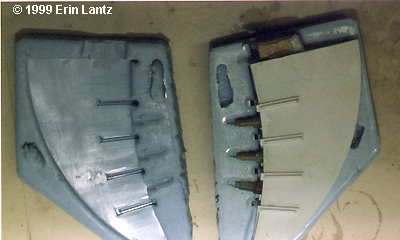
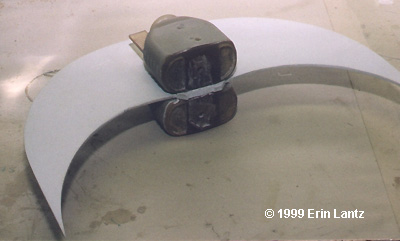
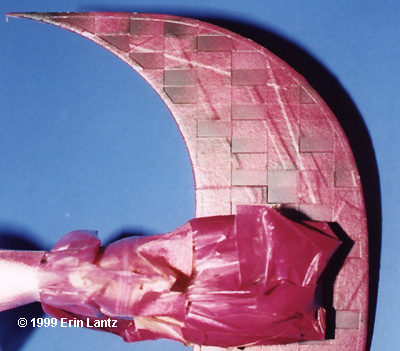
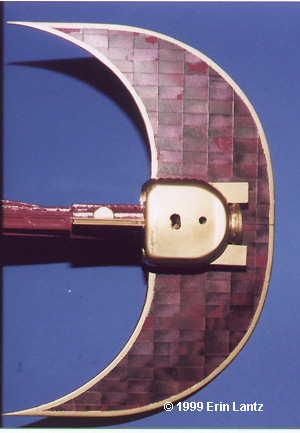
Acting as the front line vessel in the Centauri Navy, the Vorchan is the epitome of Centauri design. Used as fast strike ships, their small size, high speed, and heavy firepower allow the "fan heads" to get in and out quickly. As the Alliance soon found out in season 5, this ship is much more powerful than it looks. Twin cannons on both top and bottom mounted turrets and 6 wing-mounted cannons allow the Centauri to more than leave their mark. Gravitic mines are carried internally, and can be released anytime during battle. While actually a corvette or medium cruiser, this ship would put up a good fight against any capital ship, and when used in the typical Centauri raiding pack, it's downright deadly. After seeing them throughout the show, I decided that it was my favorite "metal" ship of the show. Since very few, if any, reference pics are available of this ship, I decided to base my scratchbuild on the AoG mini, sizing my creation 5 times bigger. First, I bought the ONE Vorchan AoG mini I could find and photocopied the pieces before assembly. Placing each piece on the glass individually, an enlarged copy of the piece was made to use as templates for construction. Using artist's 3M brand spraymount, I mounted each copy onto a piece of 1/16" styrene. After cutting out each of the main pieces for the wings, I decided to save some time and locate some ready- made engines. Searching the shipyards known as my wife's kitchen, I came upon some beautiful engine blocks in the form of a Vanilla flavoring bottle. It had nice bumps on the sides and was perfectly sized. The cap would act as the afterburner cans, saving me the hassle of having to scribe in grooves for the can details. A search of my scrap parts box turned up the radiator grills for the top of the hull. T-80 tank track links from an old Dragon kit were now a radiator array. After searching for what seemed forever, I finally realised that everything else would have to be scratchbuilt. Oh well, the kitchen can only provide so much..... The next step was to figure out how to do the distinctive nose of the ship. I started one in resin, but soon found it too hard to shape right. I kept shaving off too much. I finally bought a piece of basswood and carved it out of that. Using my belt sander, I slowly got the shape right and started detailing. All nose detailing was made from bits of styrene and resin, with a few track links thrown in for balance with the hull. Since I didn't have very good references, I decided that the hull should have heavy heatsink type radiators all over it; those big guns must produce some serious heat! The hull was built in pieces of styrene and resin. A central rectangular styrene box was made to act as the spine. This piece would be the attachment point for the rest of the parts, so it was filled with resin for strength. Next I built the right side hull from styrene, and detailed with plastruct half I beam. I made a mold of this piece and then cast a copy. Both pieces were then glued in place on either side of the "spine". The wing supports were made by sandwiching sheet styrene and cutting to size. These were then glued to the hull in the correct places. The front part of the hull where the neck starts to narrow was made by shaping some resin into some triangular pieces that fit and then glued on. The bottom of the hull was covered with thin, small grooved styrene sheet to replicate corrugated hull plating. Next I glued the completed nose to the end of the hull with JB Weld. It isn't coming off, gang! It came off 4 times before I used the JB Weld, but it's on to stay now. The references showed a bridge type structure at the base of the nose, so I fashioned one from scrap resin blocks and unused pieces of hull side castings. It was at this point that I realised I had forgotten the mine bay doors, so a door was made from sheet styrene and glued to the bottom of the nose. Next I cut and glued the tracks onto the upper hull. Details were added on the wing supports using some resin parts made for another project and some solder. Main hull completed, I set to work on the engines. Taking a Vanilla bottle and making a mold of one end of the bottle made the engines. The cap would serve as the afterburner, and the bumps on the side made for good details. After the first resin copy was made, I carved intakes to fit it from basswood. The intake was then epoxied to the "engine", and the "afterburner can" was drilled out. I made small engine exhausts to put inside the cans, and then glued em in. Once dried and sanded, a final mold was made of the engine block. Remember those pieces cut out earlier? Each half of the wings were glued together with Tenax on the back edge and left to dry for a week. Once dry, I took the front face piece and wedged it in between the top and bottom to make the final shape of the wing. Details were made from sheet styrene and square styrene rod. Once finished, a mold was made and copies cast. Stacking and gluing sheet styrene and then detailing with resin doodads and styrene sheet and rod made the turrets. The guns were made from progressively smaller styrene rod. Of course, molds were made of all these parts after completion. If it weren't for rubber and resin, none of my projects would ever get finished. Simply cutting two 1/16" thick styrene sheets to the correct shape, and then sandwiching them together with Tenax made the main vertical wings. The edges were filed smooth and then sanded to final shape. Final assembly brings all of the subassemblies together. Each engine was mounted to the vertical wing with superglue, then reinforced with JB Weld for strength. The small winglets on the engines were made and cast in resin and then mounted at this time. Next I made a small "mounting bracket" to fill the gap between the front of the wing and the rear of the main hull. After carefully aligning the hull to the engines, I glued them together using 5 minute epoxy, using brass rod supports to hold the weight of the hull. The final step was to glue on the wings with epoxy, and add the guns and turrets. Painting was done with a "paint bomb" of Rubystone Red by Testors and Testors Burgundy. Panelling was done by masking off panels at random and shading one corner of each panel. The guns and reinforcement ribs on the wings are Testors MM Platinum. All gold areas are painted with a cheap paintbomb of gold. The radiator grid was done in MM Steel, and the turrent cannons were done in Metalizer Gunmetal. I didn't weather it at all, in fact, it's TOO shiny. I prefer new ships. Markings were made on my PC using PhotoShop and Print Artist. The "Cornucopia" symbol was hand drawn, then scanned into PhotoShop and colored yellow. So as not waste a whole sheet of decal film on just these markings, I went ahead and made some for other projects as well. Vorlon symbols, EA flashes, EA ship names, and Centauri Primus markings filled the rest of the sheet. All were printed using the ALPS MD-1000 printer. I ended up doing two sets anyway, one on clear and one on white decal film. Without a white cartridge, the ALPS printed decals on clear film were translucent. The answer was print one on white film and cut them out by hand. Not a fun or easy task. I'm buying a white cartridge. Once finished, the ship looks as close to the one on tv as I can get it with the paltry references I have. Three tiny screen captures were all I had, except for the vcr. As you can imagine, my B5 collection of tapes is getting worn from too much freeze framing! I'm pleased with the end product, and my wife the critic likes it - so much she placed it attacking us next to the tv, the coveted place of honor. |
|
![]()
This page copyright © 1997-9 Starship Modeler™.
Last updated on 11 October 1999.
![[Evolution]](el_vor_a.jpg)
![[Making Molds: work in progress]](el_vor_b.jpg)
![[Engines]](el_vor_c.jpg)
![[Final parts]](el_vor_4.jpg)
![[First coat of paint]](el_vor_e.jpg)
![[Shaded paneling]](el_vor_f.jpg)
![[Shaded panels]](el_vor_g.jpg)
![[Final, bottom]](el_vor_9.jpg)
![[Top]](el_vor_10.jpg)
![[Grrrrrrrrrrrrrrrr]](el_vor_j.jpg)