
By Luciano M. Trentadue - images & text © 2004
|
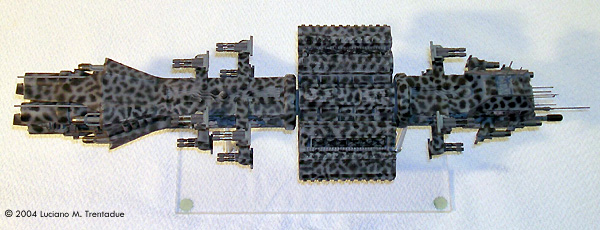
![[Click to enlarge]](lt_omg_beautyshot2.jpg) This was my first resin kit, and I did not know what to expect. |
|
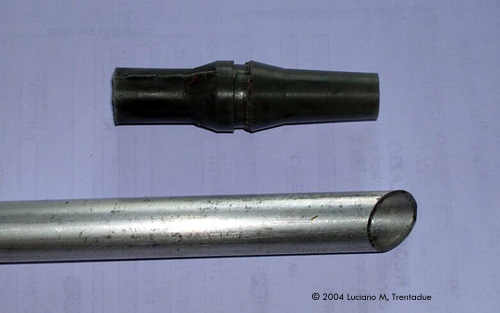
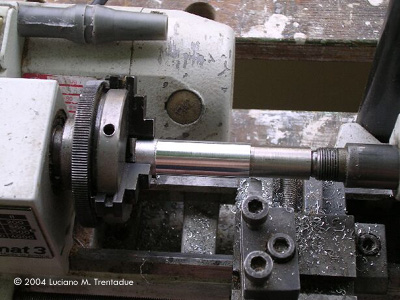
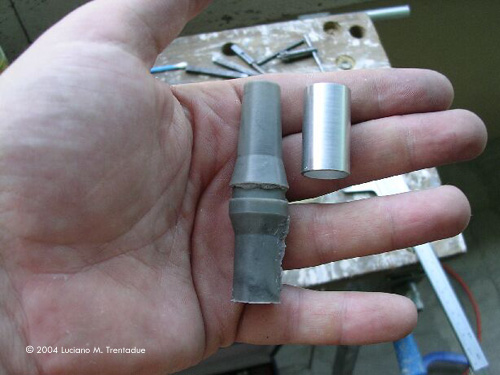
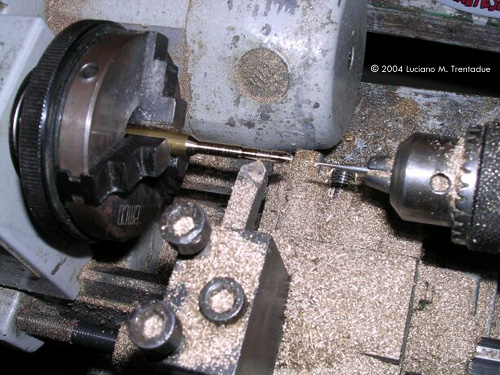
Image: Unmodified engine ... Image: ... with aluminum stock for the customization Image: New part on the lathe Image: Re-worked resin and new aluminum pieces
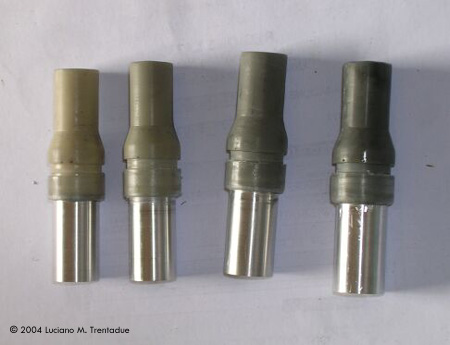
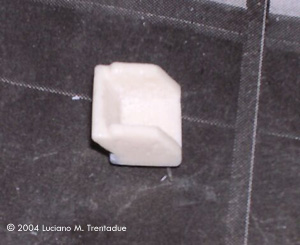
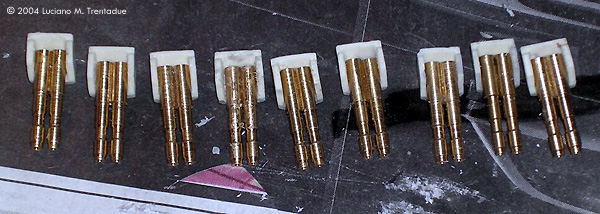
Image: Final products Image: Turning the new cannons Image: Turret base ... Image: ... with new barrells Image: All new turrets |
By the way, I ceased to build kits some years ago. I bought it because I did like Babylon 5®, and mostly the Earth Alliance ships. I became aware of the kit through the review on this site, and so I decided to take from the wasteland all the modelling tools, buy putty and paints, order the kit and try to build it. The Kit I purchased the kit through Federation Models, and received it (in Italy) through air mail after less than a week. The kit box was in another larger box, very well protected with foam peanuts. The box contained a series of plastic bags, numbered to ease the recognition of the pieces, a well written assembly instruction paper, the brass tube to make the "spine" (the Omega has a rotating section) a decal sheet, a photo-etched part set and some white metal parts and steel rods for the antennas. The resin pieces seemed good, the details were sharp and in excellent accordance with the original ship, the proportions are respected, except, maybe, for the secondary side cannons that seemed to me a bit too small - It is a personal feeling, anyway, I had not in program to use them... Preparation of the Kit Parts Some problems came from the sprues - each piece must be separated from its pouring spruce and carefully finished, even to eliminate some minor flash - something that can be done easiliy with a cutter knife and a set of key files - I suggest to use an x-acto knife and key files for the parts preparation, and sandpaper for the finishing. The dry-fitting of the hull parts is essential, allows to see in anticipation where will be the eventual seams to be filled, or to preview the eventual future difficulties. - the resin used is beautyful, grey, compact, dry, nothing to say except that it was very good and easy to work, even if the smaller parts are a bit brittle, and some of the larger parts, some plates of the hull and of the "hammer", are slightly warped, and to straighten them with the use of patience and hot water IS NOT STRAIGHTFORWARD - Anyway, I did not find real reasons for complaint, the situation was better than I expected, and I would have bought it again. As I said, the accuracy in the proportions and in the details was excellent. The photo-etched parts, the white metal parts and the decals are excellent. Preparation of the "Custom" Parts As I said, I did not want to build a Standard Omega (I wanted to build this) and so were needed some custom special parts, essentially the engines, the cannons and the chin mounted antenna. I started with the kit engines, cutting and modifying them on a lathe. With the same lathe I made the larger engine terminal nozzles, starting from an aluminium tube. The assembly was easy ( I made the work to allow a good fitting between modified original engines and aluminum made nozzles ) and the outcomes, IMO, good. The next step were the barrels of the cannons, even these made with the lathe from a brass rod. One thing that I did not take into account is that, beyond the 4 bow mounted heavy cannons, there were 12 twin turrets, and this means 4+24 barrels - If You find relaxating to work with a lathe, it is ok, elsewhere making a master and building them with resin is surely faster, while IMO a building with plastic pipes or similar can be even more time-consuming than the lathe work. Anyway, honestly the lathe-milled brass cannons are very beautyful. The side turrets were my first resin work - I made a master of Evergreen styrene sheet, made a silicone rubber mold and begun to produce turrets - The resin must be mixed very well, elsewhere you risk to have a piece that does not solidifies, and at this point the mold is destroyed - Molding parts so small with a single mold means that at least an half of the resin You use will be lost, anyway the total quantity used is less than a couple of spoons... AND REMEMBER TO LUBRICATE THE MOLD BEFORE EACH CASTING! The resin cast turrets can be cleaned from the flashes with the x-acto knife, then can be finished with files and eventually some putty and sandpaper. The "twin barrels" of the side Ion cannons were glued together with superglue on a glass plate to ensure that they were parallele, then glued in the cast turrets. The Small details of the turrets were made of sheet styrene strips. Assembly I proceeded with the following phases:
The main hull sections assembly is conceptually straightforward, but to hold them exactly in place when the superglue fits requires or four hands or a good quantity of patience and some rubber bands - The dry fitting of the parts and the eventual previous adjustements to be made with files and sandpaper is essential. I suggest to assemble three sides of the hull with one bulkhead, and after set in place the fourth sideand the other bulkhead. There are some seams that must be filled with putty and sanded - nothing exceptional - overall it fits well. The forward "hammer" was much more easy than one can expect, the instructions provided are excellent and the parts fits well, requesting only minor adjustements. The engine section is a problem: while the halves and plates that build up the engine block (the truncated pyramid armoured piece), after some dry fitting and minimal adjustement comes out pretty well, the rear plate that would have to hold in place the four engines, the engine cradles and the rear cannons was warped, and each engine pointed at a differnt location of the universe, instead to be parallele: my suggestion is to use this "engine bulkhead" in the assembly of the rear block, then remove it and replace it with a part made of sheet styrene, that it is planar, and so allows a decent engine assembly: a styrene sheet "clone" of the original bulkhead is IMO the best solution, it is faster to build than to try to eliminate the warping of the original part, and a plane bulkhead is essential to allow a decent engine assembly. I did this, with a plate of evergreen sheet styrene 1.5mm thick, with reference holes for pins of the engine cradles. |
|
I have found the engineering section, the cluster of the four engines and of the four rear cannons to be the most difficult of the kit. Must anyway be remarked that the details of the parts are excellent. The rotating section is easy - six large resin parts, they must be dry fitted, then can be assembled. For the whole kit I used superglue (Cyanoachrilate), but for the rotating section I used essentially epoxy glue, to pre-fill the seams and allow a superior useful adhesive surface: as can be seen in the figure, the epoxy glue works well, some putty will fill the joints pretty well, but most part of the seams are yet filled by the epoxy. The final assembly with the central brass tube that holds everything together is straightforward, but pay attention to quickly aligne the rear and forward assembly before the glue fits. The side cannons of the "true" Omega are placed in a position in which their primary targets are parts of the ship they must defend - I made the sponsons where are placed the side gun mounts with sheet styrene stripes. Even the supports of the more backwards main cannons placed on the sides of the hammer are made of Evergreen 1/4" styrene tube and styrene sheet.
I put in place the cannons and the antennas after the painting job - The white metal antennas fits well, the steel rod ones require to drill a couple or so of holes with a 1mm drill bite - Set your dremel at the slowest speed, or use a hand hobby drill - the resin is not very hard, and a fast drill will melt it or make craters instead of holes. The chin mounted long gravitic antenna, the one with the two black bulges at the ends, is built with 5/32" styrene tube, while the bulges are aluminium parts, about 5.5mm of diameter made with the lathe. Painting and Finishing I Wanted a paint scheme recalling the "Shadow Armour" seen in the show (The "Omega Epsilon" is a ship of the 2270's, developed in the hottest period of the Drakh War, and the Earth Alliance put in it every bit of technology she was able to develop, steal or recover). Most part of the painting was done with a Badger Air Brush and acrylic paints - A step forward with respect to the Enamels I knew when I was a boy - I painted the whole model with a layer of Tamiya Acrylic primer (spray can) and with a layer of Tamiya acrylic light grey XF-66 - The black pattern of the "Shadow -derivated Armour" is airbrushed with Tamiya matt black XF-1. The airbrush was setted to spray a very thin stream. Some details, like the bases of the antennas, the sensor domes and the chin mounted oval plasma mortars are painted in a darker grey, XF 24 dark grey - the red parts like the inner part of the hangar and the side mounted hatces of the escape lifepods are painted in XF-7 flat red, with a brush. The barrels of the cannons are XF 24 dark grey, and X-10 Gun metal for the recessed belts. The placement of the cannons was the last step of the assembly, the decals were excellent, while I made easily the nameplate drawing it with Microsoft Paint - I cut the "nameplates" from the paper sheet I painted them on, then I put them on a strip opf two-sided adhesive scotch and covered them with normal scotch - cut them at the right dimensions and then apply on the finished model. Overall, a decent work, but nothing more: some weathering would improve a lot the model, showing better the details. The base is a simple perspex (plexiglas) plate in which I made two holes - I made the conical support columns with the lathe, drilled one 2.5 mm. hole under the belly of the ship to hold a spine placed on the rear column, while the forward column has not a spine, the model simply rests on it.
Conclusions Overall, I have found this an excellent kit, enjoyable to build. A bit more attention to avoid the warping of the main structural parts would be welcome, but the kit as a whole is fine, in excellent accordance with the original of the series, even if not to be recommended to a beginner due to the large number of parts and, I presume, to the intrinsecal difficulties of a resin kit. Anyway, after this building, I have bought even the Warp Model's Nova Dreadnought - This can be a clue that the outcome and the satisfaction, at least for me, deserves both the expense and the effort. |
![]()
This page copyright © 2004 Starship Modeler™. First posted on 2 March 2004.
![[Click to enlarge]](lt_omg_beautyshot.jpg)
![[Click to enlarge]](lt_omg_bow01.jpg)
![[Click to enlarge]](lt_omg_rear04.jpg)
![[Click to enlarge]](lt_omg_engine03.jpg)
![[Click to enlarge]](lt_omg_engine09.jpg)
![[Click to enlarge]](lt_omg_cannon02.jpg)
![[Click to enlarge]](lt_omg_stern08.jpg)
![[Click to enlarge]](lt_omg_sterntop09.jpg)
![[Starboard]](lt_omg_side05.jpg)
![[Starboard]](lt_omg_side06.jpg)